Segments
Releva groups your users into targeted segments automatically. By using the Segments functionality, you can build and optimize your campaigns and communication strategy according to your commercial goals.
Why do you need segmentation?
When using segmentation, you know better whom you’re talking to, so you can develop stronger marketing messages. You can avoid generic, vague language that speaks to a broad audience. Instead, you can use direct messaging that speaks to the needs, wants and unique characteristics of your target audience.
The importance of market segmentation is that it makes it easier to focus on marketing efforts and resources on reaching the most valuable audiences and achieving business goals. Market segmentation allows you to get to know your customers, identify what is needed in your market segment, and determine how you can best meet those needs with your products. This helps you design and execute better marketing strategies from top to bottom.
Creating a segment
You can create a new segment by clicking on the “+” button under “Create a new segment”:

Then you will be redirected to a page where you can name your segment and choose the rules for the subset of users you want it to represent. For example, in the following segment, named “Loyal visitors”, we want to include users who visited the website but are not subscribed.
To create such a group, we’ll need to use a combination of two rules. To define the first rule, we click on the “Add rules” button and choose Viewed page from the drop-down menu. We make sure then the Viewed page option is selected (marked in purple). Then again, we click on “Add rules”, and choose Subscribed. Here we select the Not subscribed option. The result should look like this:

After the rules are implemented on your users, you receive the user settings for this segment. In our case, we have 49 such users.

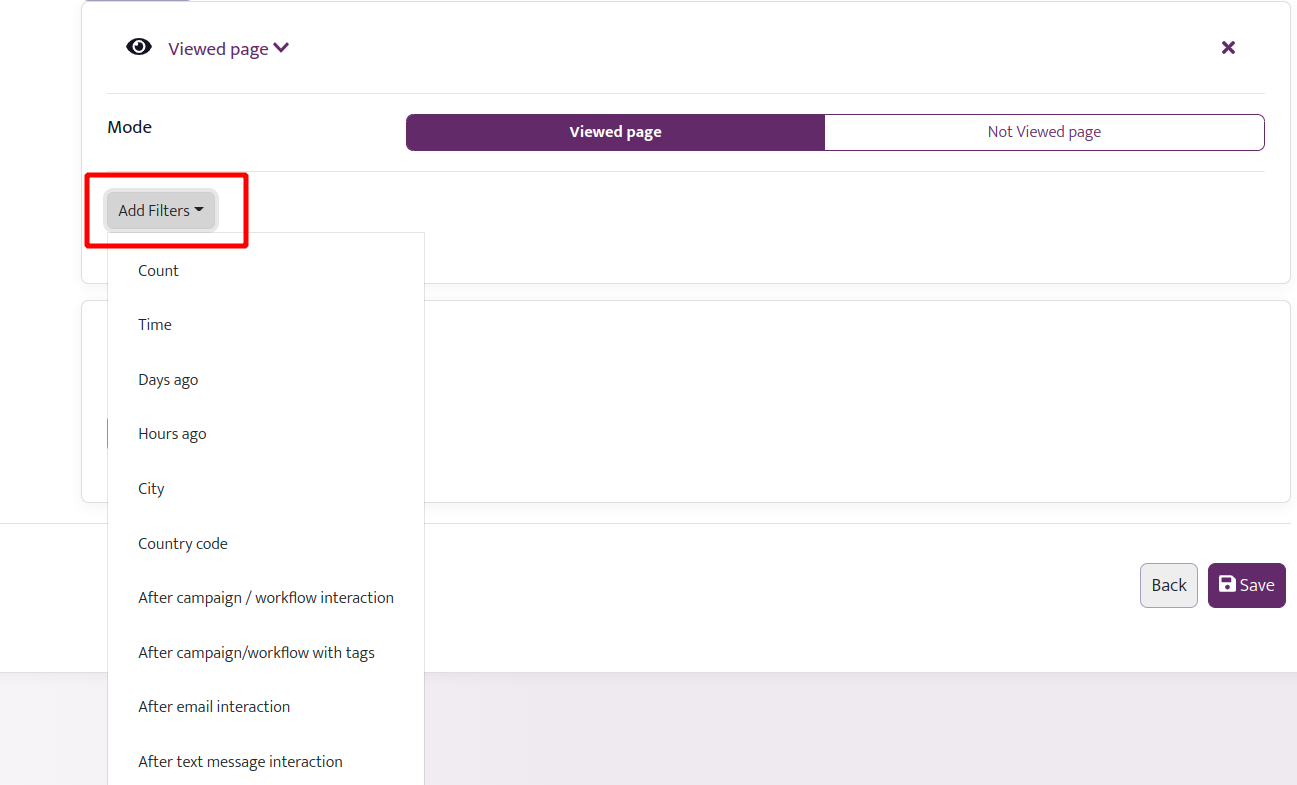
You can further specify your segment by adding filters to the rules. You can choose the filters from the “Add filters” button at the left bottom of every rule.

For instance, if you want to filter only customers that visited your website in the last 7 days, you can add the filter “Days ago” to the Viewed page with values from 7 to 0:

Exploring, exporting, and saving a segment
By clicking on a profile in the result, you are redirected to its page in the Audiences section, where you can see detailed information about the user’s actions (see the Audiences documentation).
Another important part of segmentation is tagging. After selecting the rule “Profile Attributes” and fill the “Tags” field, you can immediately find all “the profiles that correspond to the described tag / or tags. In this section, the comma means a separator between two different tags and the symbol of “|” means “or”:

If you click on the “Export Segment” button on the left, the system will schedule an export and send you a download link via email when the export is ready. The export will be in .csv format and will have the data about the first name, last name, email, phone number, registration and subscription dates and tags of the people included in this segment.

Note that in cases, where the segment consists only of people that did not leave personal information on the website (anonymous visitors),the exported data set will be empty.
You can save the segment by clicking on the button “Save” in the button right corner.
