Workflows
What is a Workflow and how to create one?
Workflows are an easy-to-build automations to connect with users via different marketing channels. From the Releva platform, you can create three types of workflows: OneOff, Continuous, and Triggered. This article will explain how to create workflows and some of the most common use cases for them. Both single-step automation and multi-step automation that combine different marketing channels can be created.
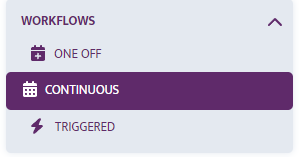
To create a new automation in the left column, select Workflow Automation > Continuous and click the Create New Automation button. Specify a name for the automation so that it is easily recognizable for what it refers to.
One Off Workflow
One-off workflows are designed to create individual automations that can encompass a variety of marketing channels, such as email, push notifications, Viber, SMS, and Facebook. The key distinction between one-off workflows and one-off campaigns lies in the capabilities they offer. While one-off campaigns limit you to single-step email or Facebook campaigns, one-off workflows provide more flexibility by allowing you to use multiple channels simultaneously.
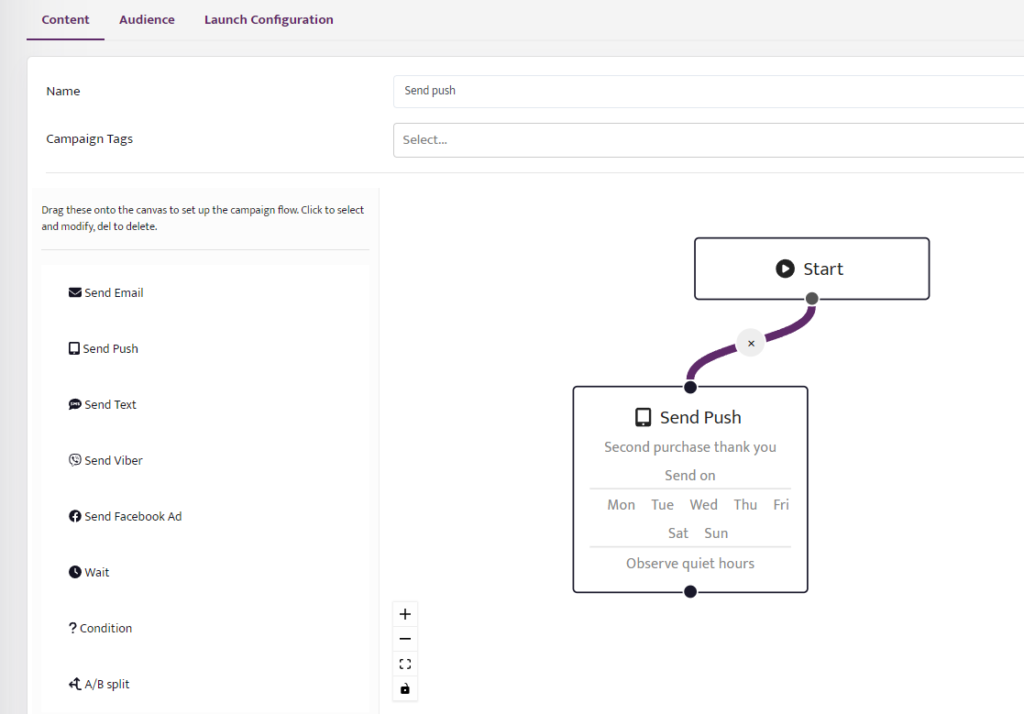
This is an example how you can send a one-off push notification to your user lists.

You can select the scope of the workflow, which in most cases would be marketing. In the “Segment” field, designate the specific users for whom this automation will be executed, if the workflow isn’t aimed at a specific segment, you can select “Everyone”.

In this section, you can choose to delay the start of the campaign or start immediately. From the calendar on the right, you can select a start date and time for the campaign.
Finally, by activating the send at optimal time feature, users will be sent a message at the time when they are most inclined to engage with it. Once the workflow has been created please click on the “Launch” button to activate it.
Triggered Workflow
The triggered workflows become active through specific triggers or webhooks. An example for that would be a user subscribing to an e-shop, the system automatically triggers the workflow with a “subscription trigger” and the newly subscribed user receives an automatic welcome email which includes a promo code. The screenshots below show how a triggered workflow for subscription works and how is it configured in Releva.
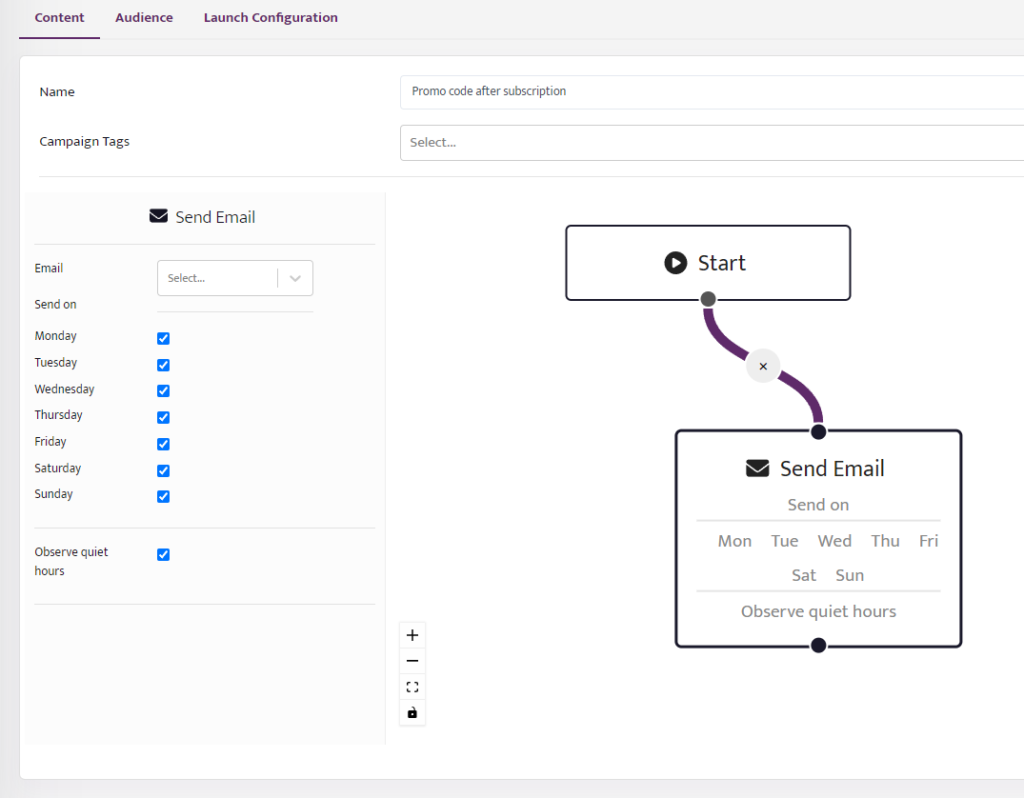
In this example the triggered workflow will sent an email to the clients who have triggered a subscription event.
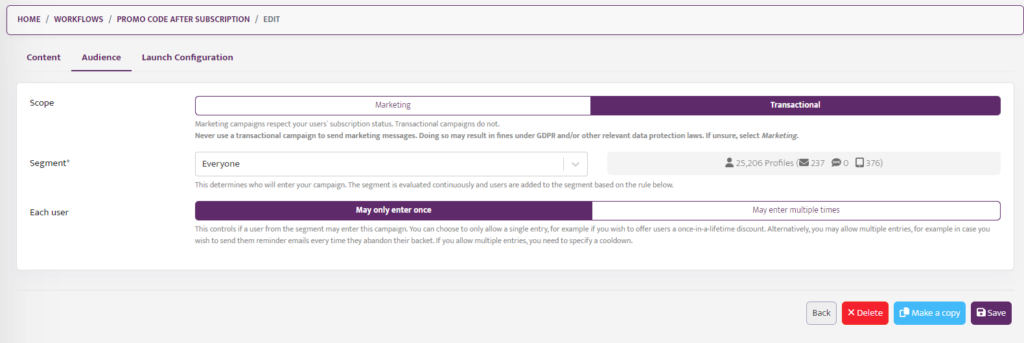
The scope of the workflow should be transactional and the used segment should be “Everyone”. Using this configuration every person who have subscribed will receive an email with promo code as soon as possible.
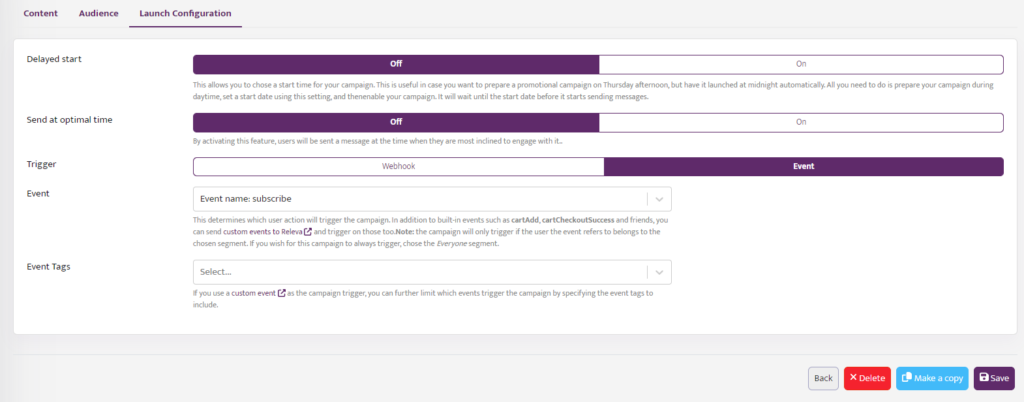
Finally, in the Launch Configuration tab, it is essential to turn off the “Delayed start” and “Send at optimal time” options. The primary objective is to ensure that users receive the email promptly after subscribing. Next, we must select the appropriate Trigger, which in this case would be “Event name: subscribe.”
Continuous Workflow
Before we get into the details of how a workflow is set we can review an example for Abandoned Cart. This particular use case is for users who have forgotten items in their cart for more than 3 hours. You want to remind them about it and the system will send them an email. If the customer doesn’t open that email for 24 hours, the system automatically sends them a reminder of your choice, such as a Viber or push notification.
With Automations the visual elements (emails, Viber messages, push notifications, SMS messages or Facebook ads) must be created independently in the relevant section. Here, you have the option to create a path to be executed for certain users under certain conditions.
Below, we’ll look at sample automation settings for forgotten cart and sending an email reminder. After sending the email the system waits for 24 hours and if the user hasn’t opened the email in that timeframe the system sends him a Viber message.
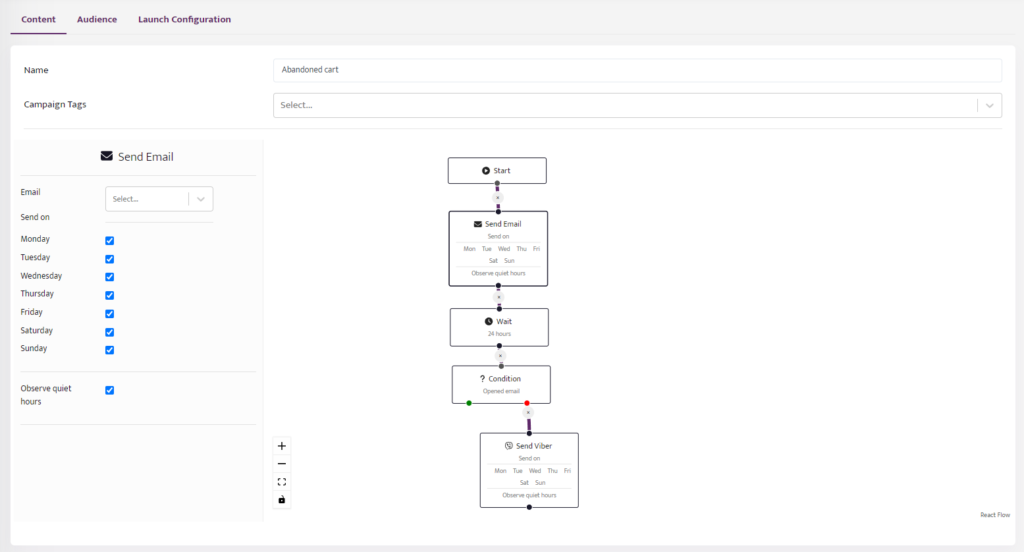
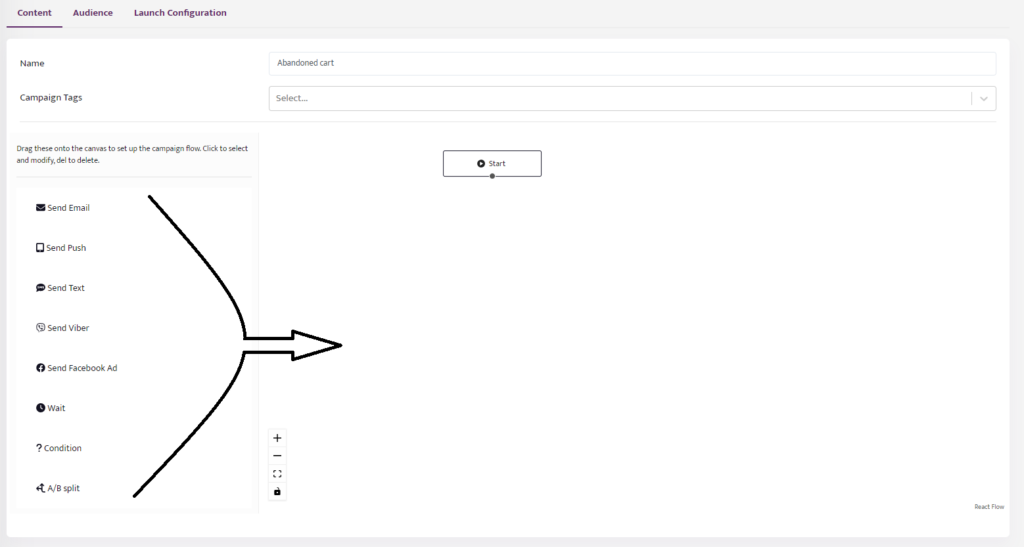
This serves as an example of a specific use case, and it can be fully customized according to your specific strategy. You have the flexibility to create different scenarios based on your needs. To modify the elements of the workflow, you can utilize the menu on the left-hand side and drag the available elements onto the canvas. Simply click to select and modify them, or press “Delete” to remove them.
It is important to connect the different elements of the workflow, otherwise, the workflow will run until the last connection after the “Start”. Using the example in the previous image on the left you can see an option to select which of the already created emails will be used for this workflow. Also, you can select the days on which this email will be sent. As this is an example of an Abandoned Cart all the days of the week are selected, however if you want to set a Weekly Newsletter for example you can select only the day you want it to be sent to your clients and the day after for users who were unable to receive the email during the first day.
In the image below you can see the currently available elements that can be dragged into the canvas.
Wait
Here you can specify how long the system should wait before undertaking automation.
From the middle section, click the “Wait” button and drag to the right under Start / “Start”.
This step is placed between Start and the actual action or between two actions:
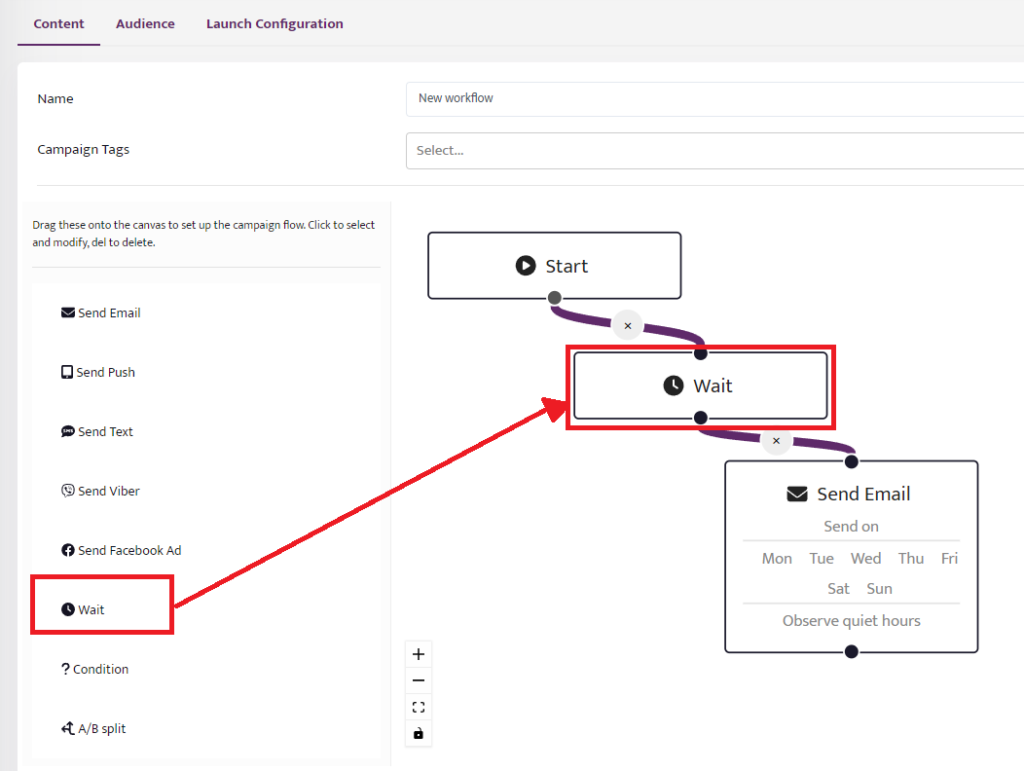
To set a specific wait interval, click on the step and set the desired interval in the newly appeared field. Please note that the unit here is hours!
Condition
Here you can set a condition such as whether a customer has placed an order, viewed a product, put something in their basket, opened an email, and much more.
To add a new condition click on Condition in the middle section and drag to the right to the desired item and link it to the previous and next step.
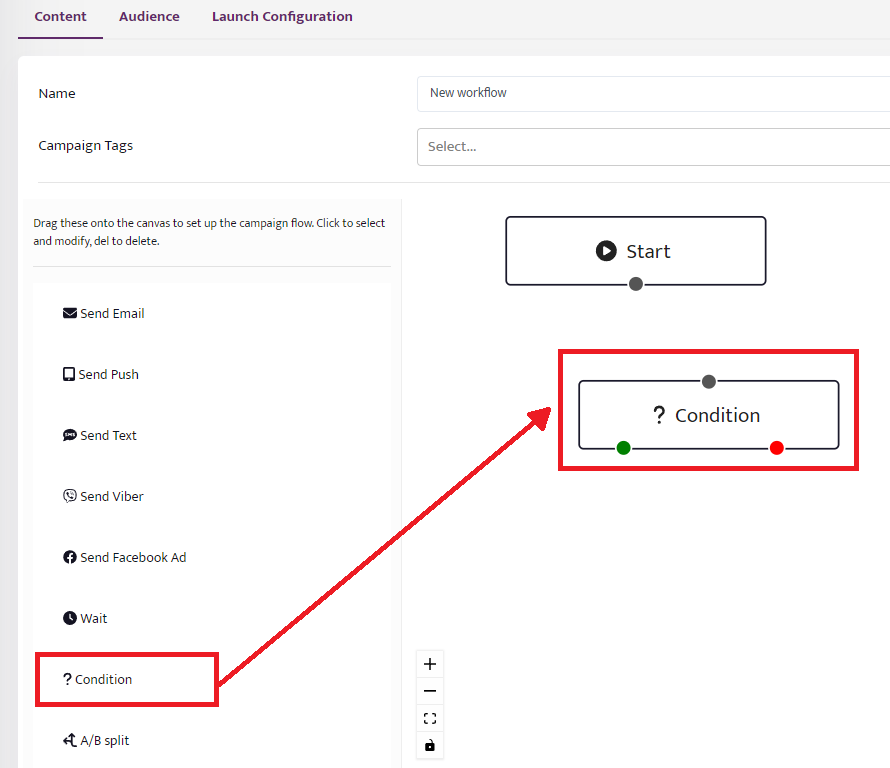
Click on the condition to set its parameter. Click Add Rules and select a condition from the drop-down menu.
The condition can be positive or negative, i.e. “Yes it is” or “No it isn’t”, for example, there was a product added to the basket.
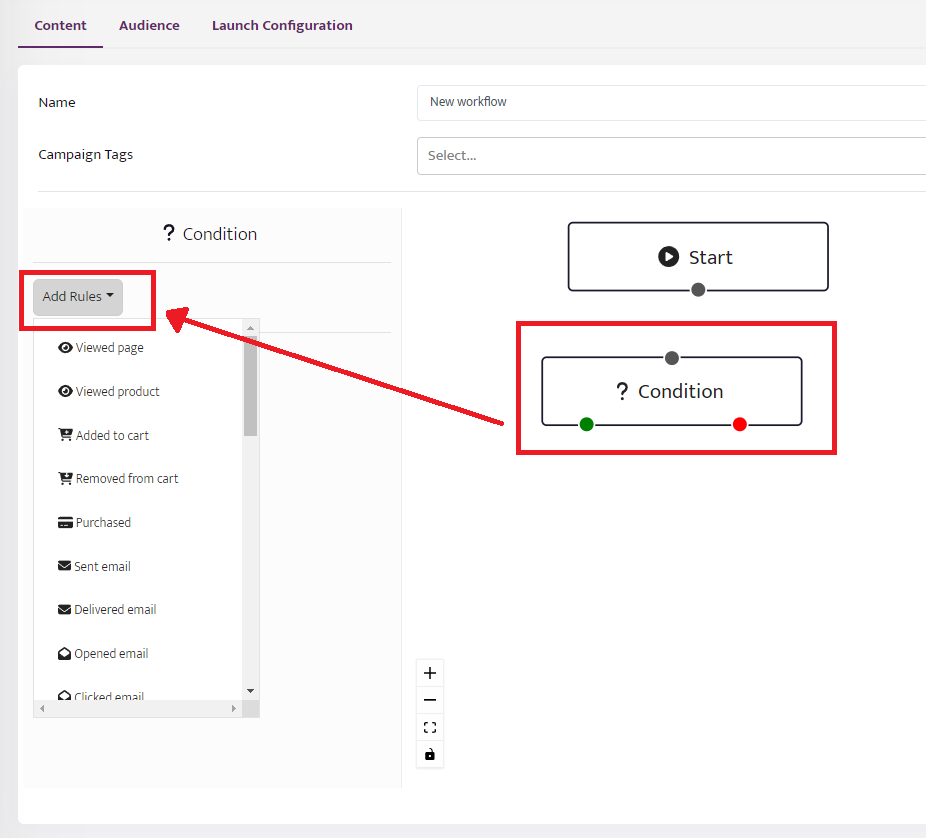
Filters can also be applied to this condition, for example, a time interval, an amount that the cart value amounts to, a certain product, etc. Click the Add Filter button and select the desired option from the drop-down menu.
Audience and Launch Configuration tabs
Once the Workflow scenario is set the next step is to fill the Audience and Launch Configuration tabs.

In the “Scope” field, please ensure that you select the Marketing option and avoid using the Transactional option for sending marketing emails. Utilizing the Transactional option for such purposes can lead to potential fines for violating GDPR regulations. Unless the email pertains to changes in the site’s terms and policies, it is recommended to choose the Marketing option.
For the “Segment” field, designate the specific users for whom this automation will be executed. In the case of a forgotten cart scenario, create a segment consisting of users who have added items to their cart within the last 3 hours but have not completed their purchase.
In the “Each user” field, select the “May enter multiple times” option to allow users to enter this segment repeatedly. On the right-hand side, specify the waiting period before a user can re-enter this segment.

In this section, you can choose to delay the start of the campaign or start immediately. From the calendar on the right, you can select a start date and time for the campaign.
Finally, by activating the send at optimal time feature, users will be sent a message at the time when they are most inclined to engage with it.
Save your changes with the “Save” button in the bottom right corner.
Specific workflows use cases
Browse abandonment
Every day, if you browse a few products in the shop, you will get the last products from your browsing history (Browsing history recommender) as an email combined with personalized products selected just for you (Recommended for you recommender), you can also receive a push notification (or be contacted via another marketing channel). Here is an example of a configuration that sends an email and a push notification to the clients.
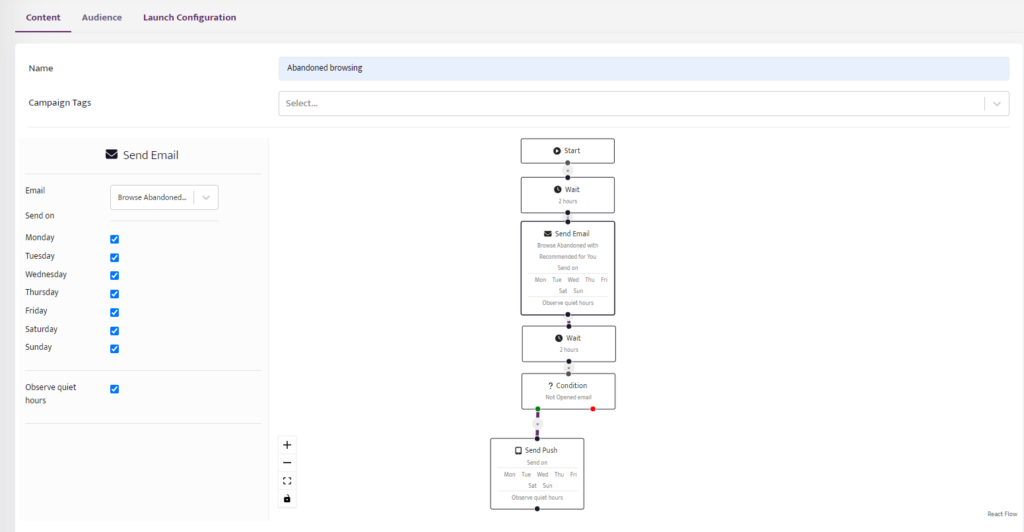
As mentioned before the system will send an automatic email that has already been created before configuring the workflow. After that the system waits for 2 hours and a condition is added which checks whether the user has opened the email in this timeframe. If the email hasn’t been opened the customer will receive a Push Notification. Please note that this use case can have more or fewer steps and can use different conditions or marketing channels depending on your own requirements.

It is configured with a segment that includes the people who have viewed at least 1 product in the shop in the last 3 hours, but haven’t added it to the cart or bought it. From the cooldown option, you can select how often users can be contacted in this workflow.
Welcome series workflow
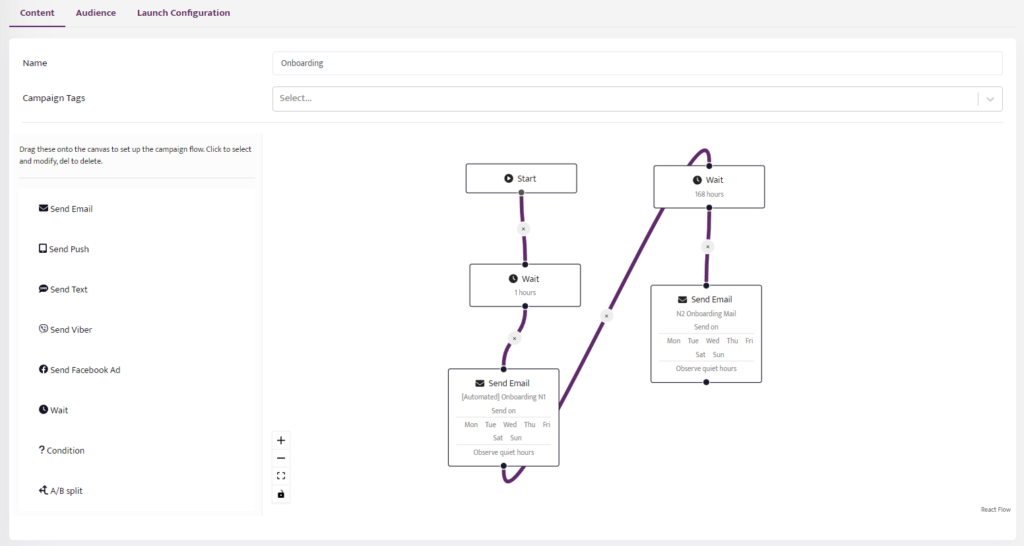
Every user of the site that subscribes to email will get our welcome series workflow. The configuration is in the following screenshot. After subscribing or registering on the shop website the users automatically receive a welcome email, in this case, it is called “Onboarding N1”. After the first welcome email, the system sends a second one, in this case after 168 hours or 7 days.
Cart abandonment reminder
If you leave a product in your cart you will receive an email campaign that aims to close your cart. The workflow will check the basket and depending on the total order value, it will send different series of communications to the user (emails, Facebook ads, Viber messages, and push notifications). The configuration is as follows:
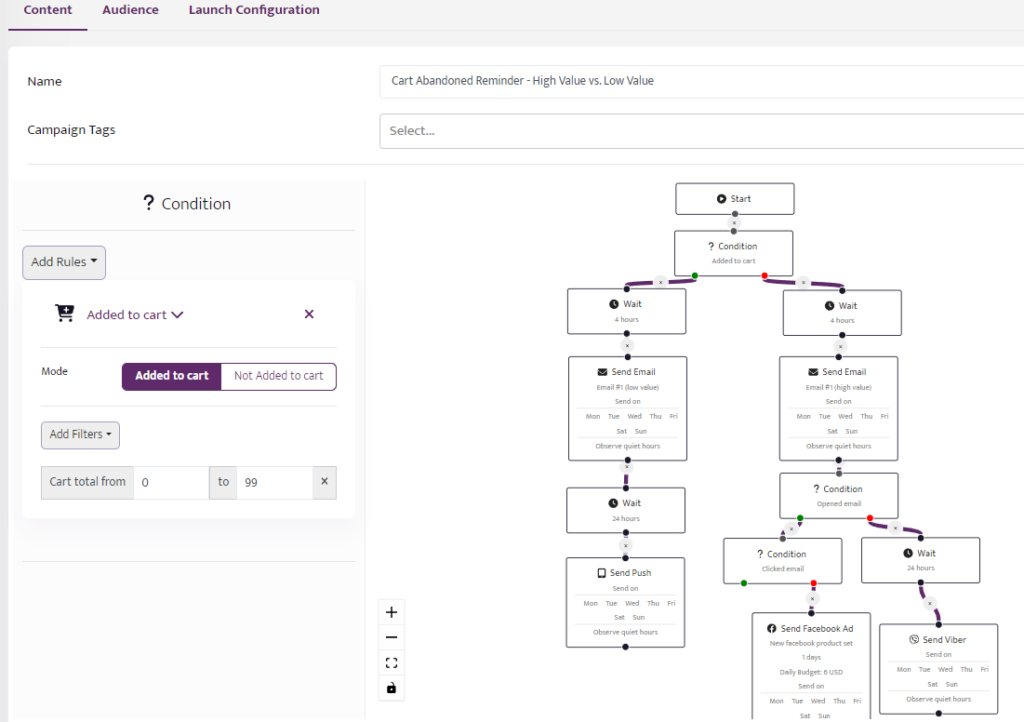
The flow has the following steps:
1. The user must add an item to the cart and leave.
2. The user will then enter the segment addToCartNotPurchased and as a consequence enters the workflow.
3. A condition checks the sum of the cart (depicted in the screenshot above).
4. If the total value (sum of prices of all products in the basked) is between 0 and 99, it waits 4 hours and then sends Email 1 (low value) then waits another 24 hours and sends а Push Notification.
5. If the sum of the products in the cart is higher than 100, after 4 hours it sends Email 1 (high value) typically this email could include a specific offer such as a discount code.
6. The high-value email is followed by a condition, that checks whether the email was opened by the user. If the email was opened, there is a second condition that checks whether the user clicked on it. If the client clicked on the email, the workflow ends there, but if he hasn’t he is then retargeted via Facebook with Facebook Ad. Simultaneously, if in the first condition, the email wasn’t opened at all the system waits for 24 hours and sends a Viber message to the user.
This specific Abandonded Cart use case shows how different marketing channels can be used effectively to assist the user to complete their purchase.
30 days after purchasing email
Certain e-shops often engage with their customers a few days after their purchases to request feedback or remind them about the ideal time to make a new purchase. Releva does it too and offers the capability to create such workflows. In this scenario, there are two essential steps involved: crafting the email that will be sent to the clients and defining the specific segment to identify the targeted customers for contact. Below are screenshots illustrating an example of such workflows.
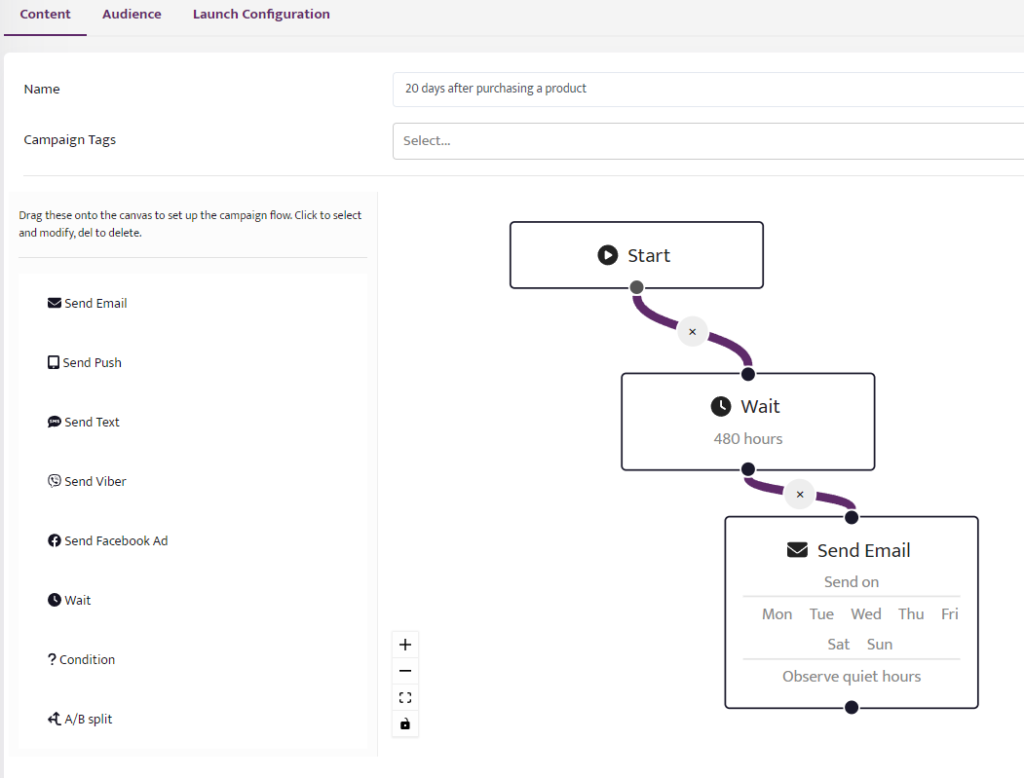
*Please keep in mind that the Wait setting is configured in hours, not days. Therefore, when setting up the workflow, ensure that you adjust it to the appropriate number of hours following the purchase. This will allow for the desired timing and sequence of events in the automation.
