

Show a banner on your site
A banner block places one banner on one page of your shop and decides how it appears. This guide adds an image banner inside the Category page of your shop, picks its exact spot on your own site with Position on my site, switches it on and checks the numbers. The banner itself (its content and audience) is a separate object under Marketing Channels › Banners; see Choose who sees a banner. For the rules Releva applies when it serves a banner, read How banners work.
Before you start
Section titled “Before you start”- You have a banner under Marketing Channels › Banners. A block cannot be saved without one. If you have none, select New next to Choose a banner in step 4 to create one in place. The banner’s segment decides who sees it: for a first test, choose a segment everyone is in.
- Your shop has a Personalization page for the kind of page you want, such as Category page. The Releva plugins for the shop platforms create pages such as Homepage, Product page, Category page, Cart page and Search page for you. Pages are shared with product blocks and stories (Create a product block). If you have no page at all, Banner Blocks opens the New Page form first.
- The Releva snippet, plugin or app is installed on your shop, otherwise nothing can ask Releva for the page.
- Your plan includes banner blocks. If Save & Close shows a lock, ask your account owner to unlock it.
- To use Position on my site, your shop’s address is filled in under Settings › Shop & Integration, and the page has had at least one visit in the last 30 days. Releva opens the address of that most recent visit. Without one, it opens your shop address plus the page’s URL Path, which may be your home page.
-
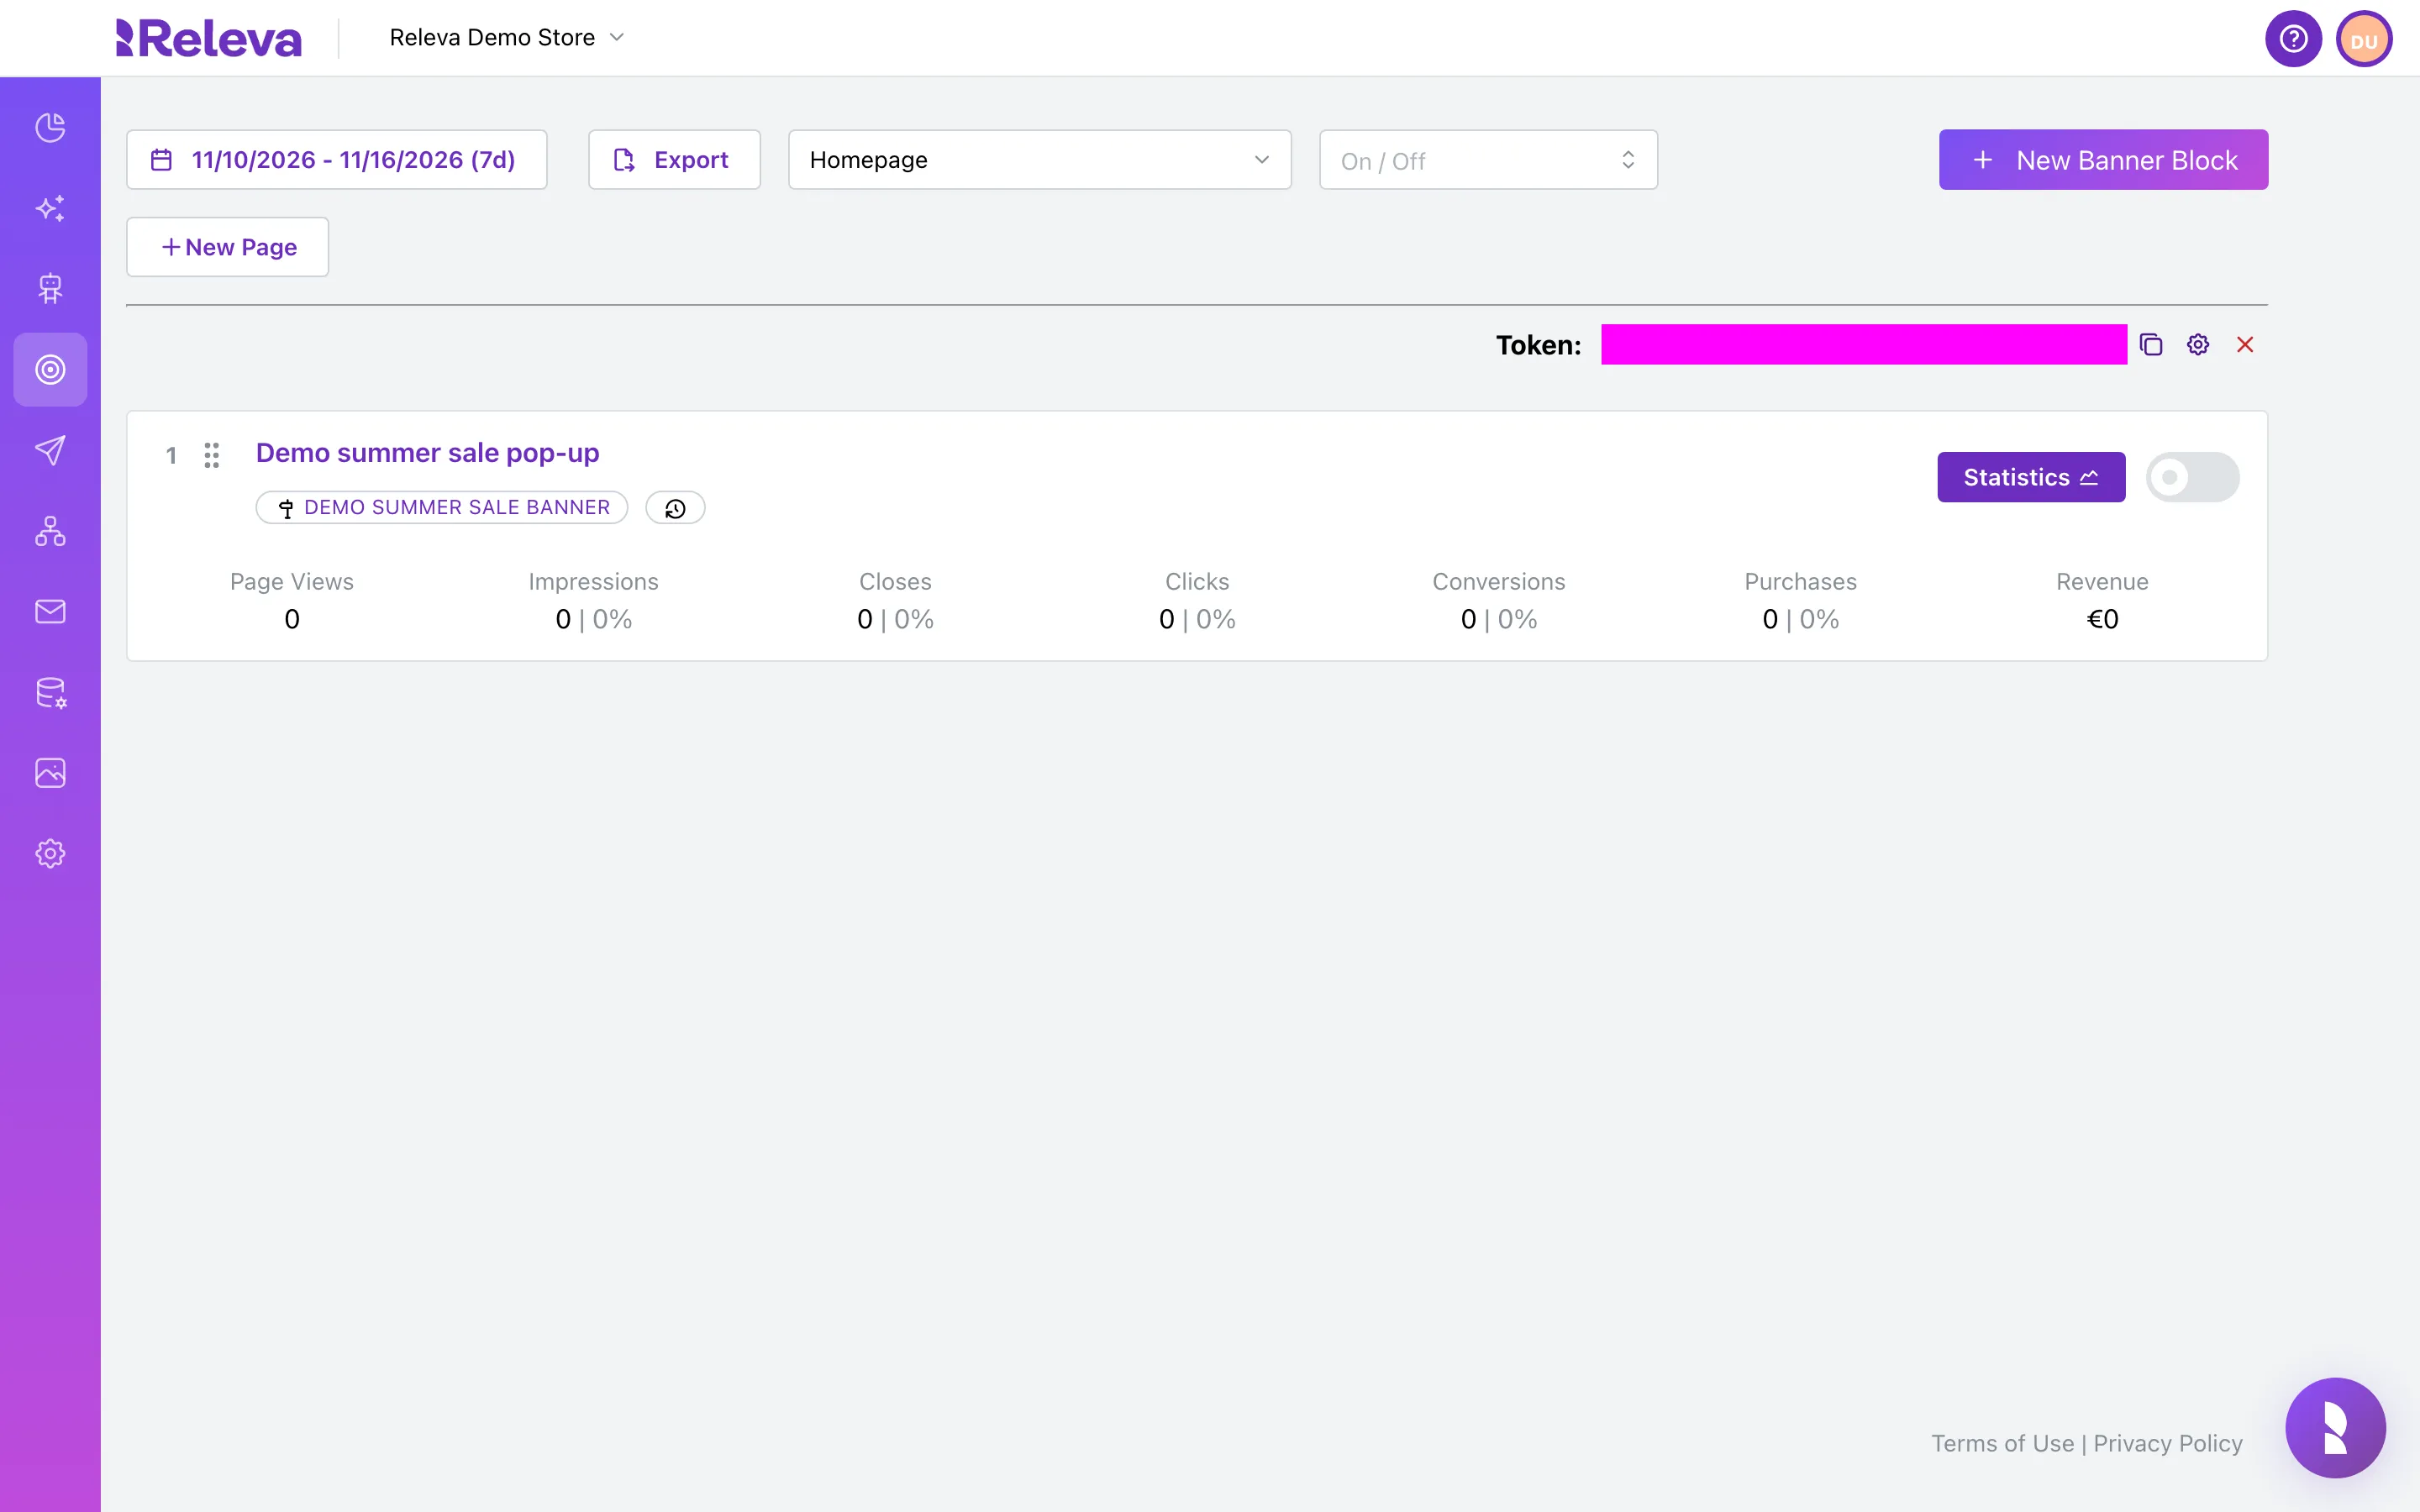
Go to Personalization › Banner Blocks
The list opens on the first page in the selector. The period button (last 7 days by default) sets the period for the numbers on each card.
-
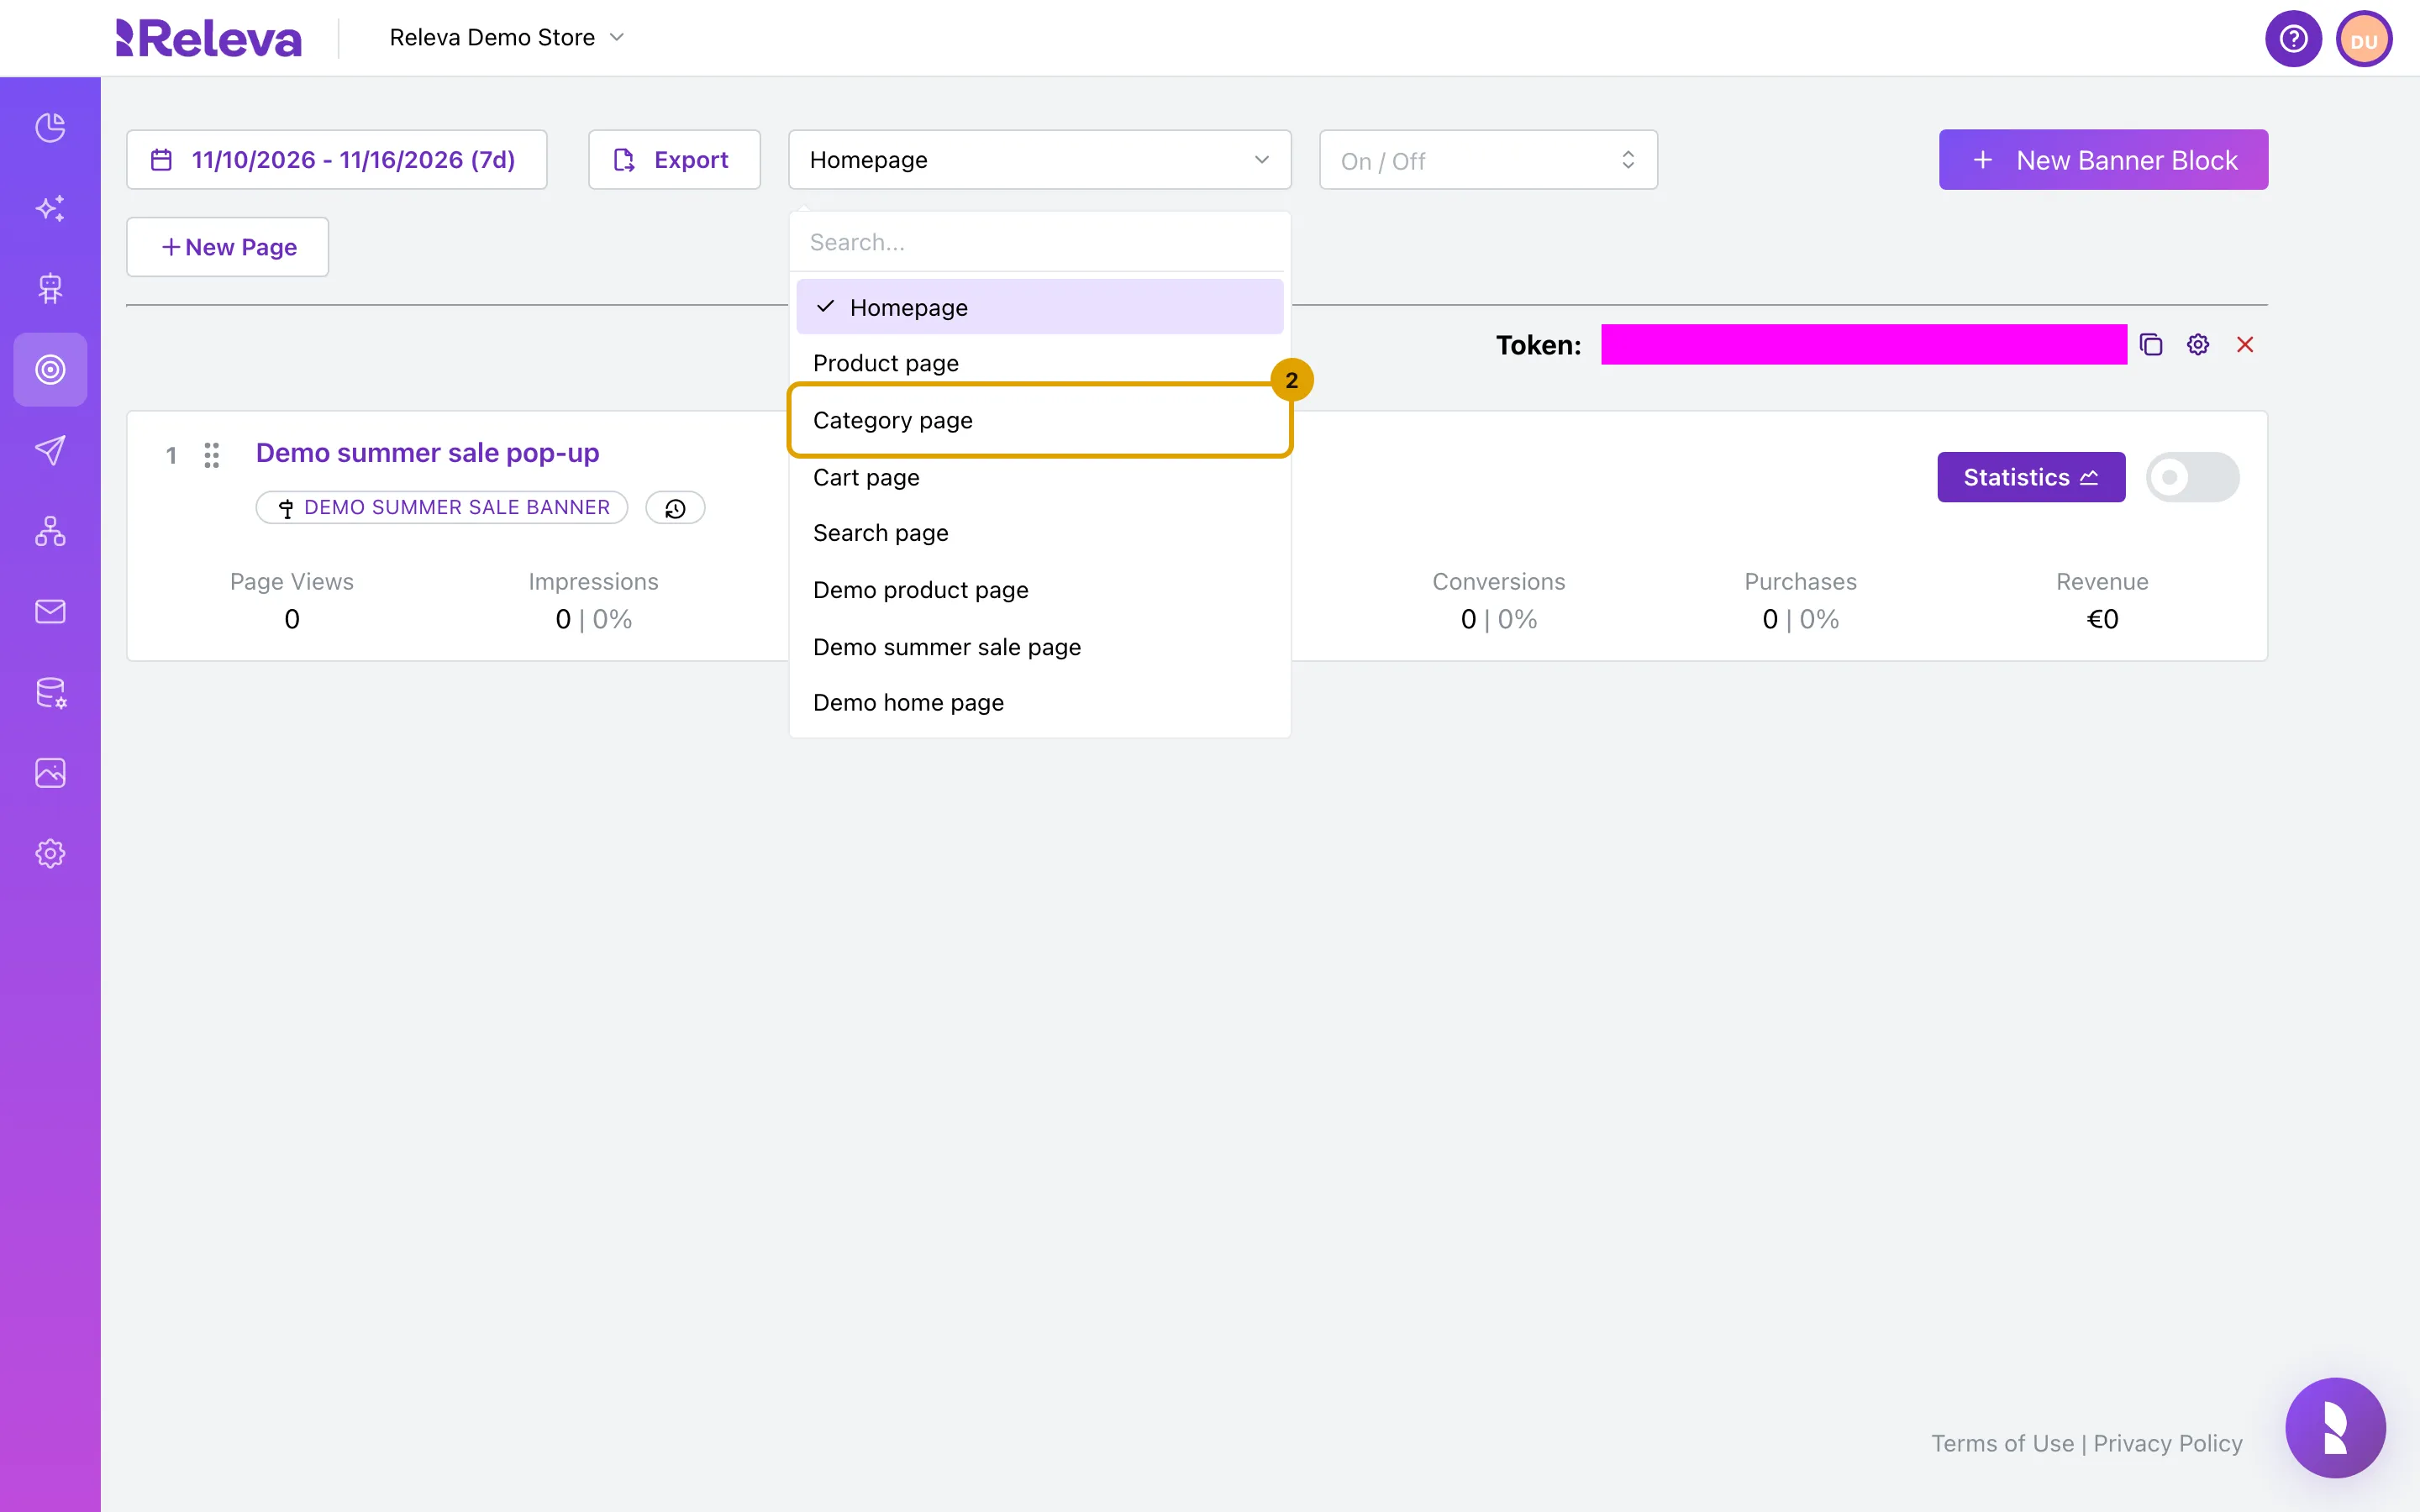
In the page selector at the top, choose the page where the banner should appear, here Category page
The bar under the toolbar shows the page’s Token, a settings icon that opens Page Settings (Page Name, URL Path, Max Banners Displayed) and a red cross that deletes the page with everything on it.
-
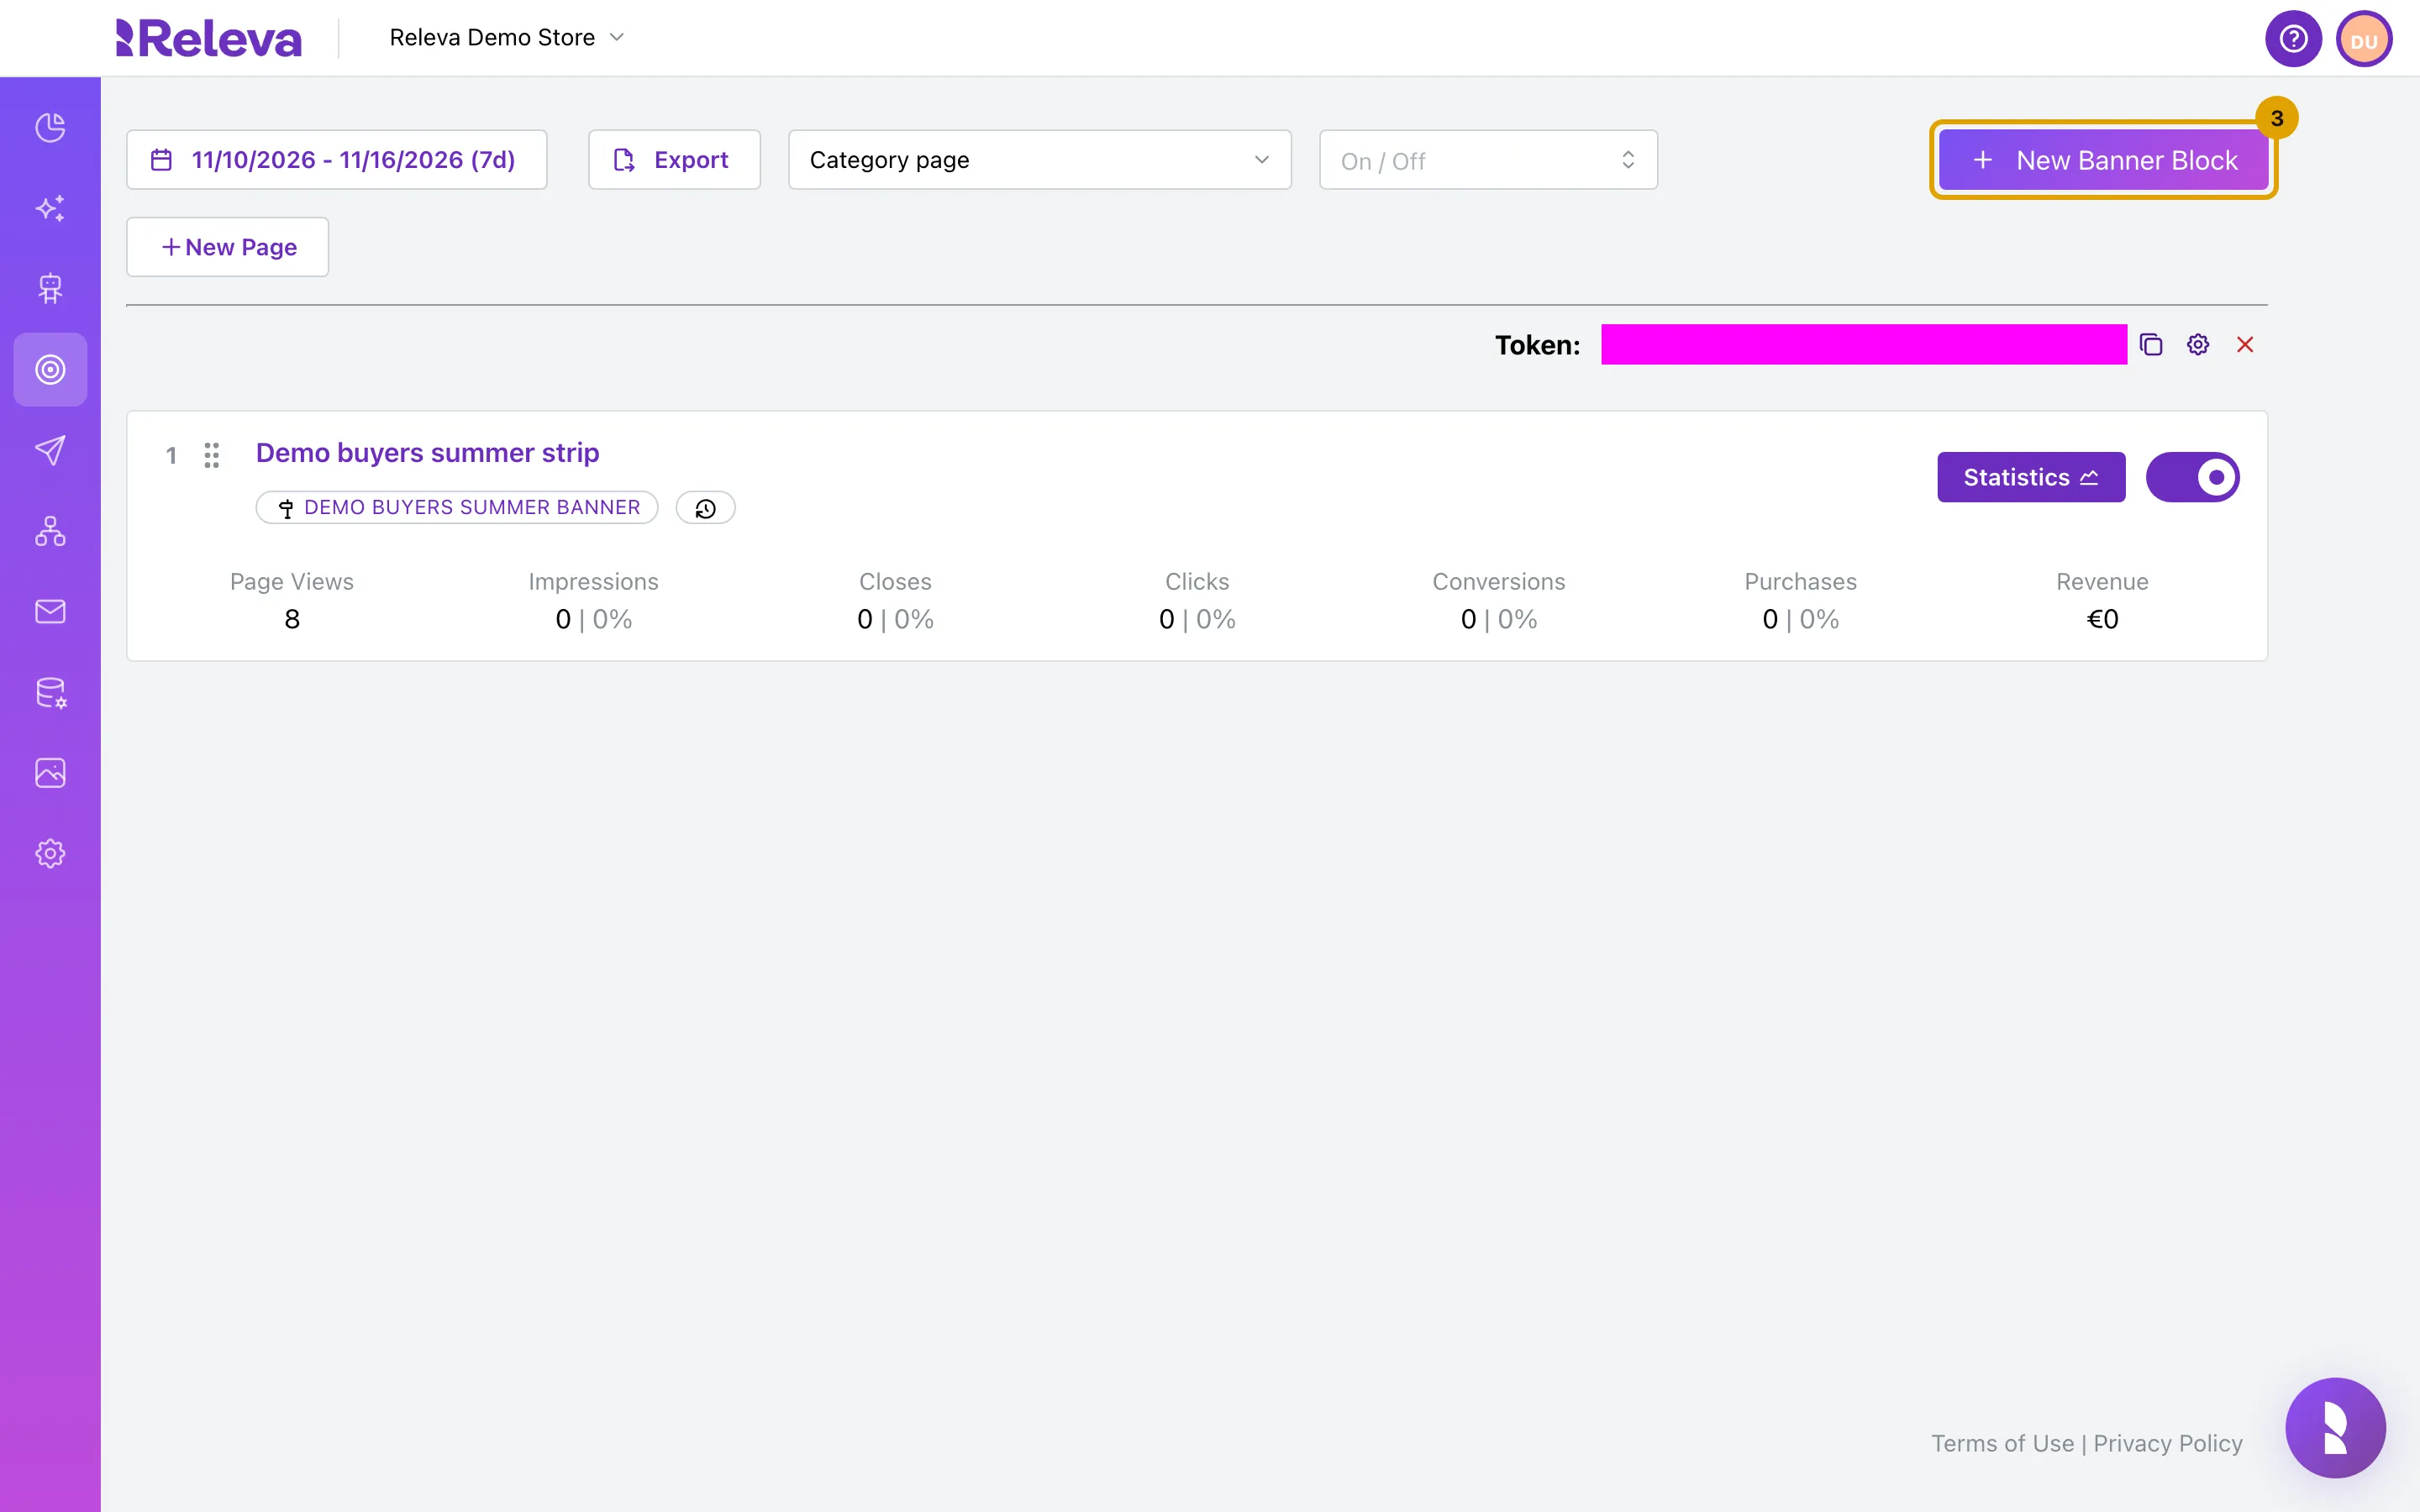
Select New Banner Block
-
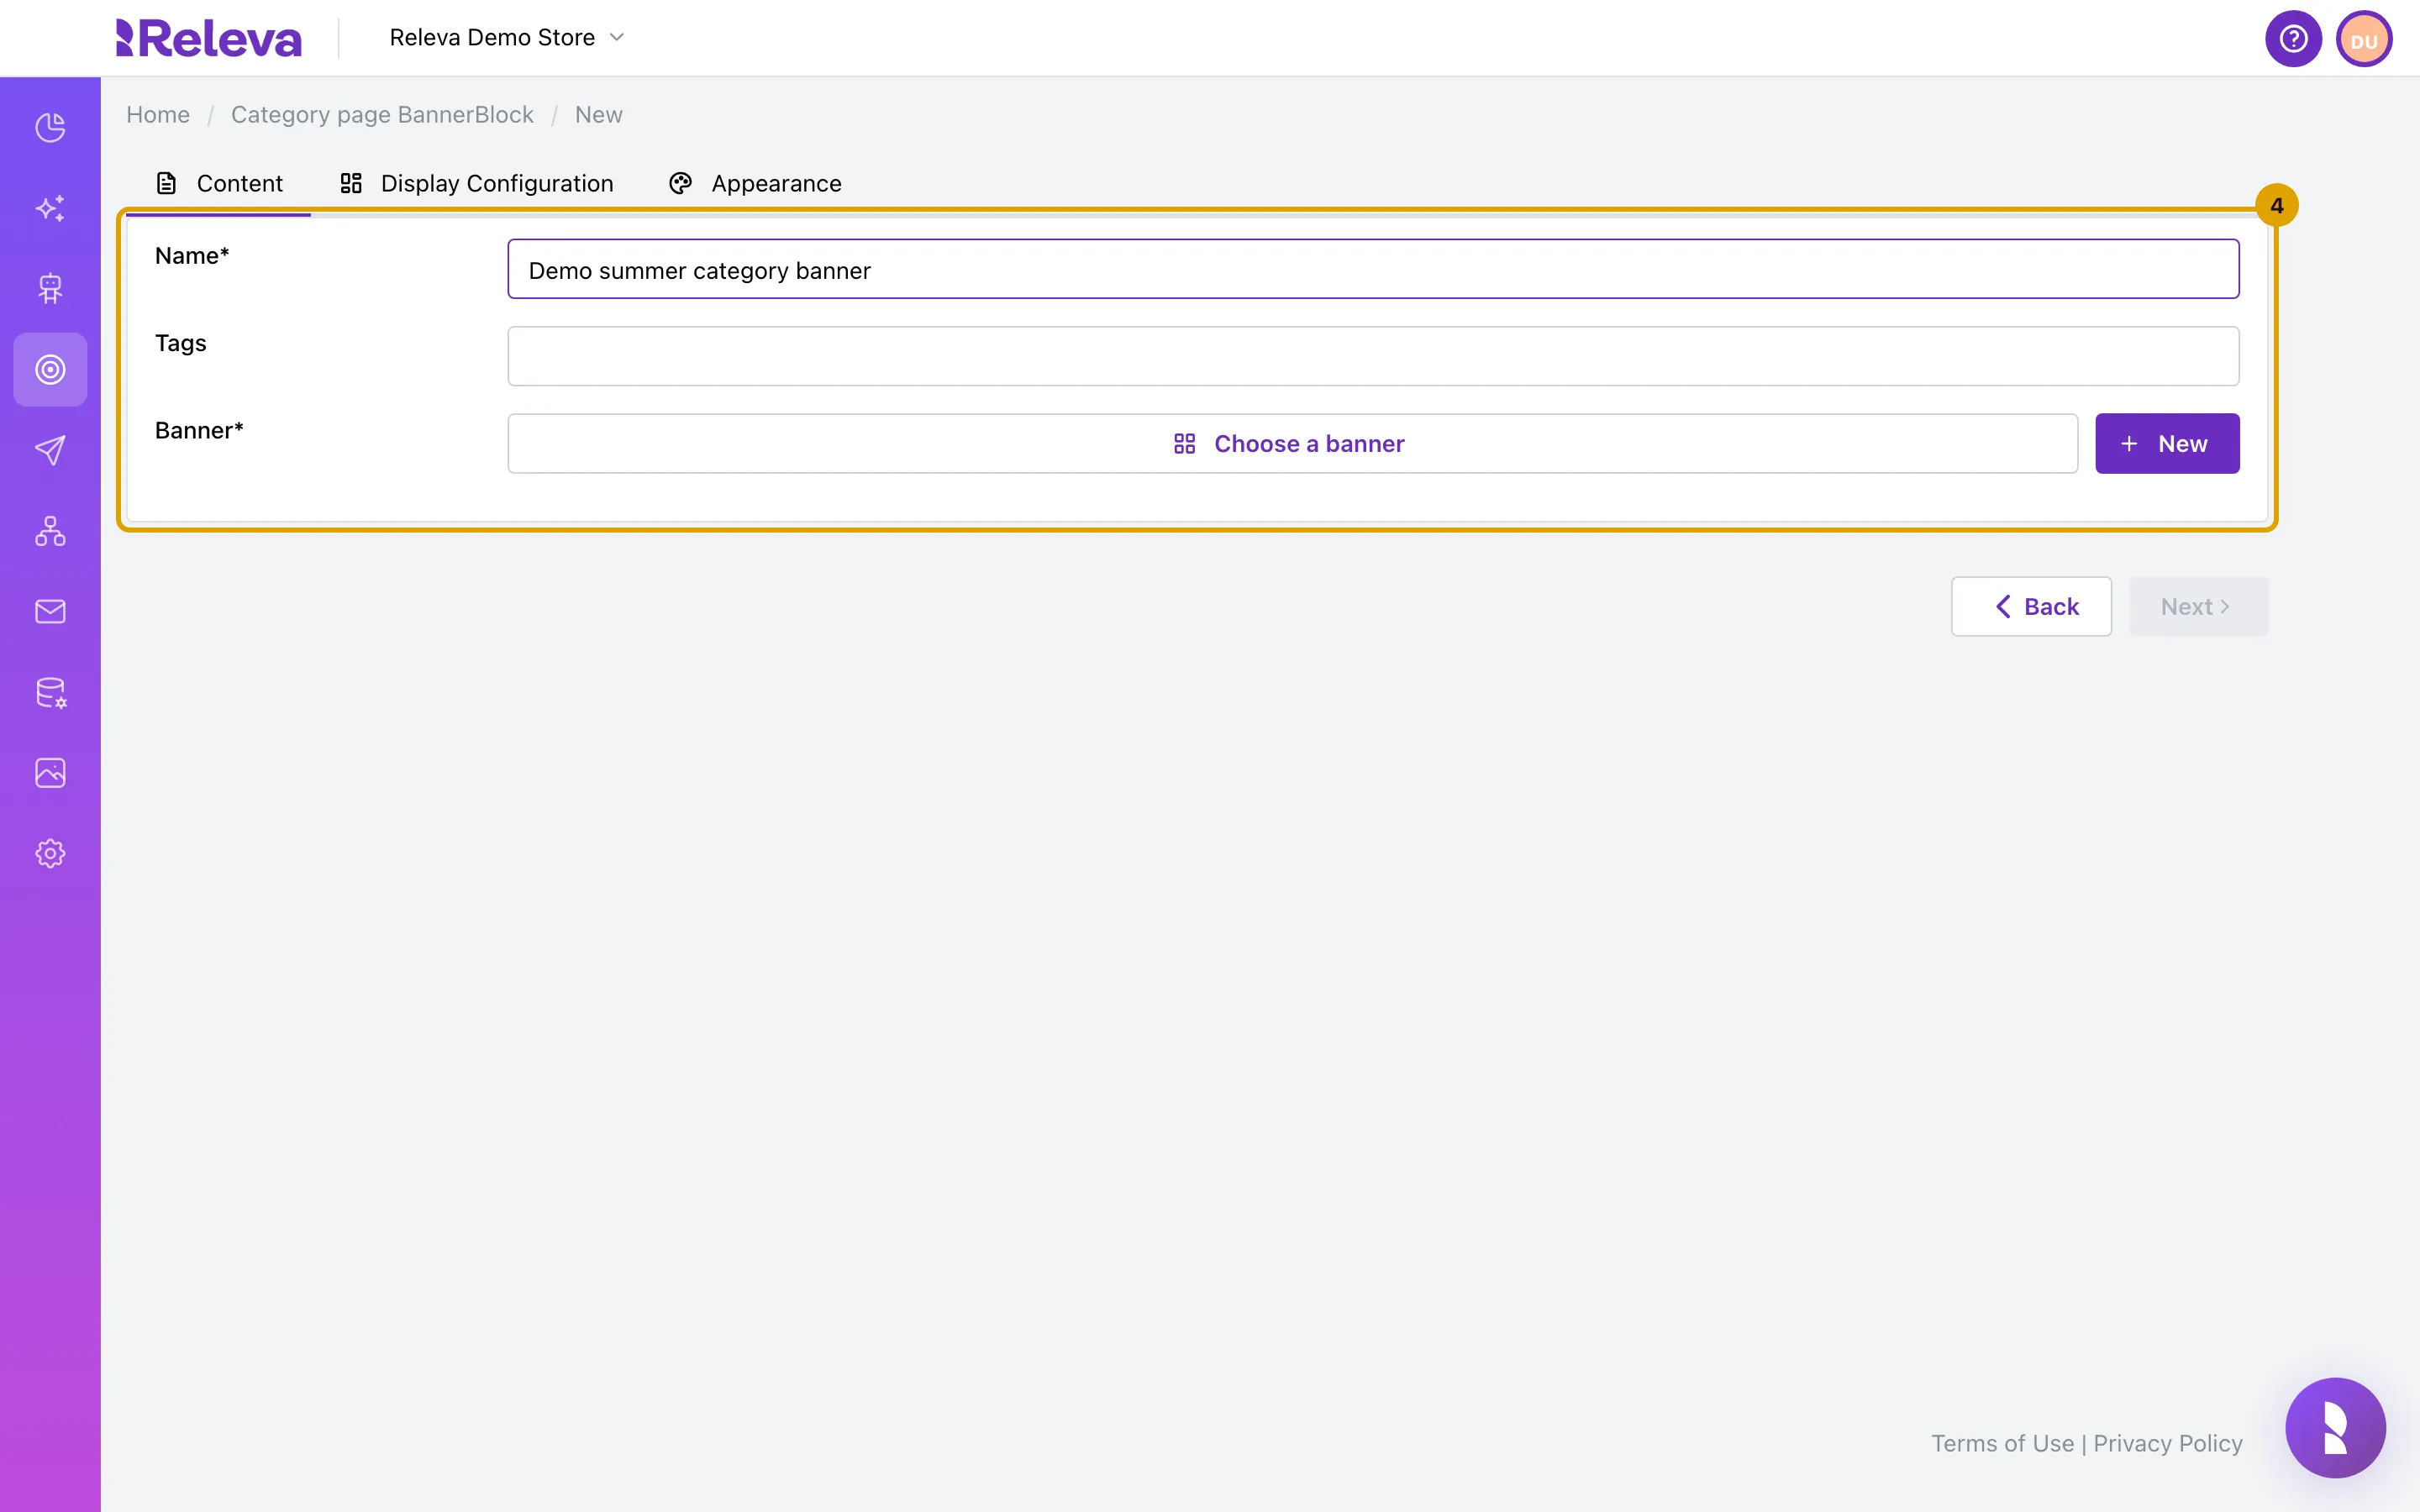
In Name, enter a name you will recognise in the list, here Demo summer category banner. Next to Banner, select Choose a banner
Next stays disabled until you choose a banner; pointing at it shows Choose a banner first. To create a banner without leaving the form, select New instead. Tags are returned to your storefront with the block, so a custom integration can pick blocks by keyword.
-
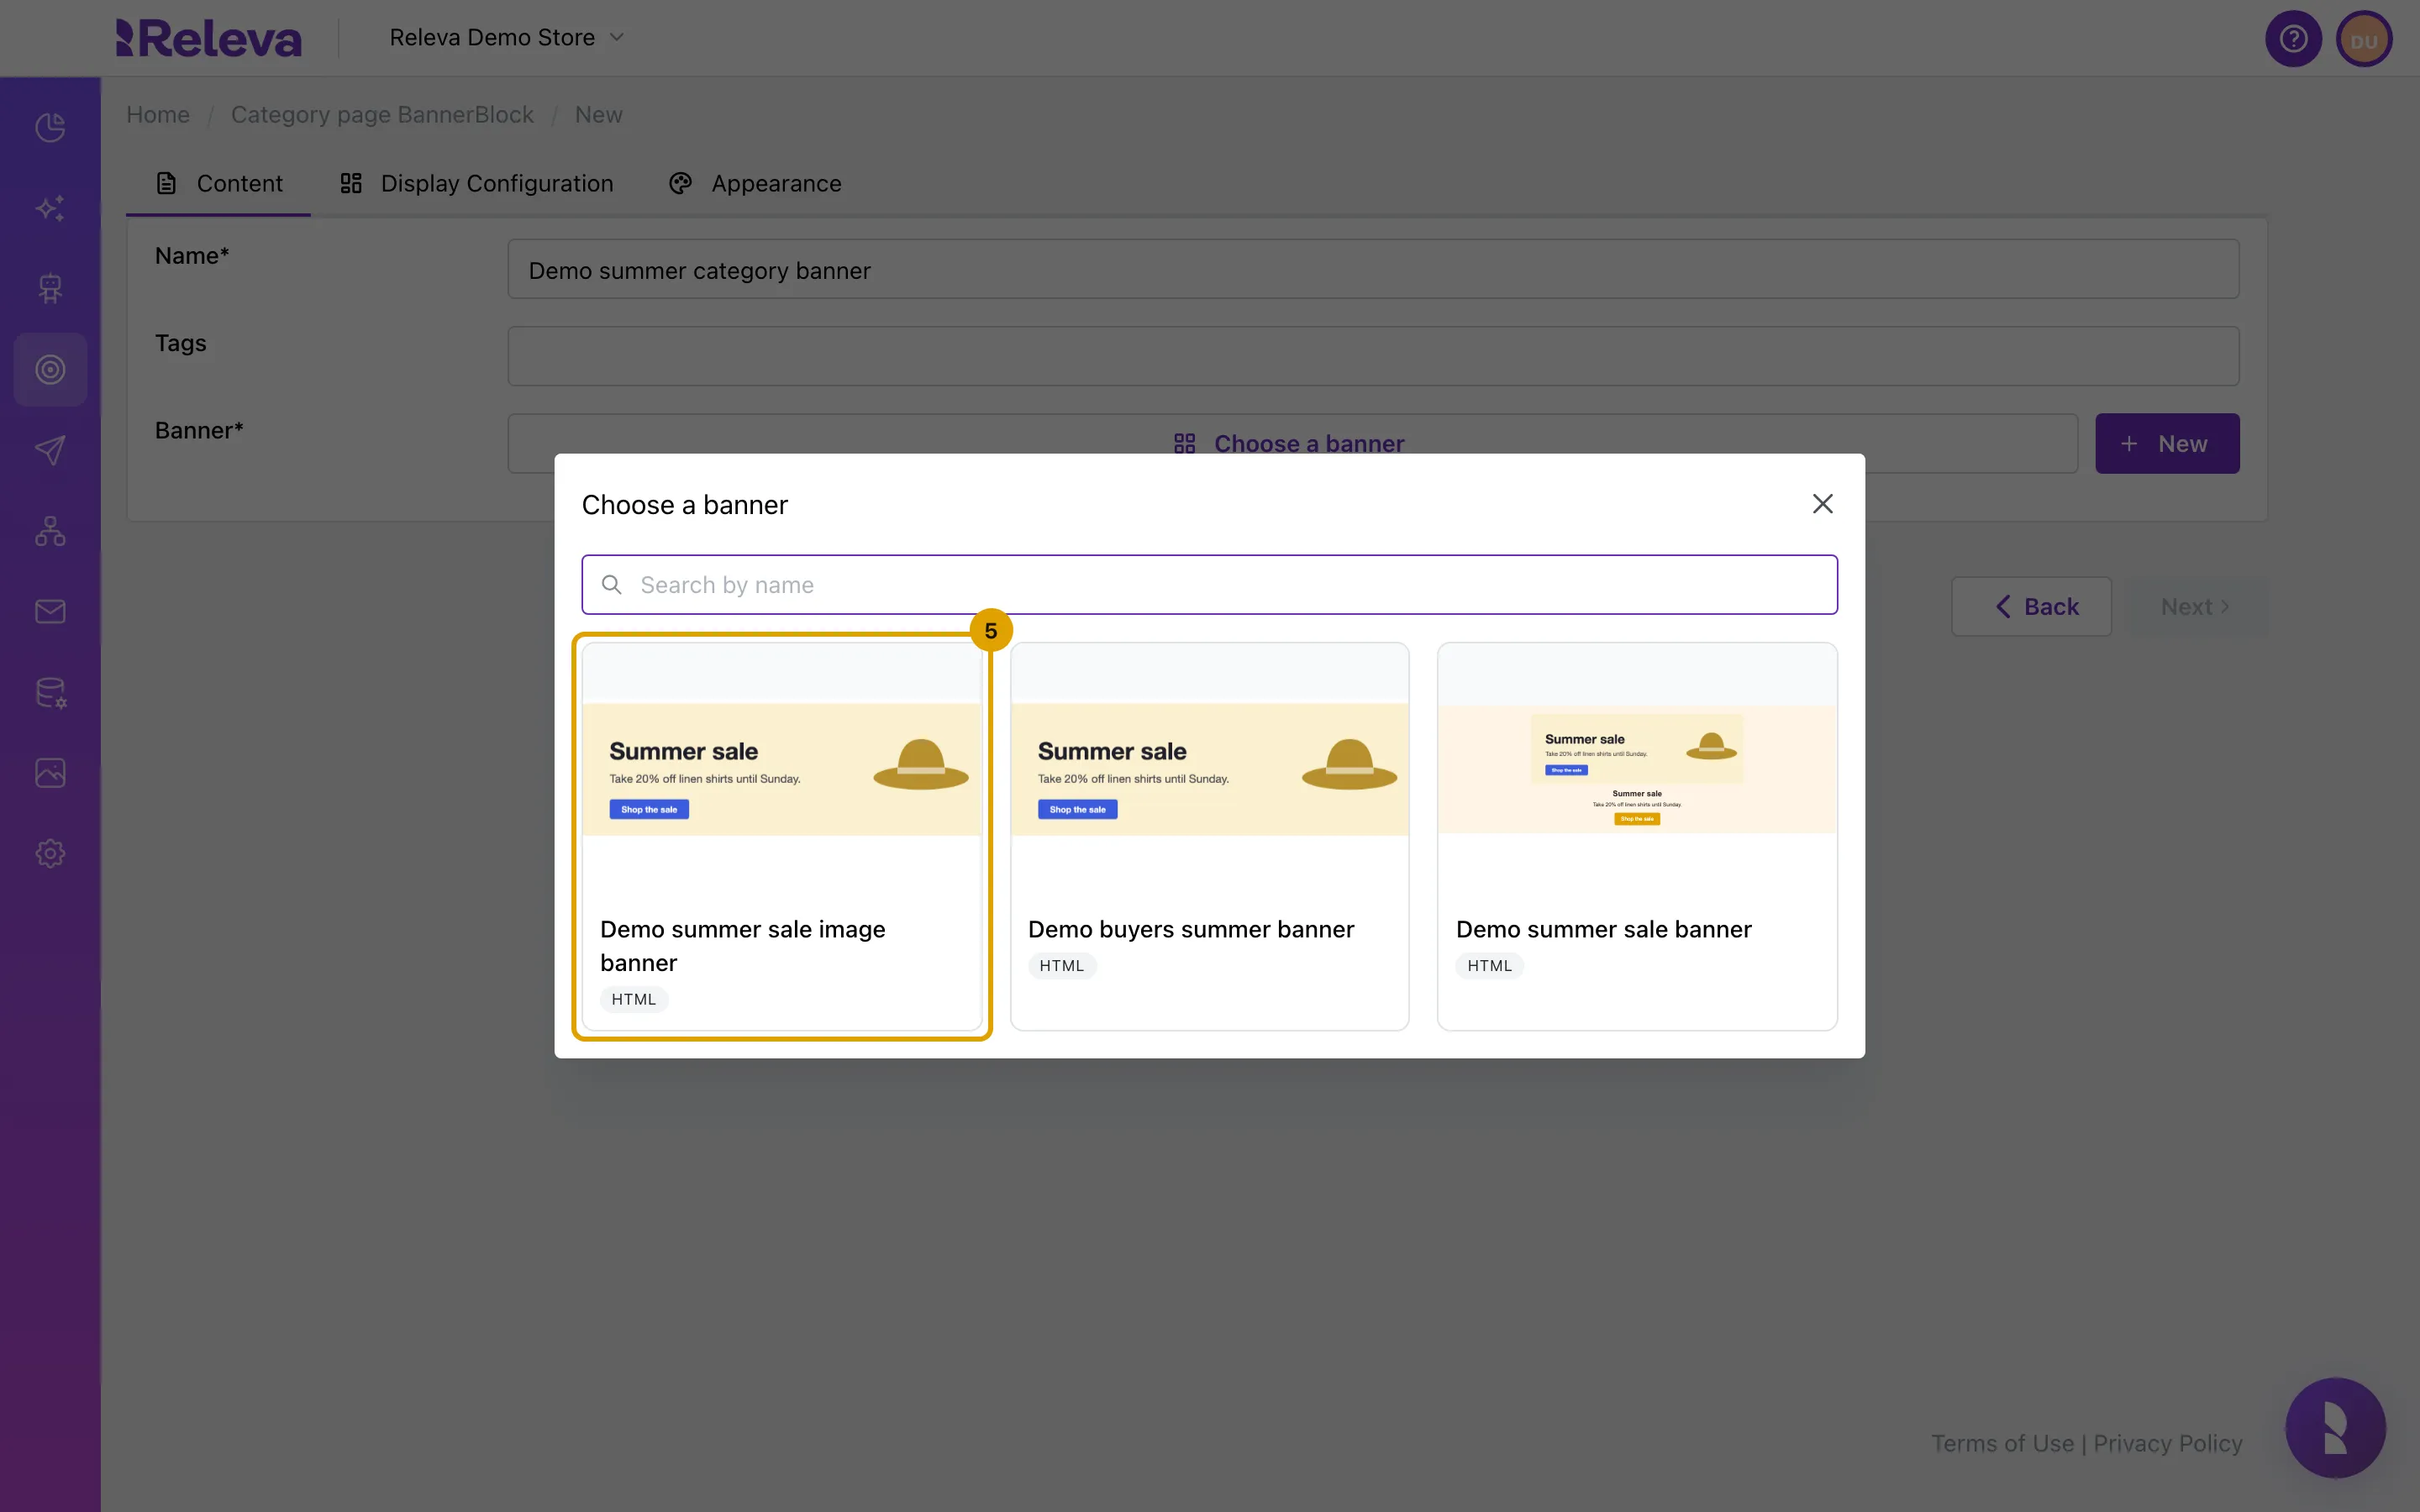
In the Choose a banner dialog, find the banner by its name or picture and select it, here Demo summer sale image banner
Each card shows the banner’s content, its name and badges: the editor it was made with (Builder, Unlayer or HTML) and Post-purchase for a post-purchase banner. Type in Search by name to narrow the list. If you have both kinds of banner, All, Standard and Post-purchase filter them by kind. The banner already chosen is listed first and marked Selected. If you close the dialog without choosing, the form shows Banner is required.
-
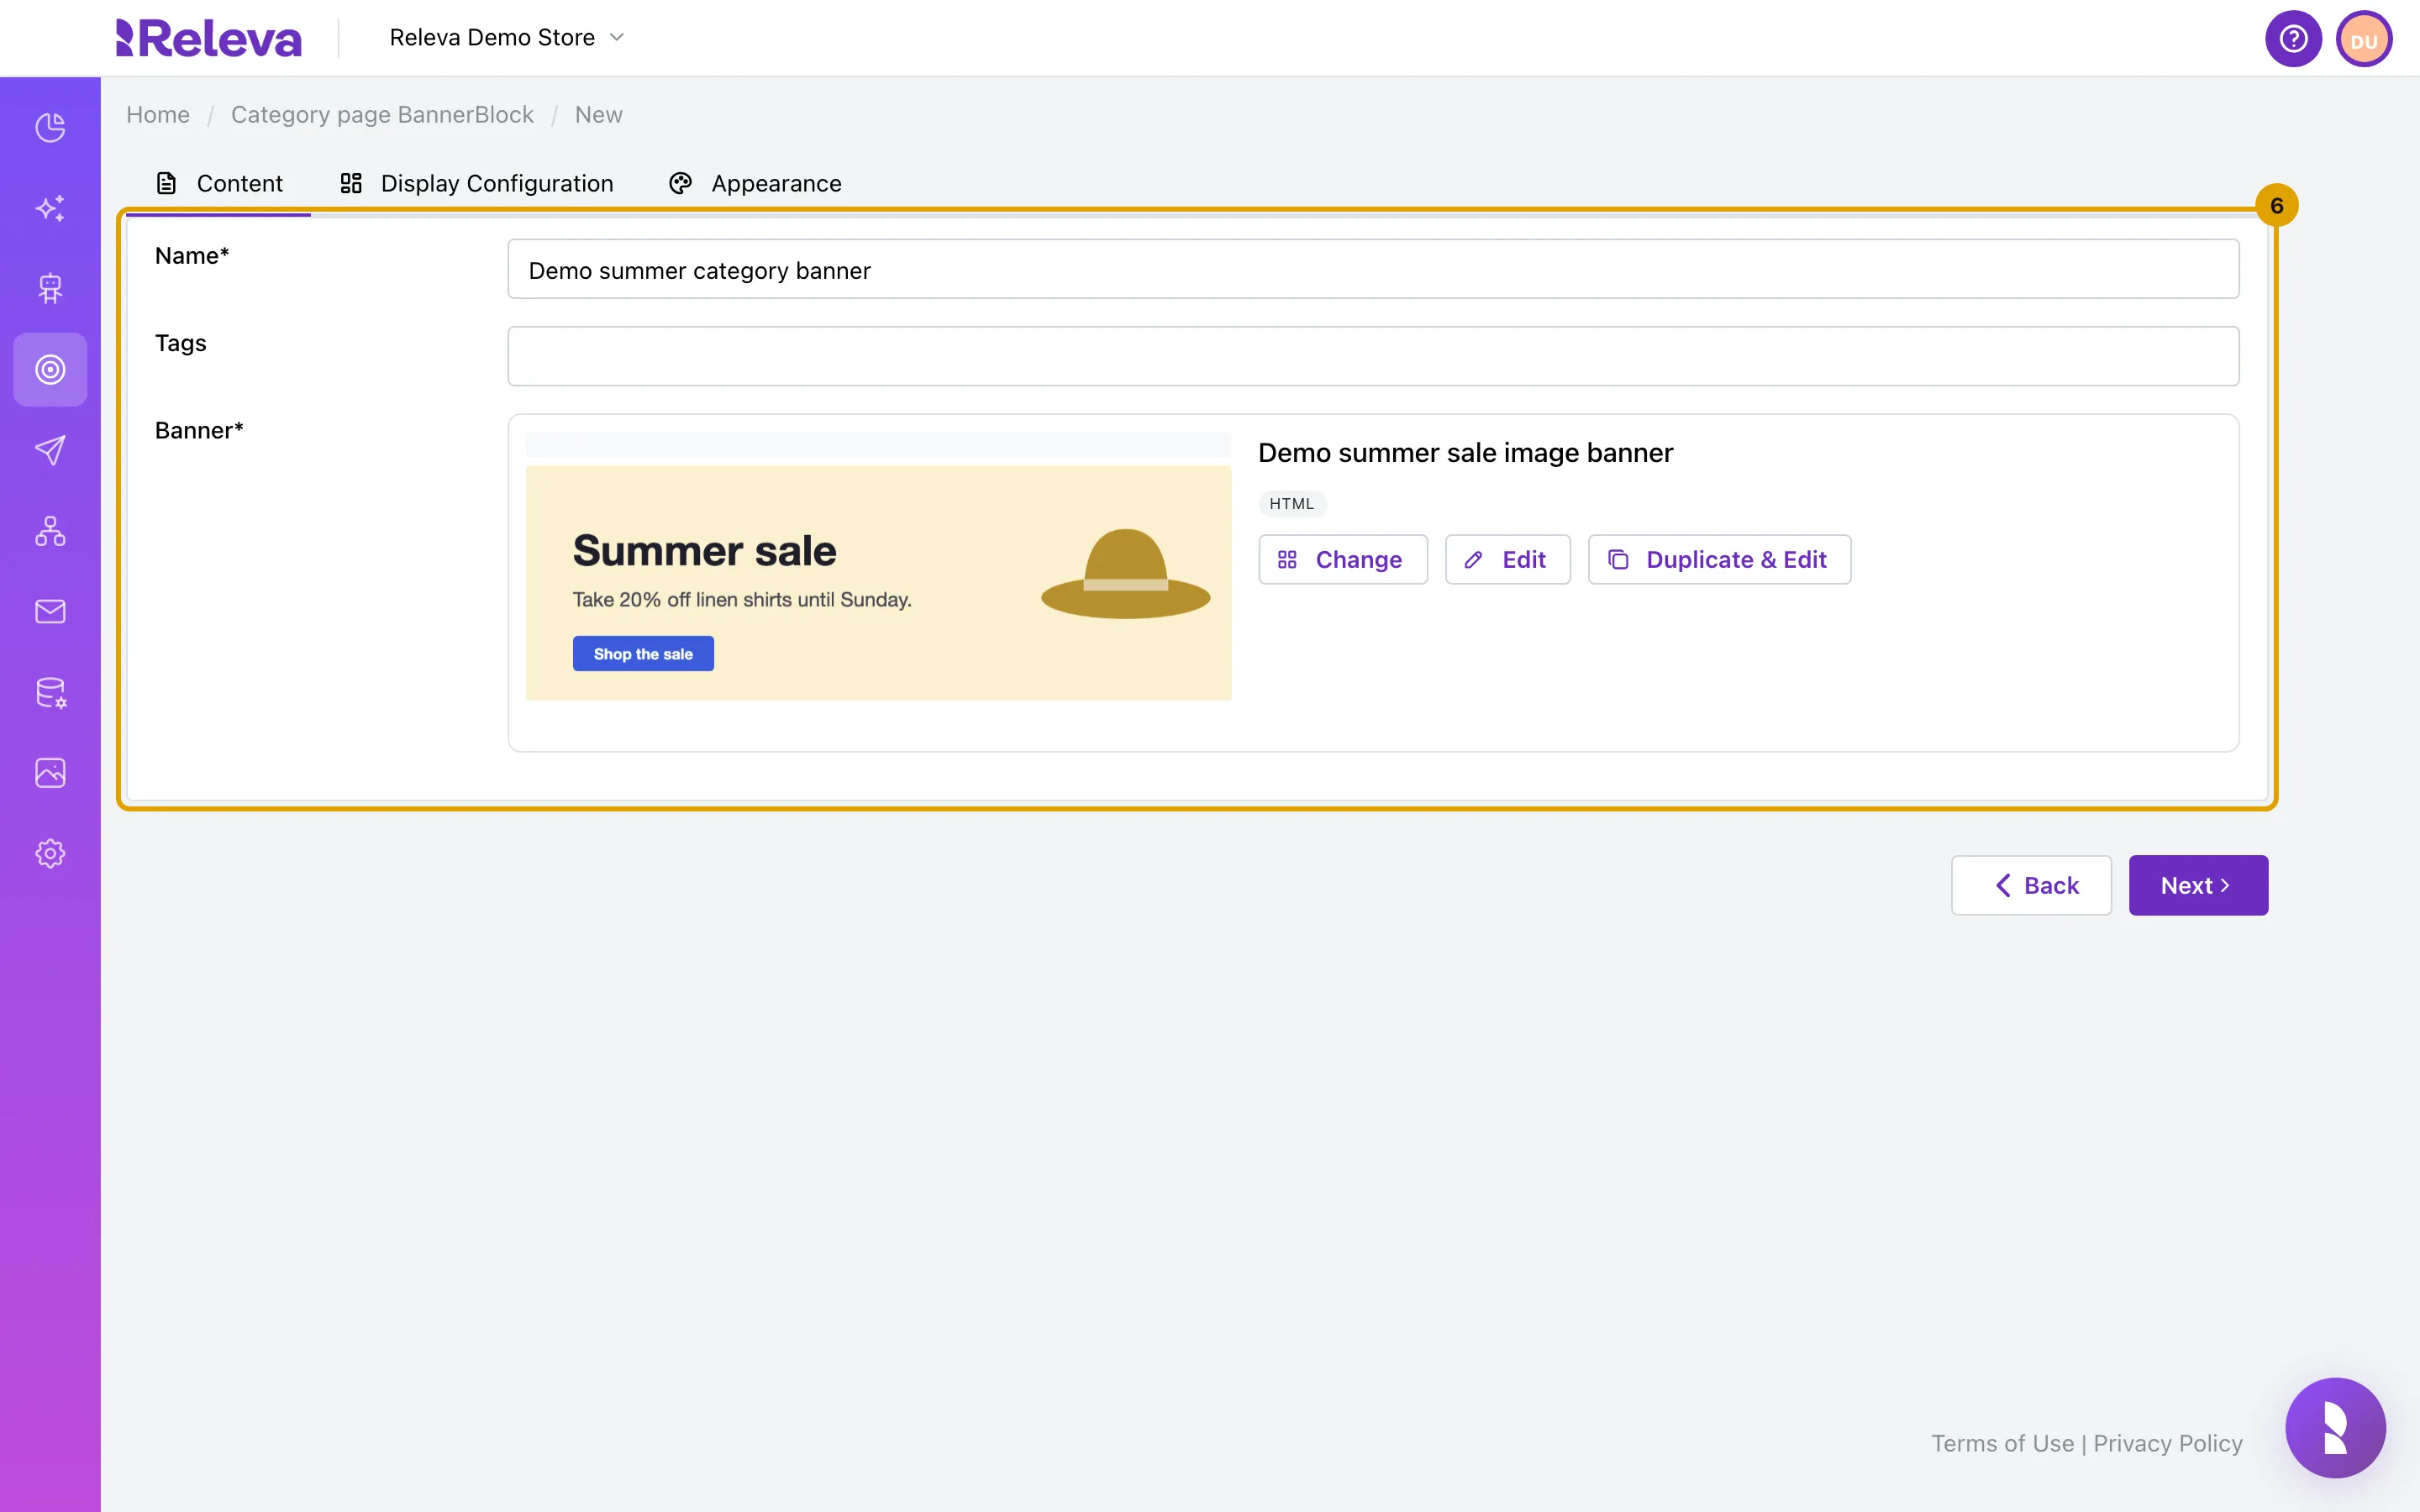
The banner you chose shows with its name and badges. Select Next
Change opens the dialog again. Edit opens the chosen banner in a modal; Duplicate & Edit creates a copy of it to change, without leaving the form. To see how the block shows the banner on a page, use the preview on the Appearance tab.
-
Under Display mode, keep Static to show the banner inside the page. Select Next
Static is placed at a spot on the page and shows as soon as the page loads, so it has no Trigger. It is the only mode you can position with Position on my site. The other modes float over the page: Pop-up is a lightbox over a dimmed page, Flyout slides into a bottom corner, Bar is a full-width strip at the top or bottom, and Custom leaves placing and styling to your own integration. These modes add a Trigger: Show immediately, After N seconds on the page, On scrolling down N% of page, On leave intent (optionally Also trigger on mobile Back button), Added to Wishlist or Added to Cart.
On this tab you can also turn on URL filter to limit the block to URLs that contain (URL contains) or do not contain (URL doesn’t contain) a piece of path, such as
categories/footwear; separate several pieces with|. Locales to Display limits the block to the listed shop languages; empty means every language. Session Interval shows the banner every N sessions; leave it empty to show it every session.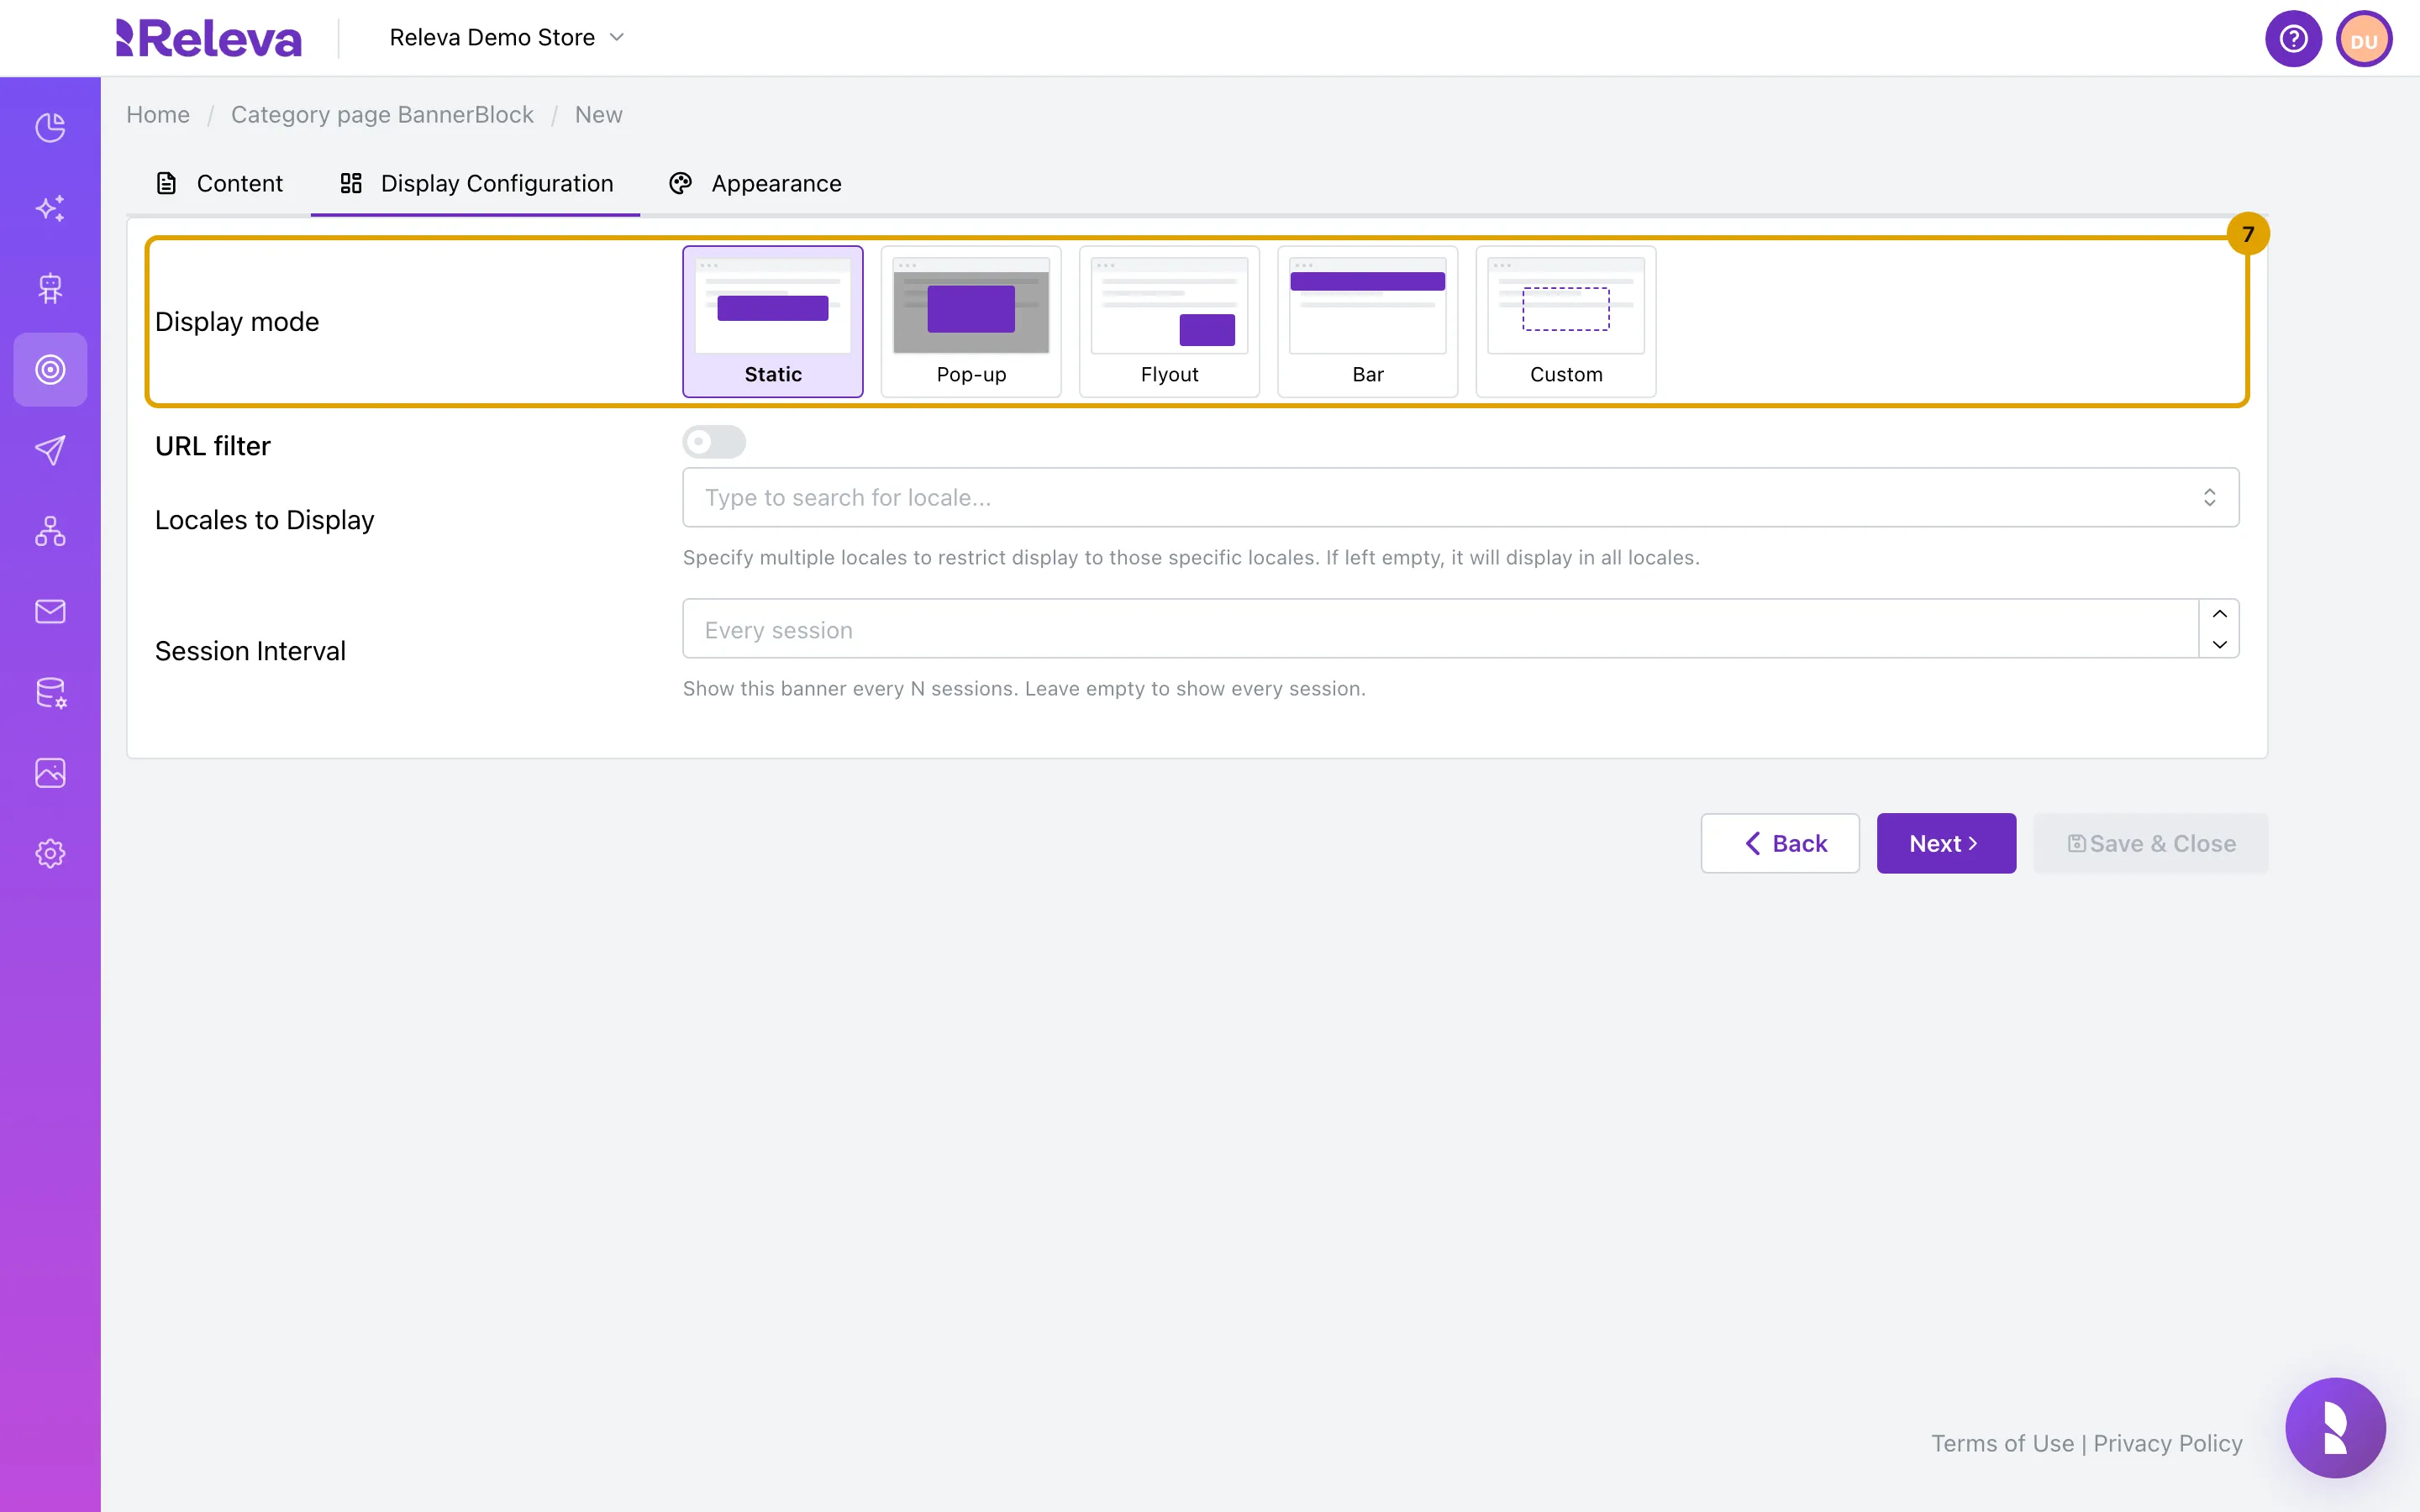
-
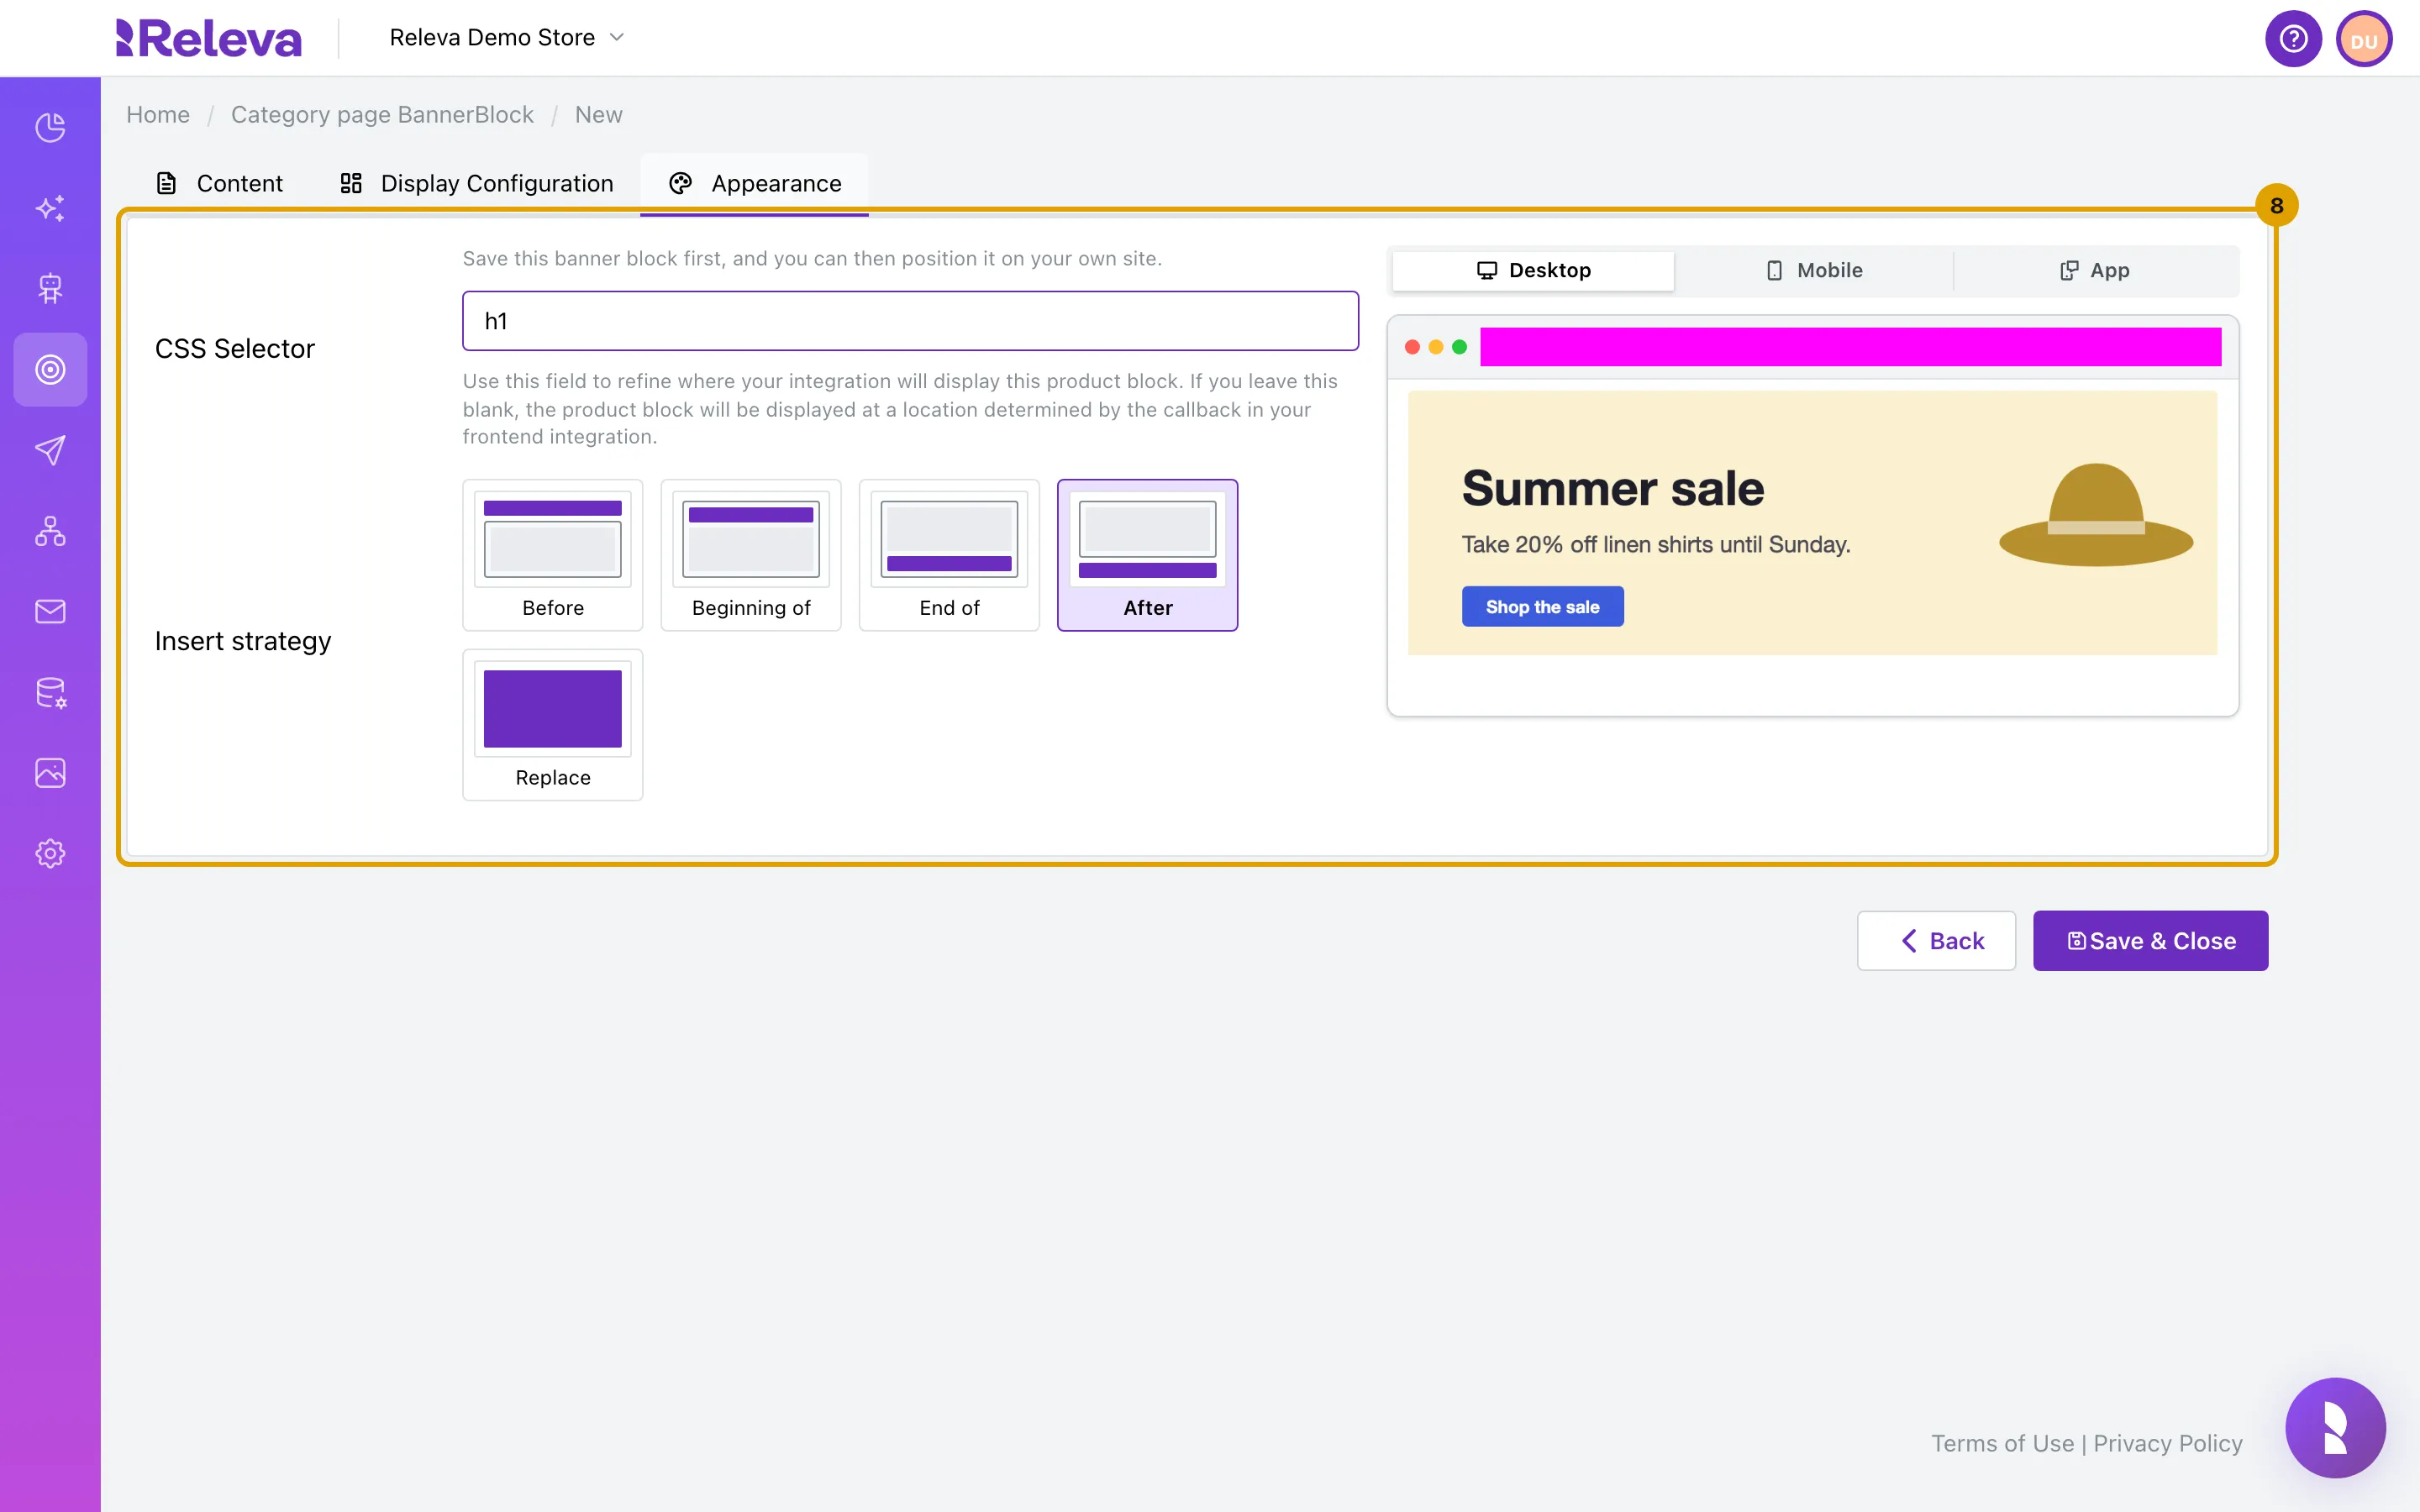
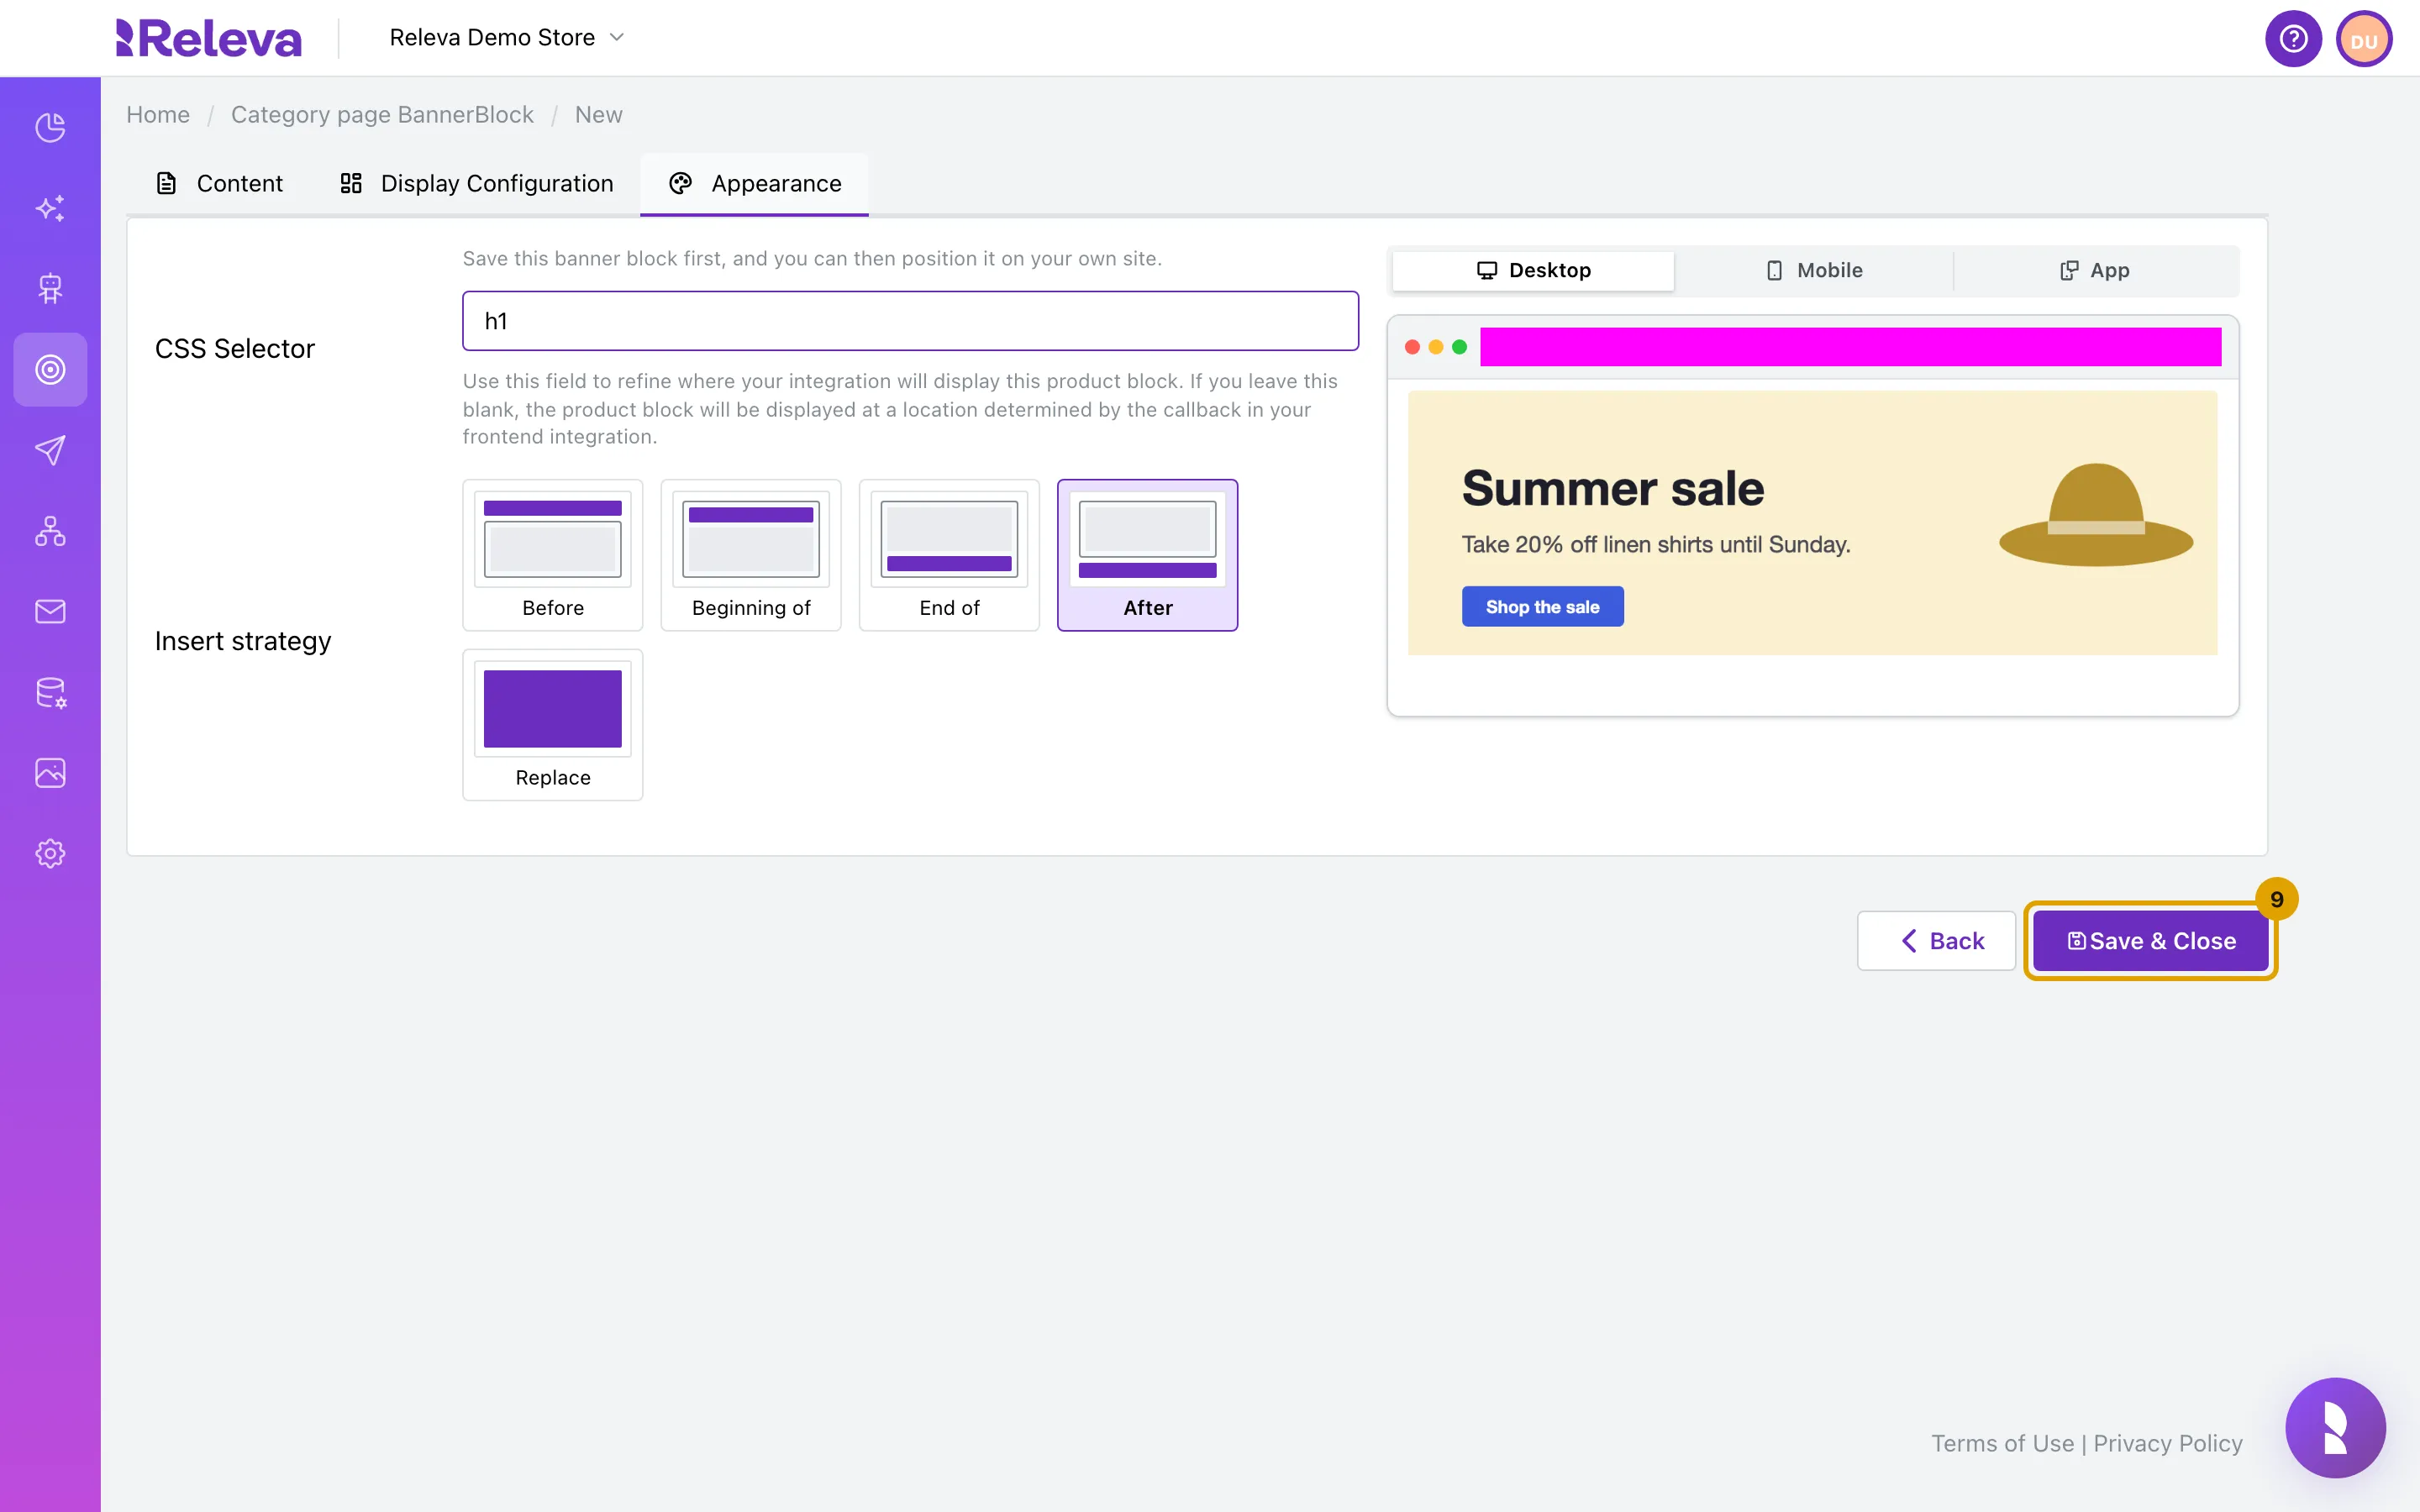
On Appearance, enter a first CSS Selector, here
h1(the page heading), and under Insert strategy select AfterA static block cannot be saved without a CSS Selector, and Position on my site works only on a saved block. Until then the tab says Save this banner block first, and you can then position it on your own site. So enter any element that is on the page now; you pick the exact spot on your shop in step 12.
Insert strategy sets where the banner goes relative to that element: Before (above the element, outside it), Beginning of (inside the element, before everything already in it), End of (inside the element, after everything already in it), After (below the element, outside it) or Replace (the banner takes the element’s place and the element is removed). The default is Beginning of.
-
Select Save & Close
-
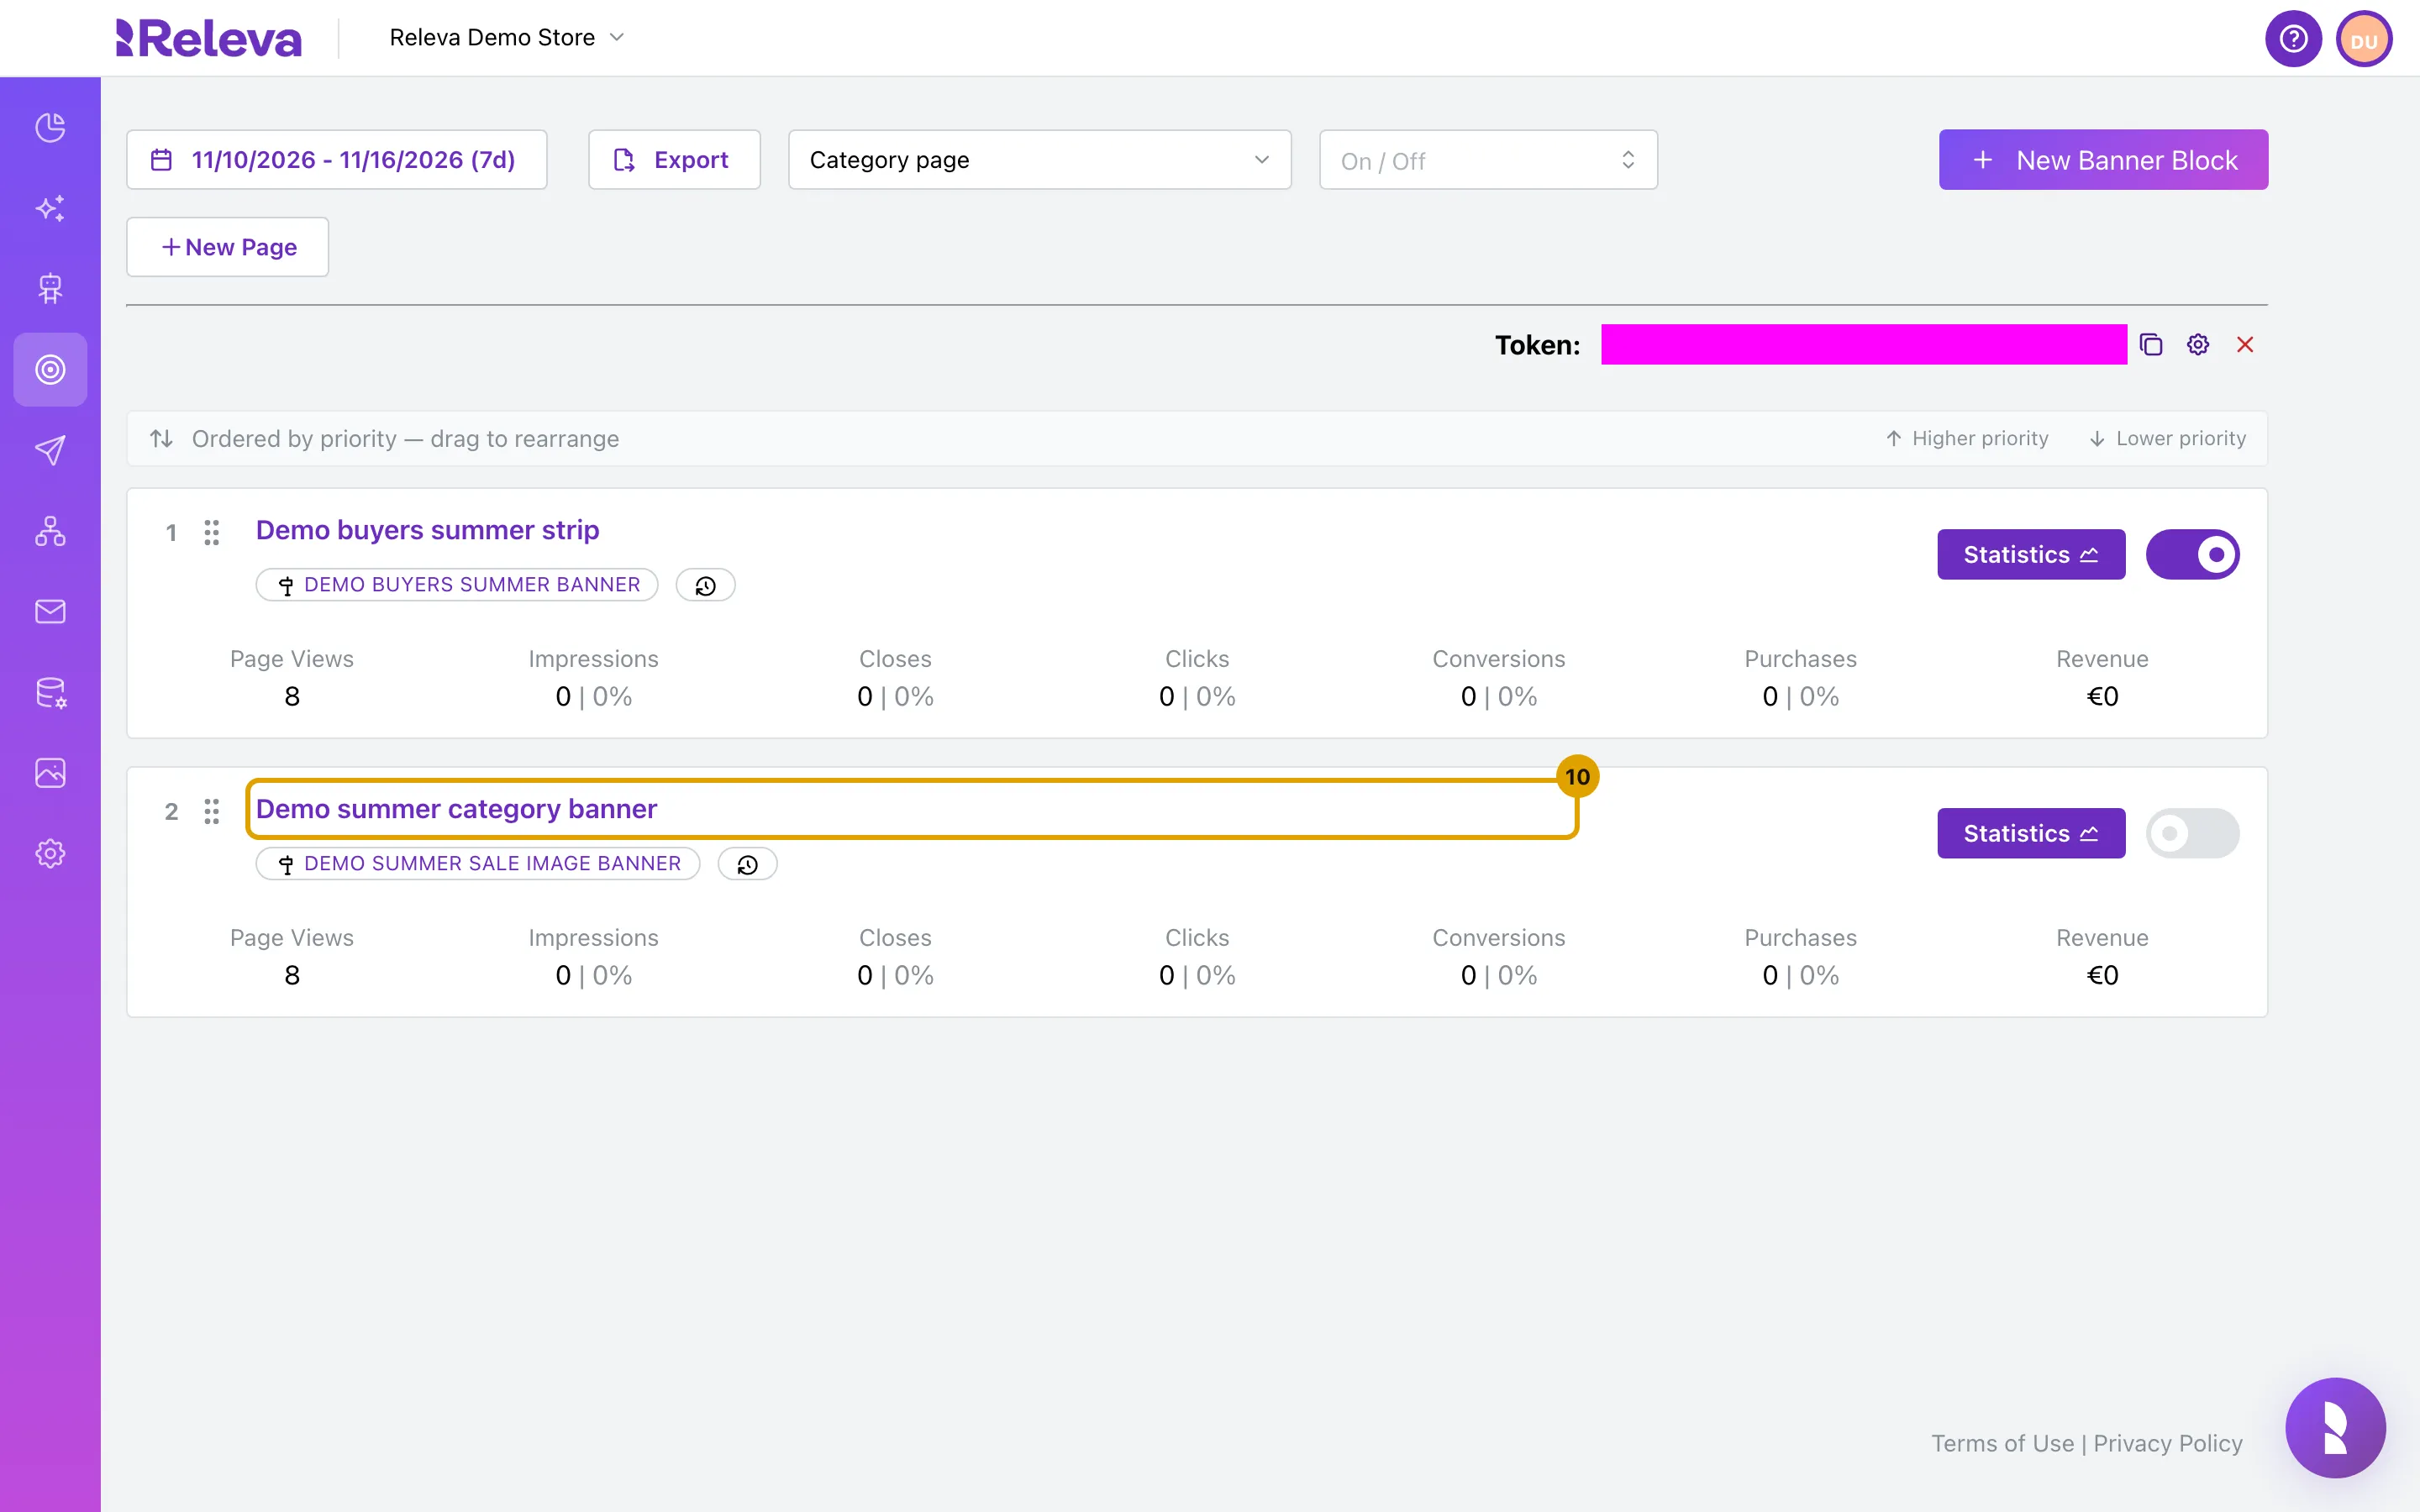
The new banner block is listed on the page, switched off. Select its name to open it again
A new block is added at the bottom of the list, which is the lowest priority. With two or more blocks the bar Ordered by priority — drag to rearrange appears; drag a card to change the order. Max Banners Displayed in Page Settings caps how many of the matching blocks a visitor gets per page load, highest priority first.
-
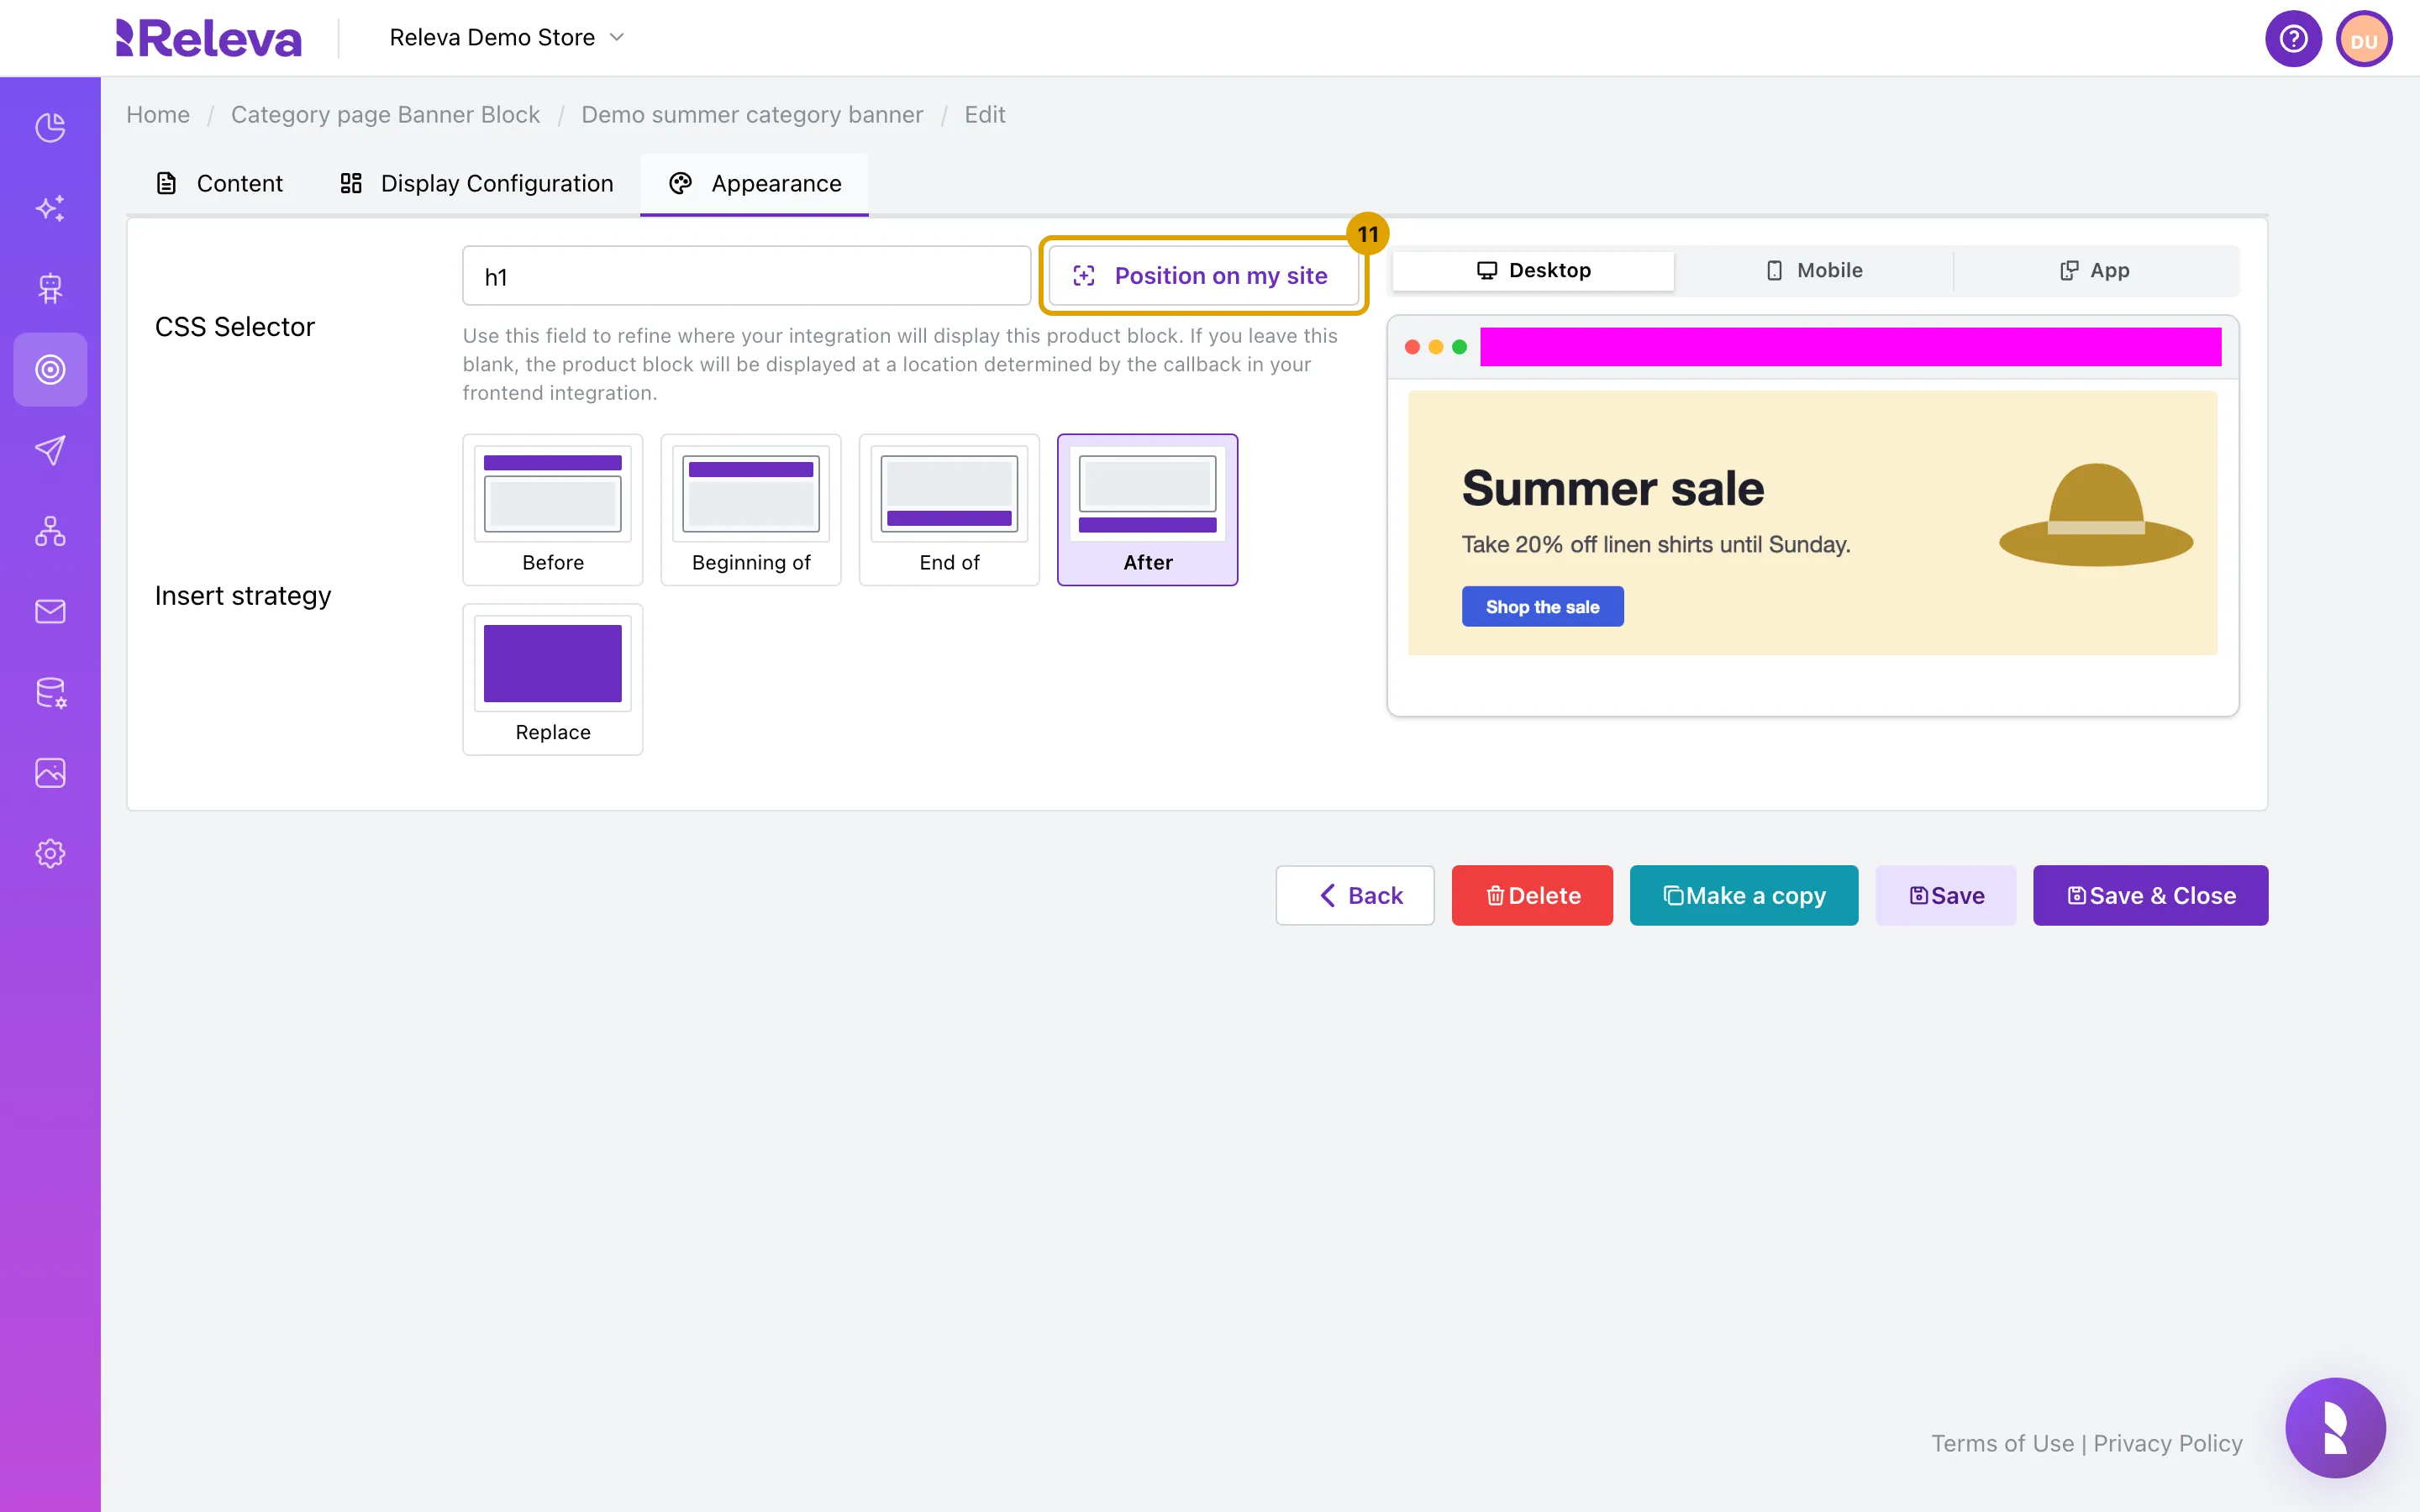
On Appearance, select Position on my site
Your shop opens in the same browser tab, on the page’s most recently visited address. Releva keeps any changes you have not saved yet and gives them back to you when you return.
-
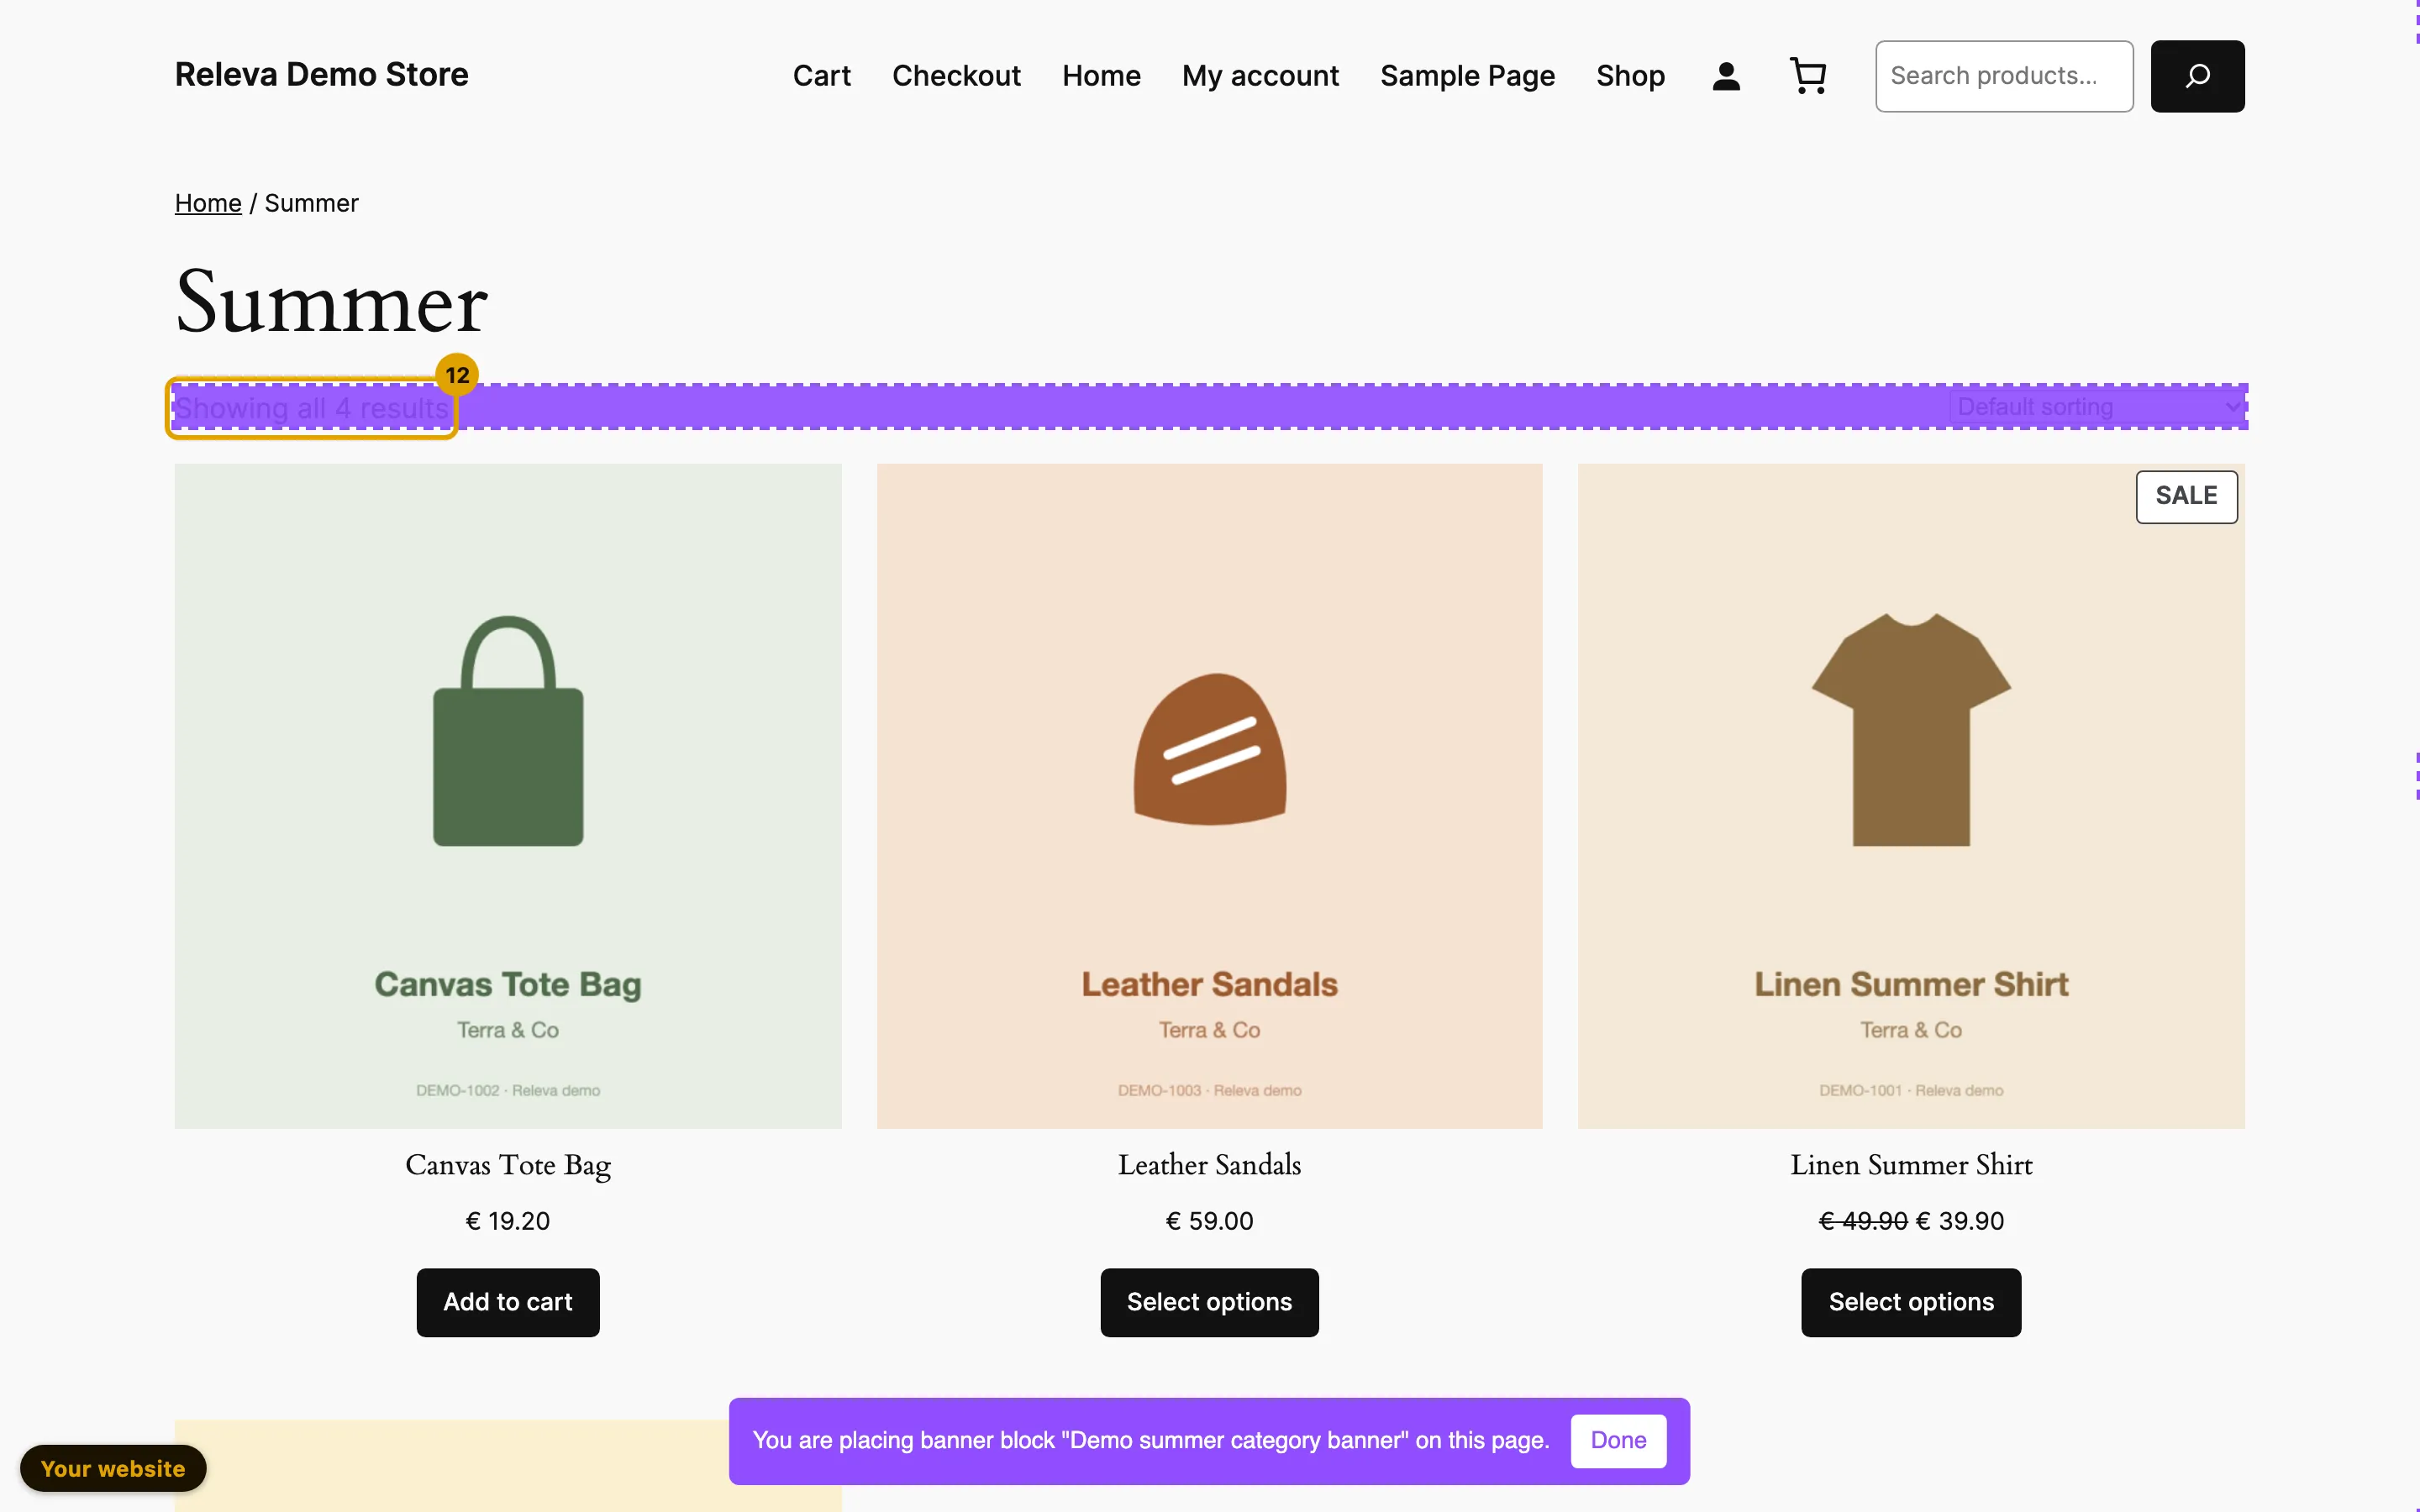
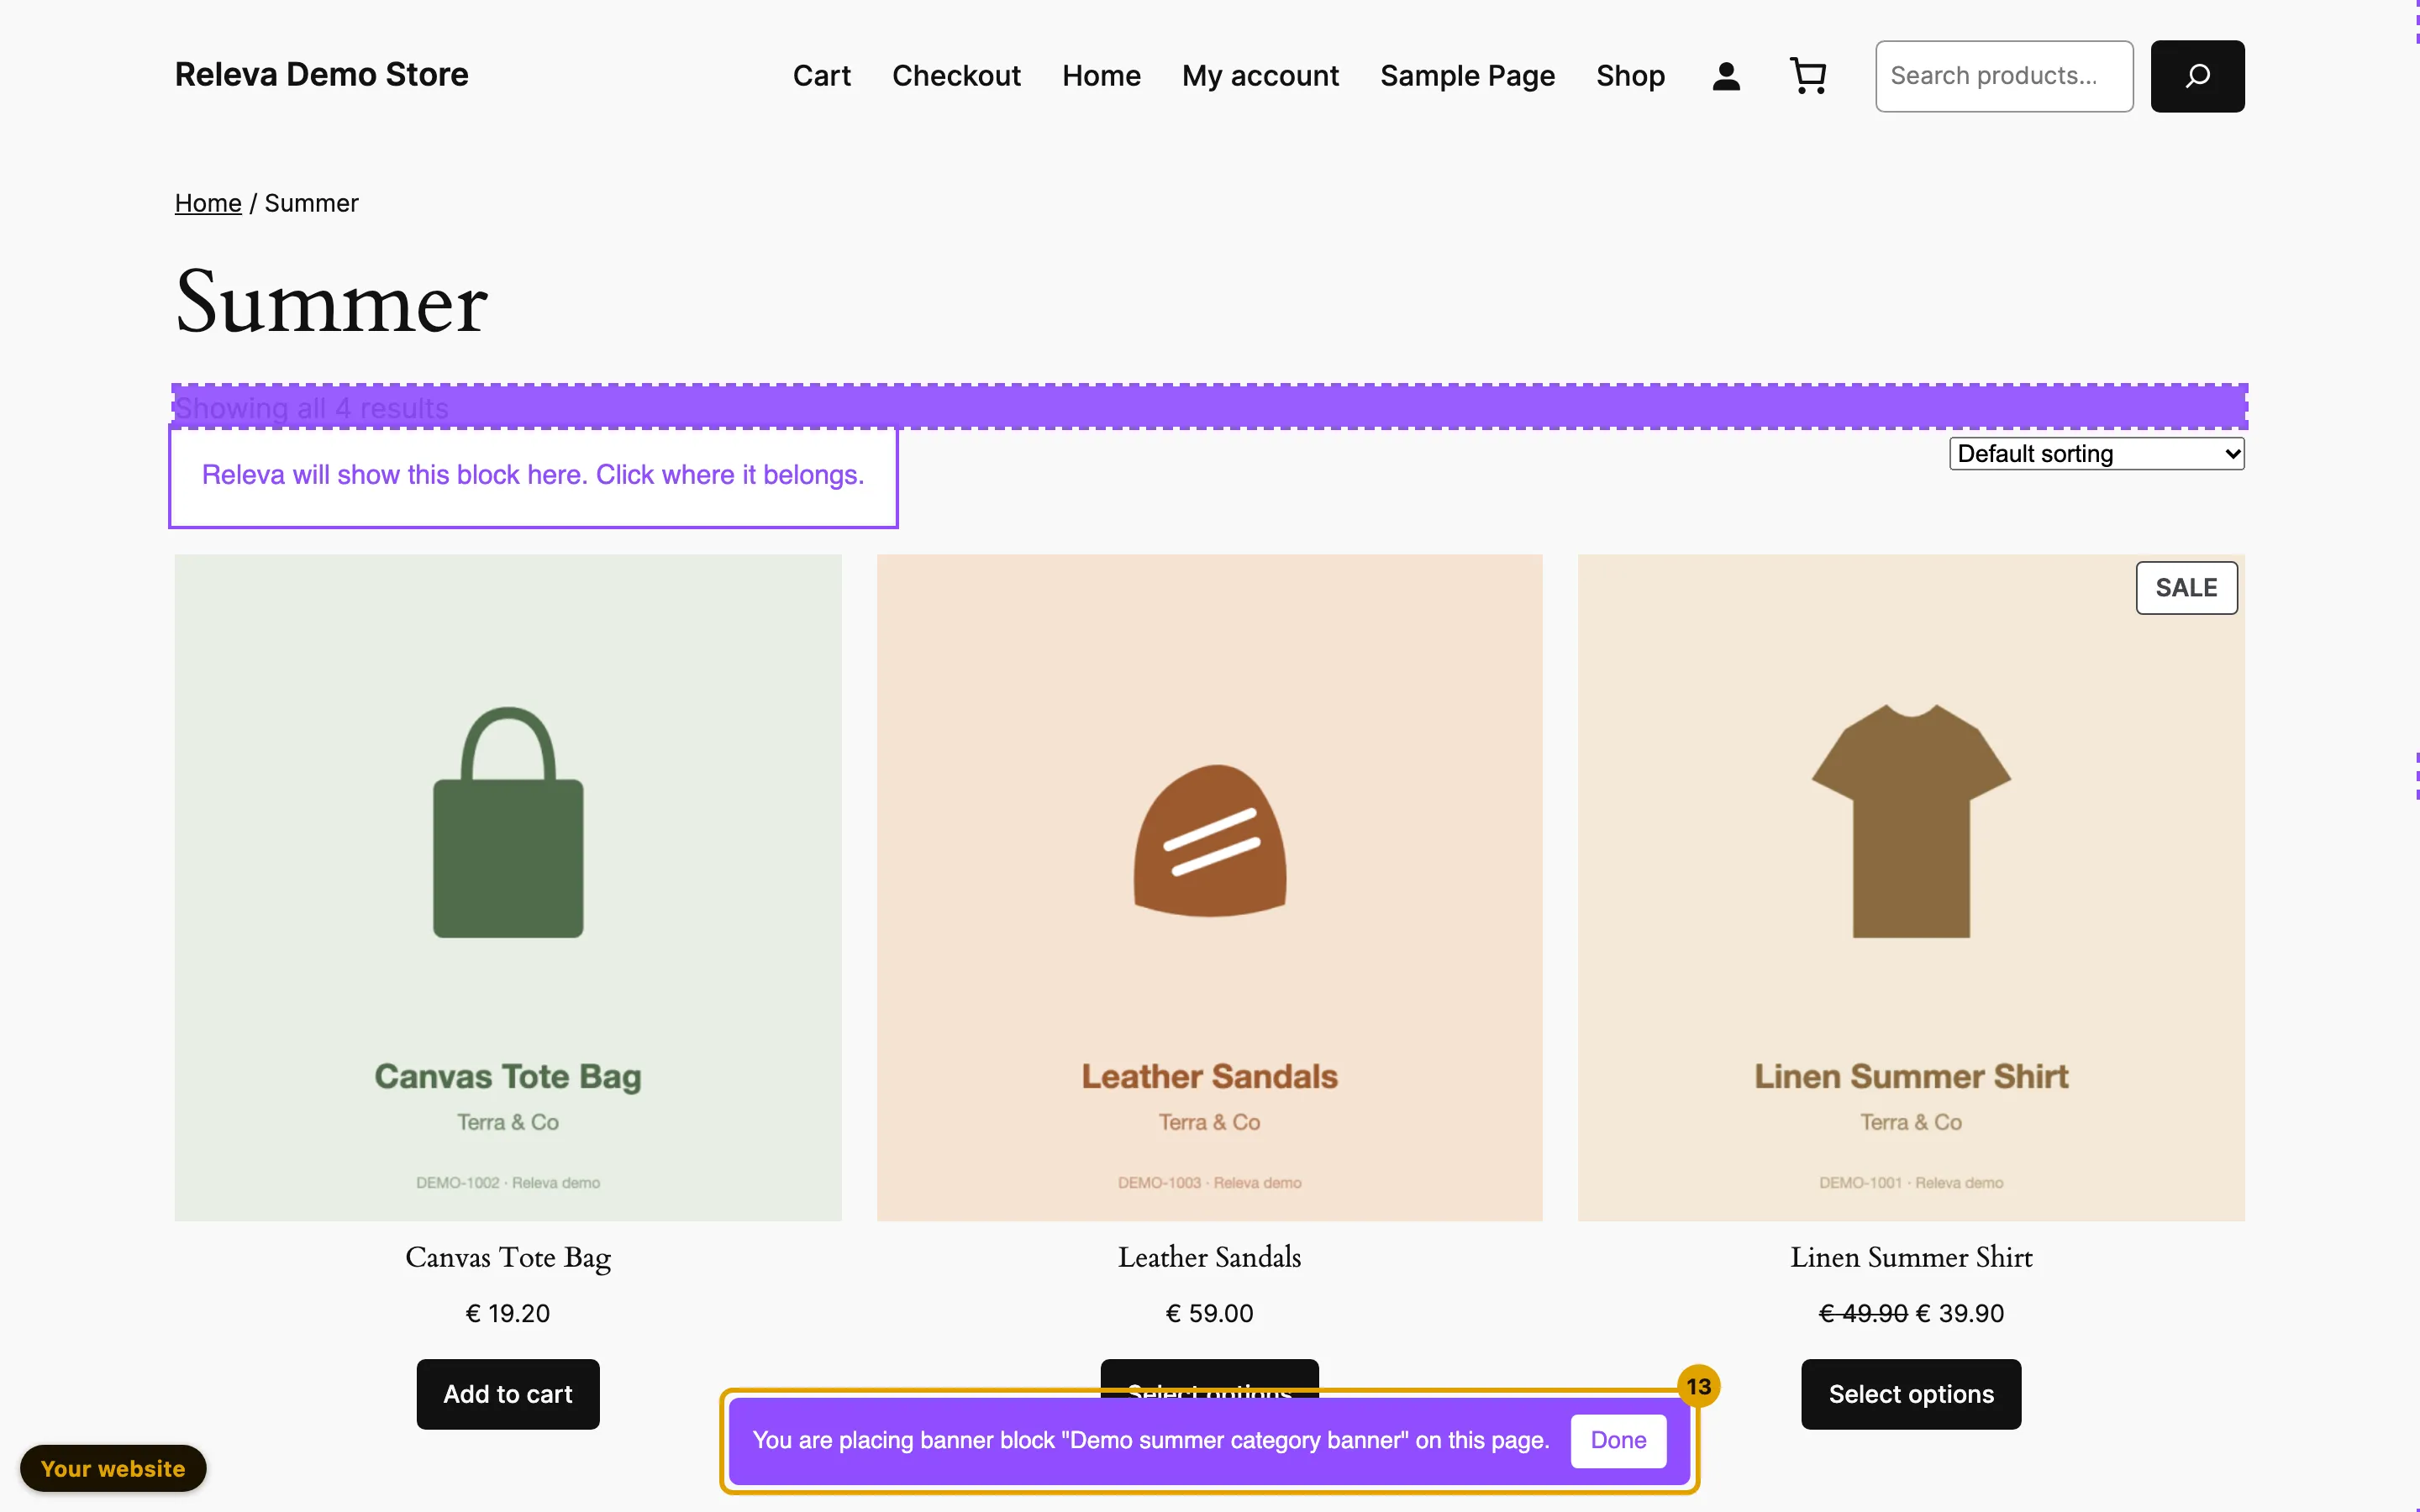
Your shop opens with the bar You are placing banner block “Demo summer category banner” on this page. at the bottom. Click the element the banner should follow, here the Showing all 4 results line
When you point at an element, Releva marks it and tells you where the banner will go, for example Your block will be placed just after this element, outside it. The wording follows the Insert strategy you chose in step 8; the click only picks the element.
-
A frame with Releva will show this block here. Click where it belongs. marks the spot. If it is right, select Done. Otherwise click another element
While the block is switched off, the frame stands in for the banner: your banner itself does not show here.
-
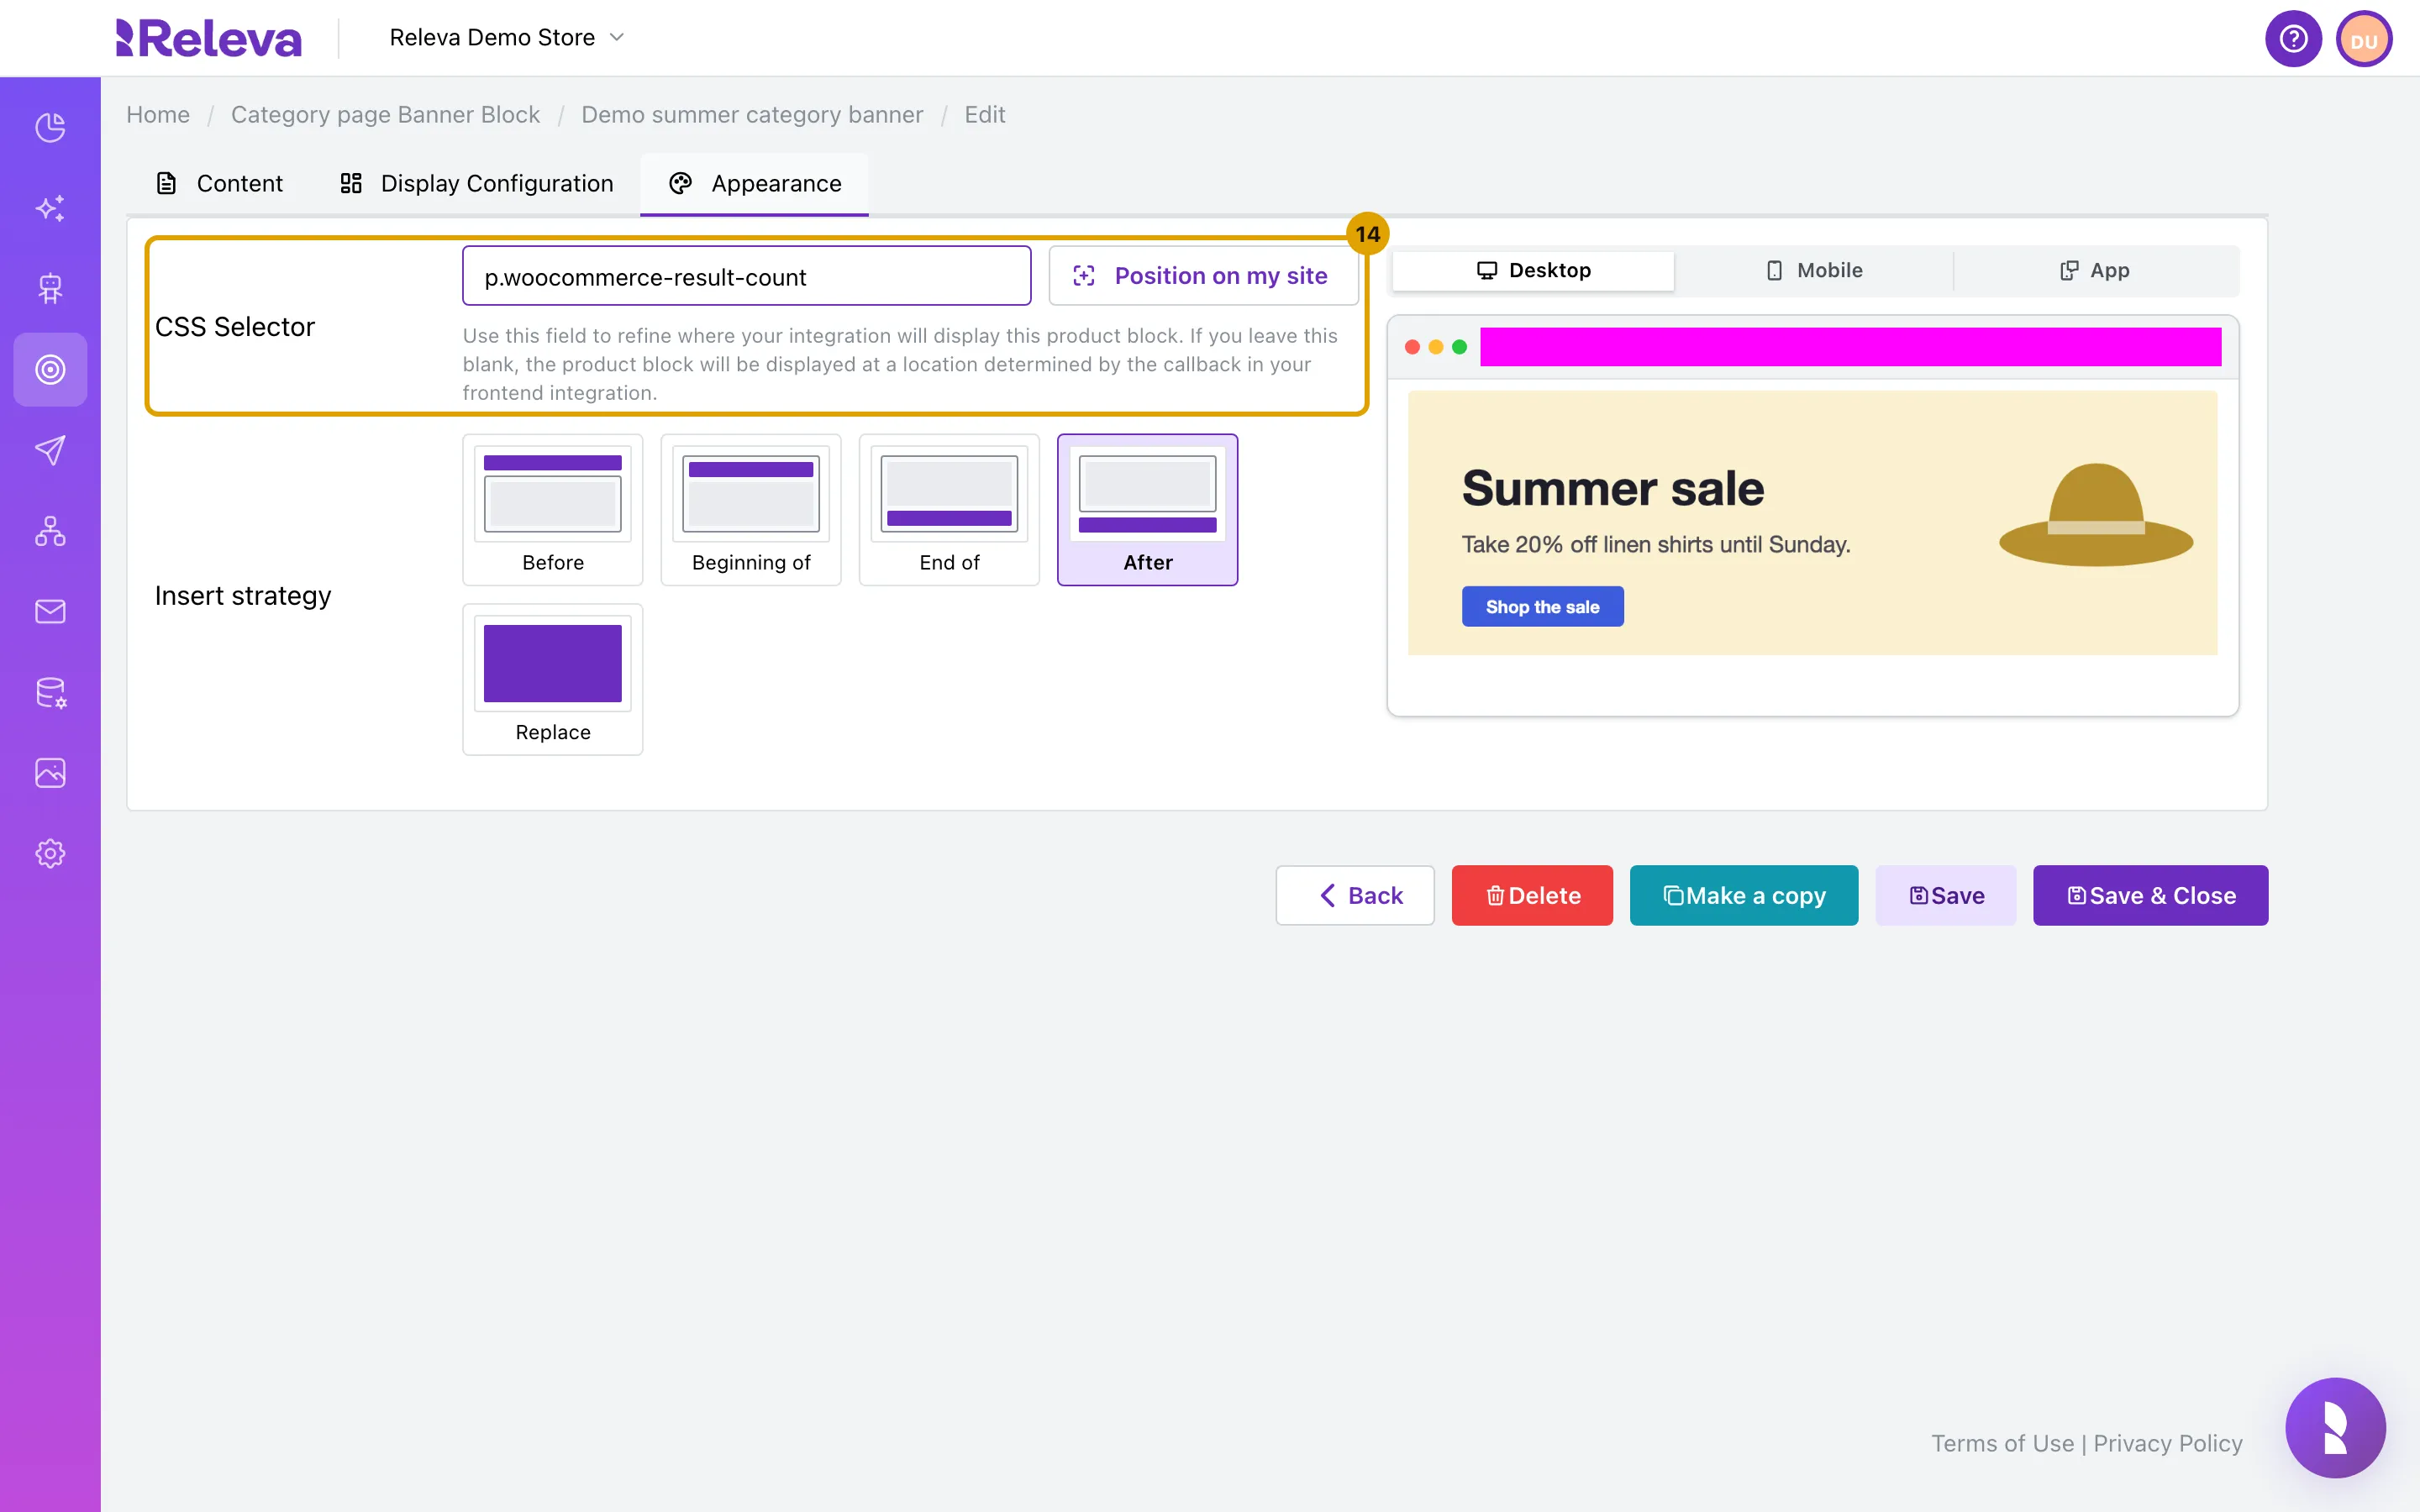
Back in Releva the notice Restored your unsaved changes and applied the new position — press Save to keep it. appears, and CSS Selector holds the element you clicked, here
p.woocommerce-result-count. Select Save & CloseNothing is saved until you select Save or Save & Close. If you select Done without clicking an element, the notice says Restored your unsaved changes. No position was picked on your site, so it is unchanged.
-
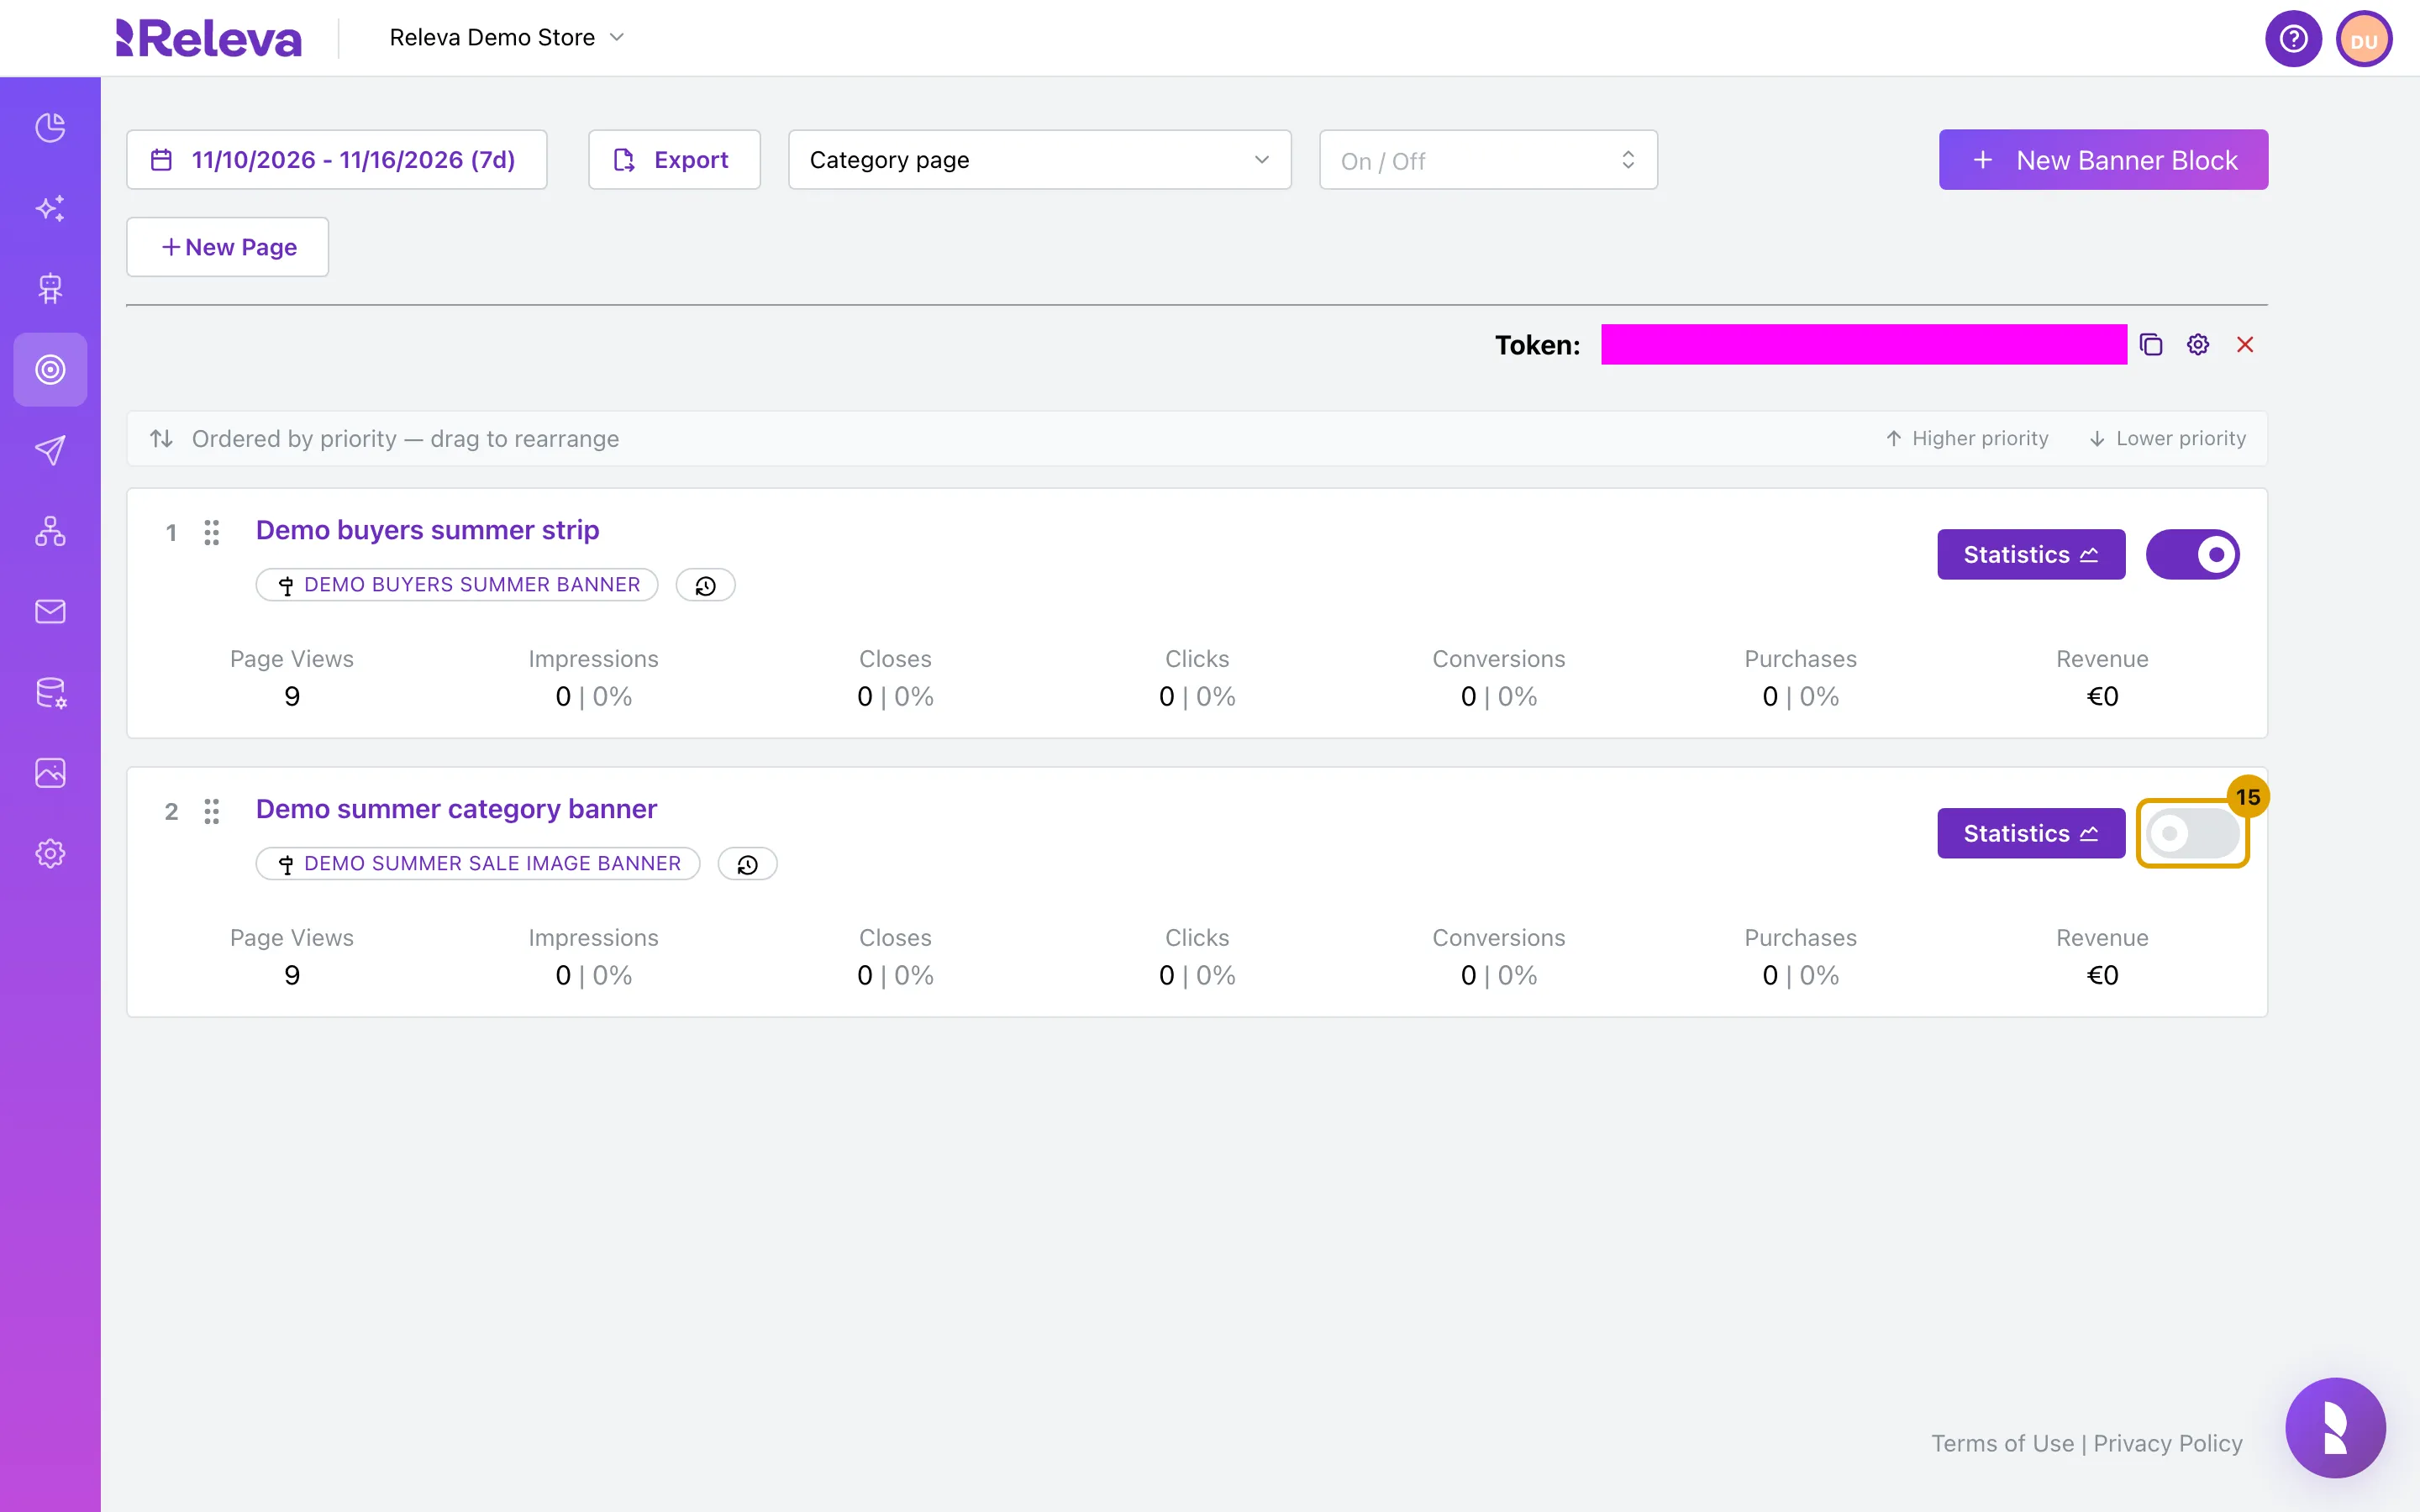
Turn on the block’s switch
The switch saves straight away; there is no extra Save.
-
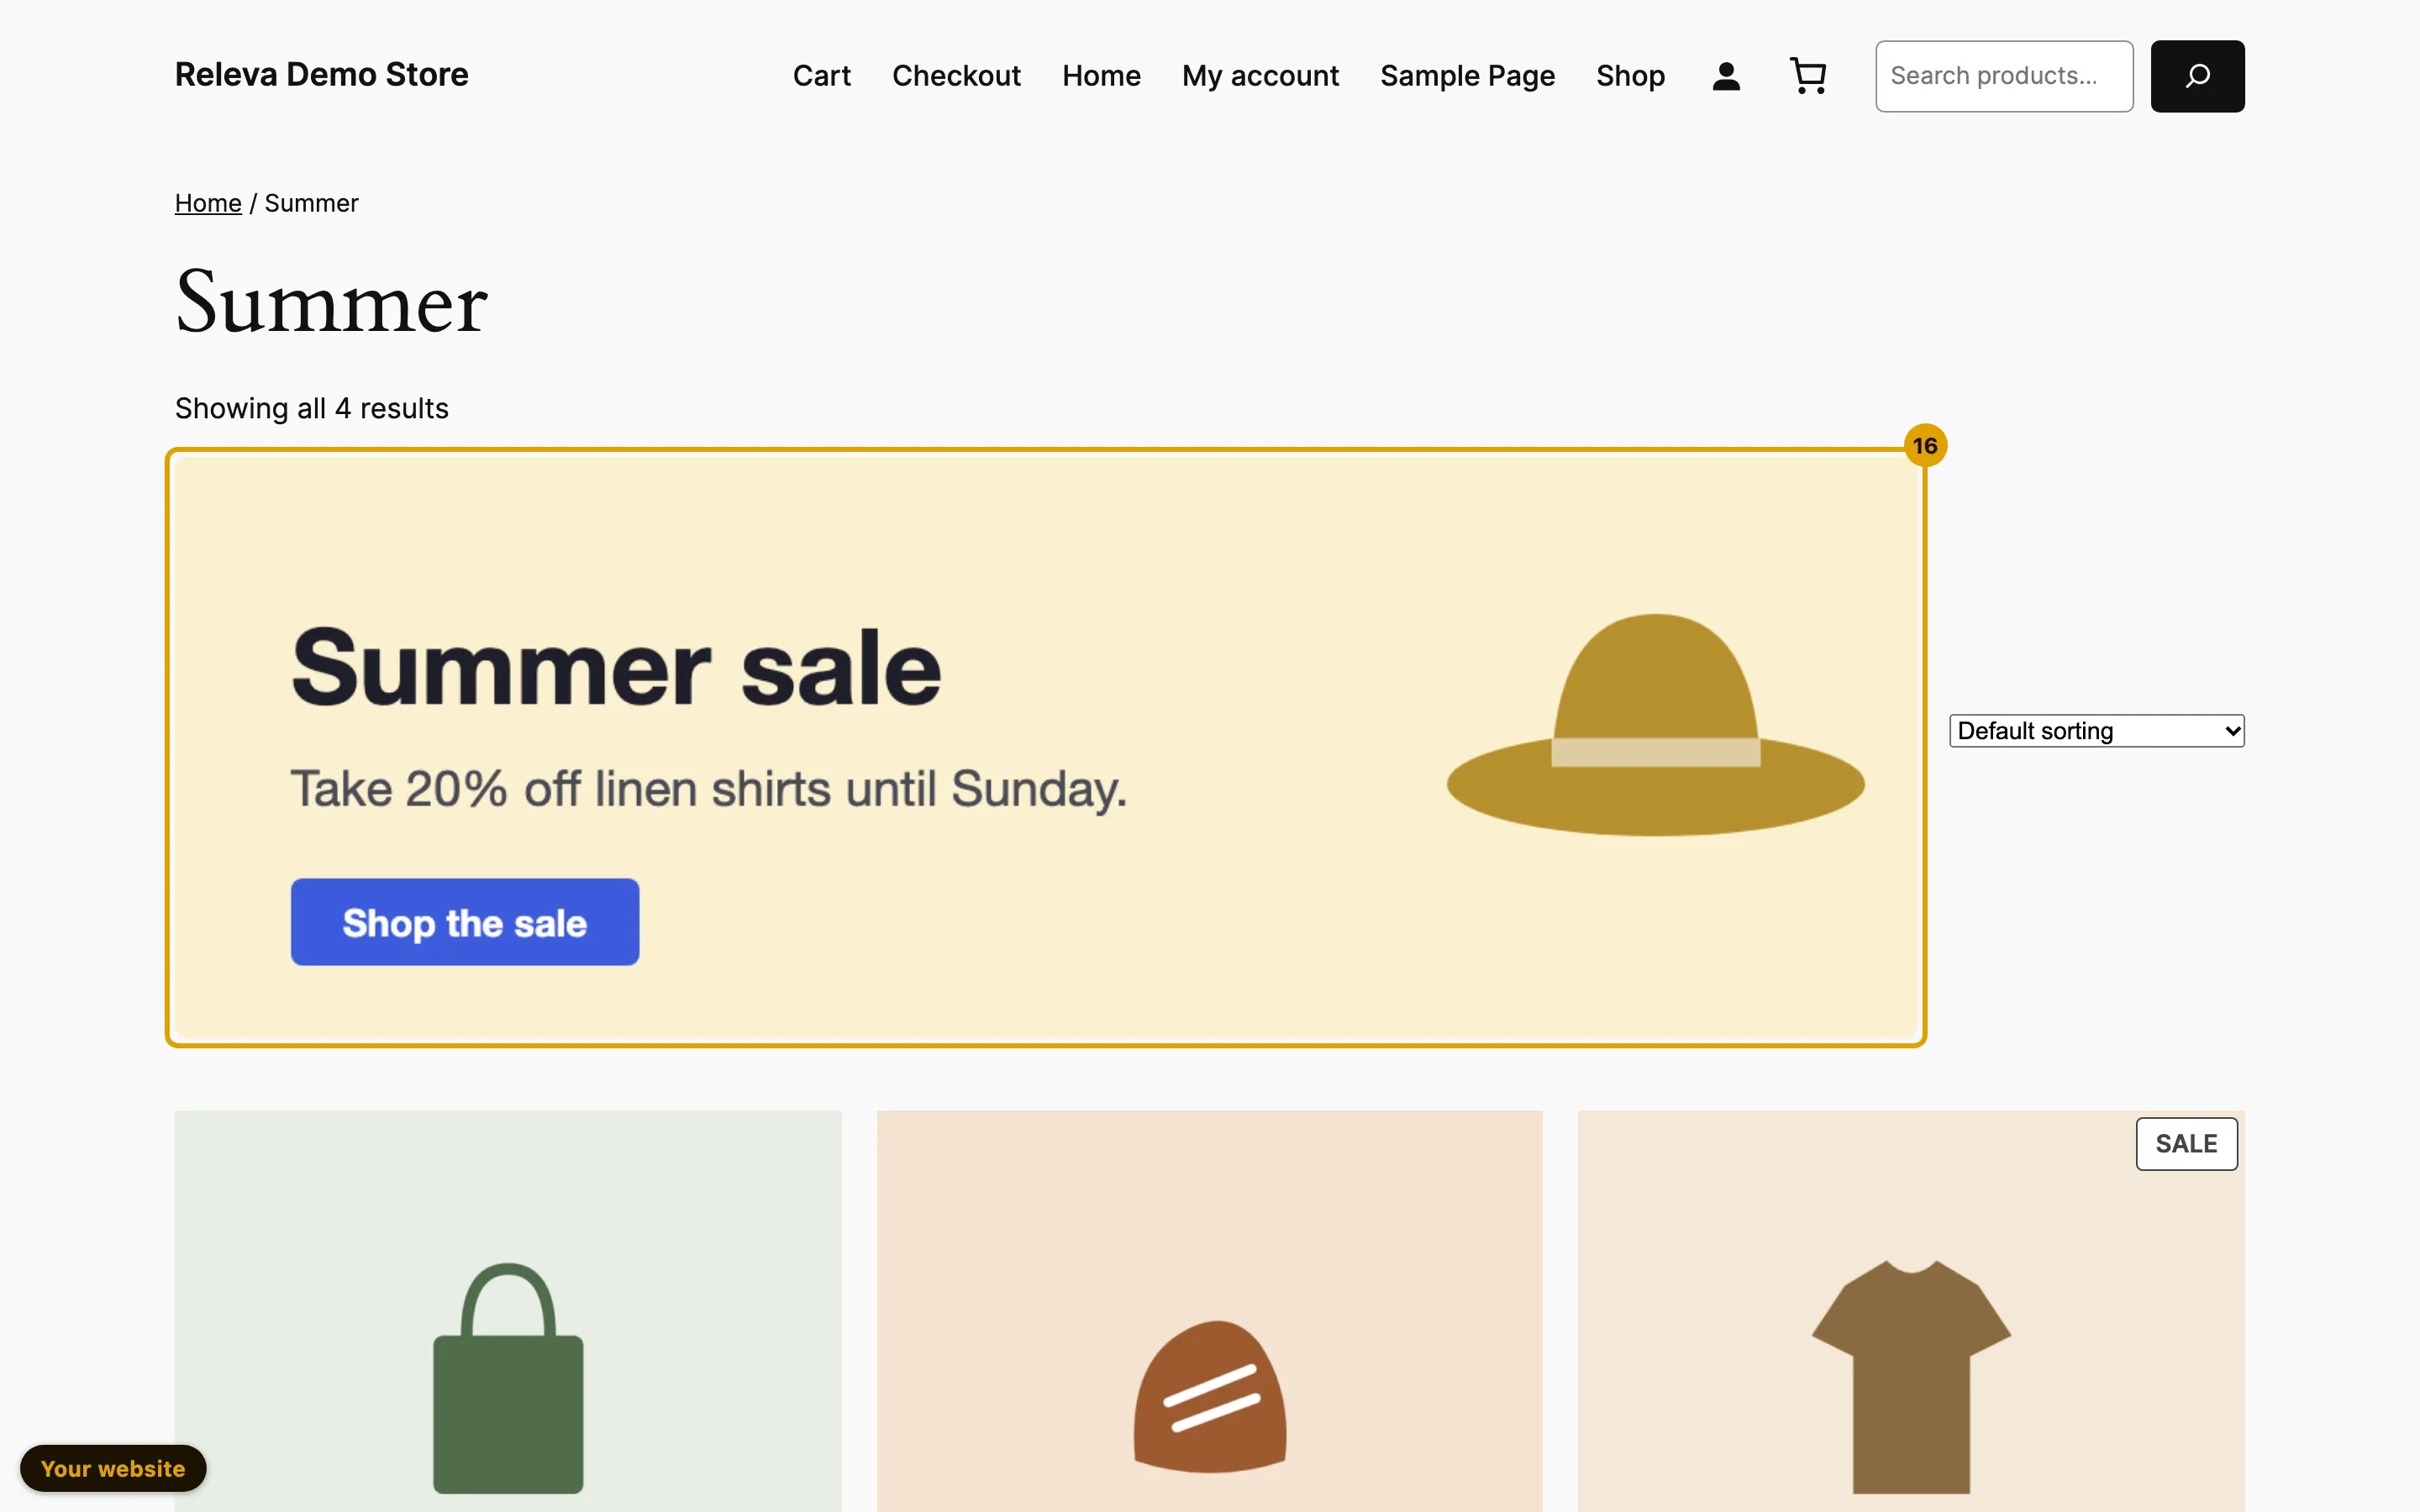
Open the page on your shop. The banner shows below the results line
Your shop can take up to a minute to pick up the change. If the banner is not there yet, wait a minute and reload.
Check it worked
Section titled “Check it worked”- The block’s switch is on, and its card shows the banner’s name as a badge, a Statistics button and the on/off switch.
- The banner shows in the spot you picked when you open the page on your shop in a new private window. A visitor sees it only if they are in the banner’s segment.
- To check the spot before you switch the block on, open the page on your shop with
?rlv_mode=debugat the end of the address. Debug mode shows the banner although the block is off, and ignores its audience (Check Releva on your site with debug mode). - To check the audience, browse your shop as a customer who is in the segment and as one who is not (Preview your site as a customer).
- After real visits, the card’s Impressions count goes up.
Read the numbers
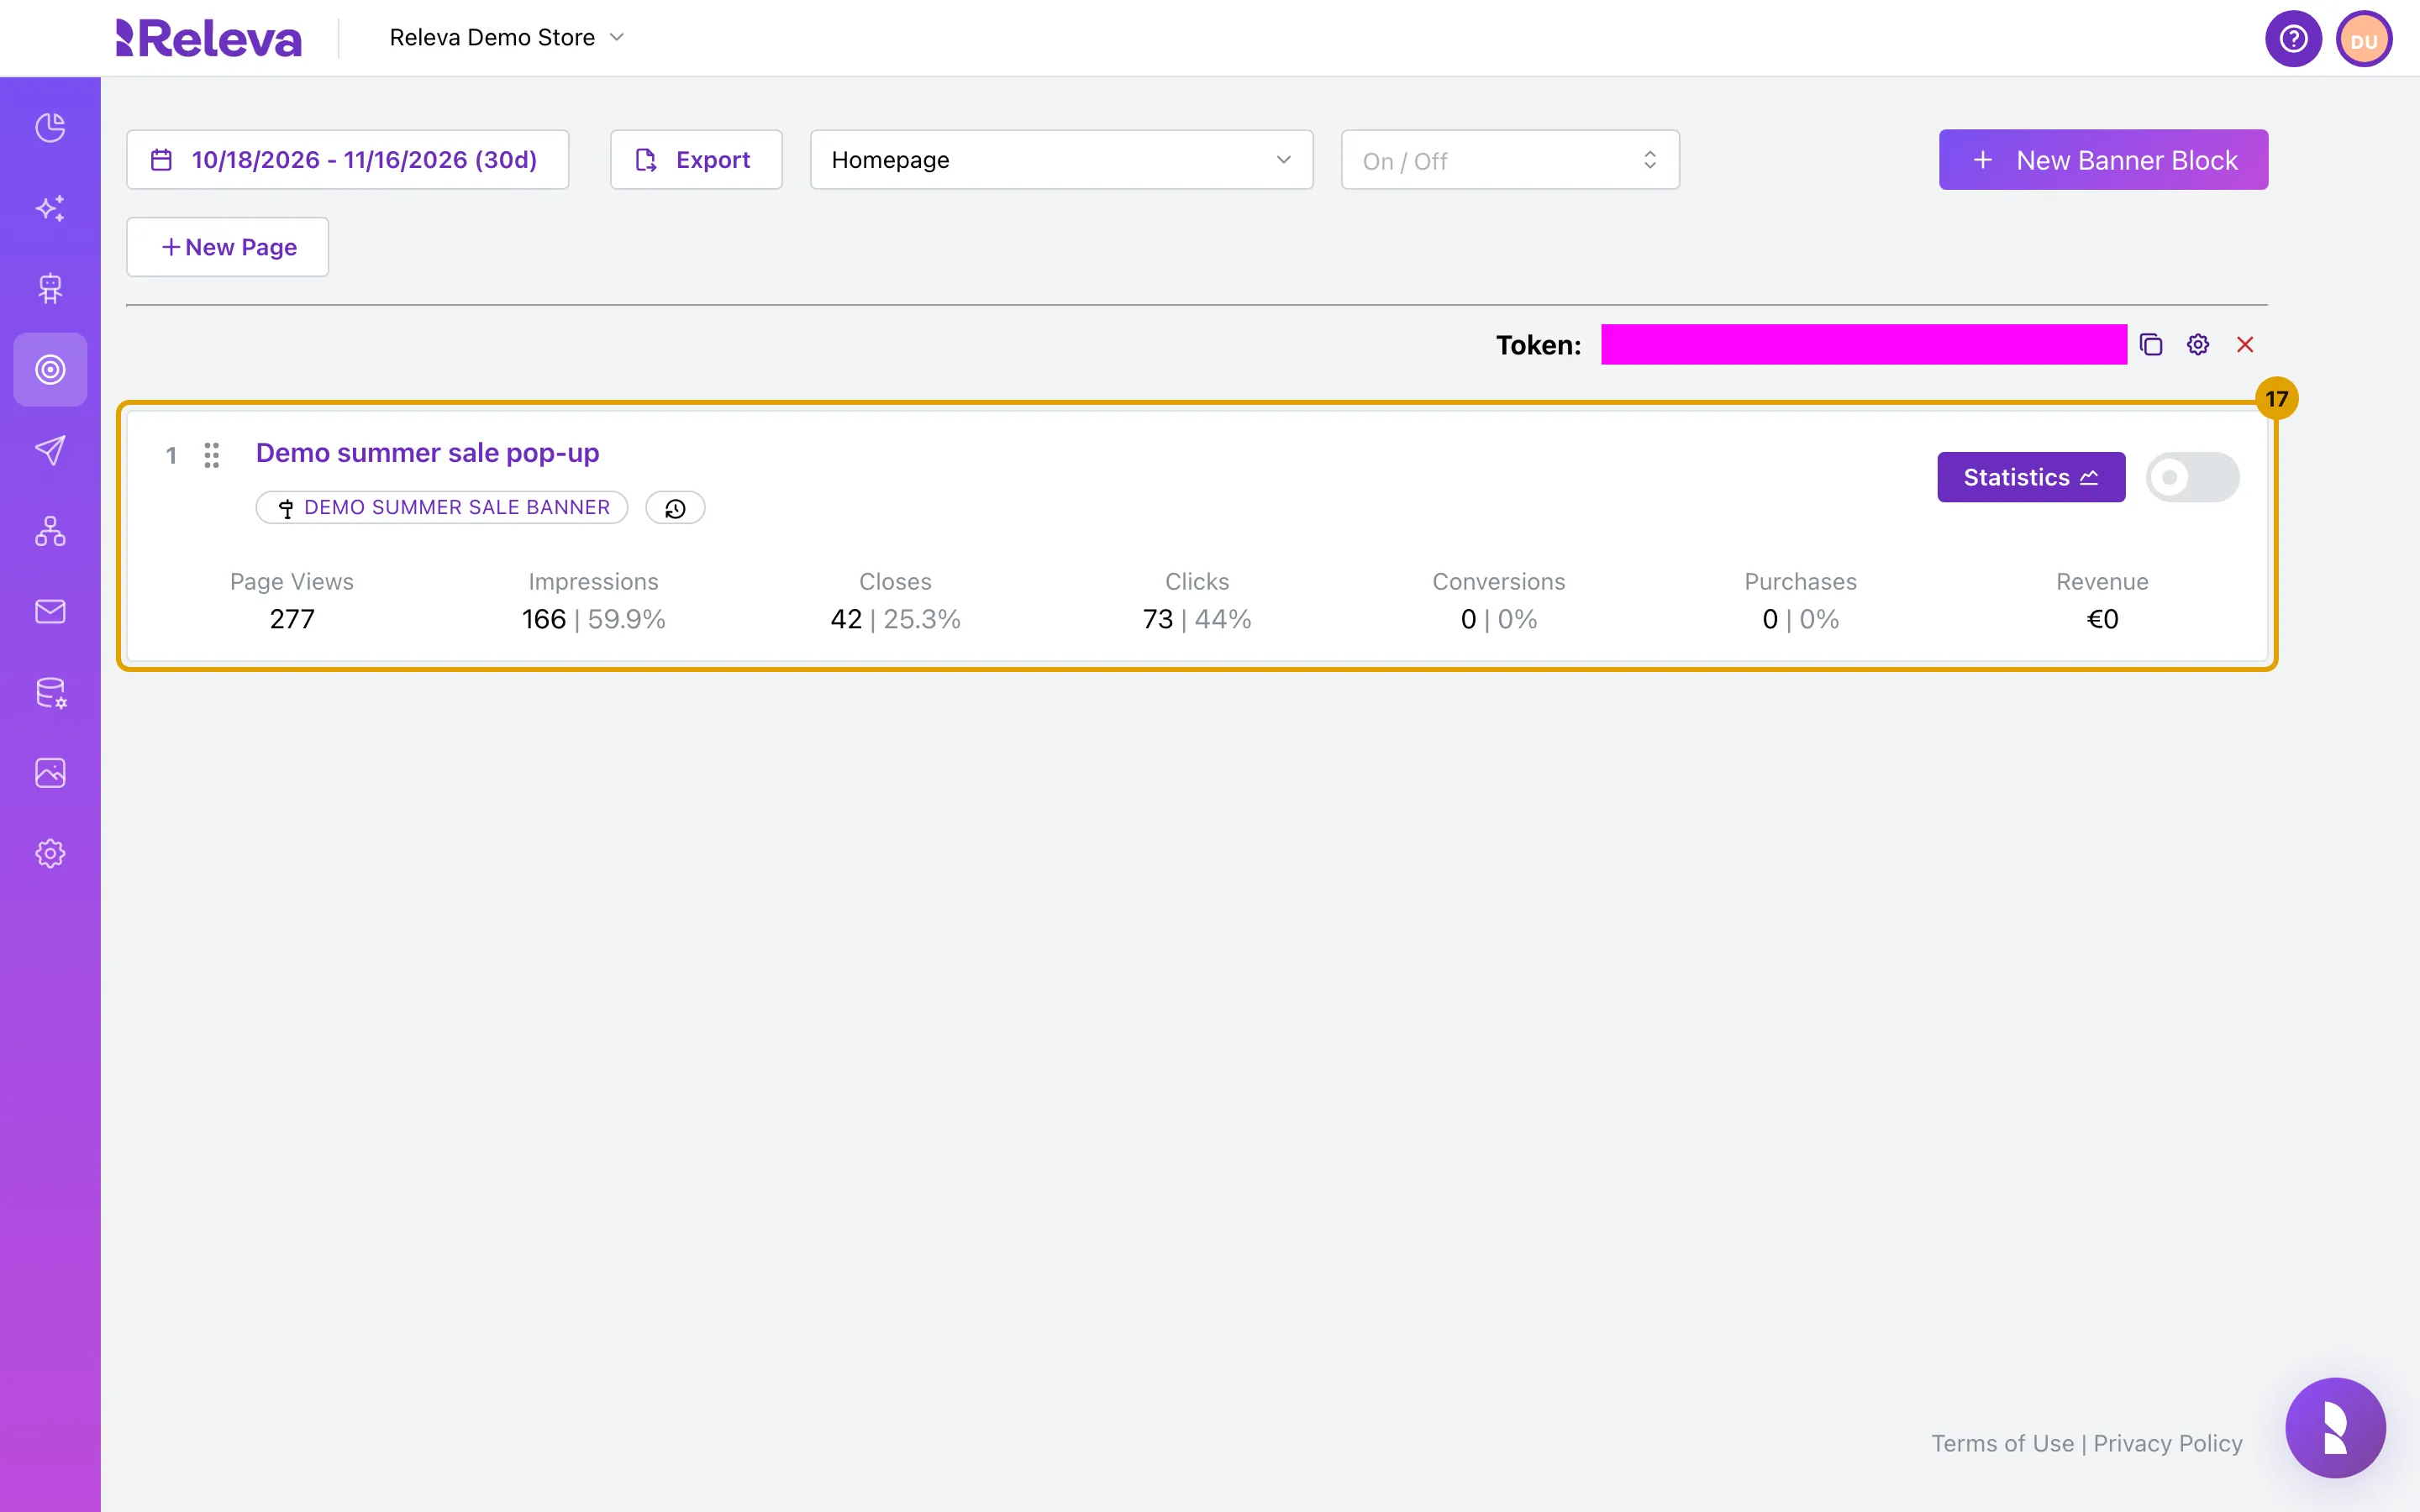
Section titled “Read the numbers”The two pictures below show a block that already has traffic, the Demo summer sale pop-up on the Homepage. A new block shows 0 until visitors see it.
Each card shows the block’s numbers for the period set by the period button at the top. Select it to choose 1 week, 2 weeks, 1 month or 3 months, or pick dates in the calendar; the pictures use 1 month:
- Page Views: visits to the page.
- Impressions: times the banner was shown, with the share of page views.
- Closes: times a visitor closed the banner, with the share of impressions.
- Clicks: clicks on the banner, with the share of impressions.
- Conversions: conversions, with the share of clicks.
- Purchases: purchases, with the share of conversions.
- Revenue: the revenue from those purchases.
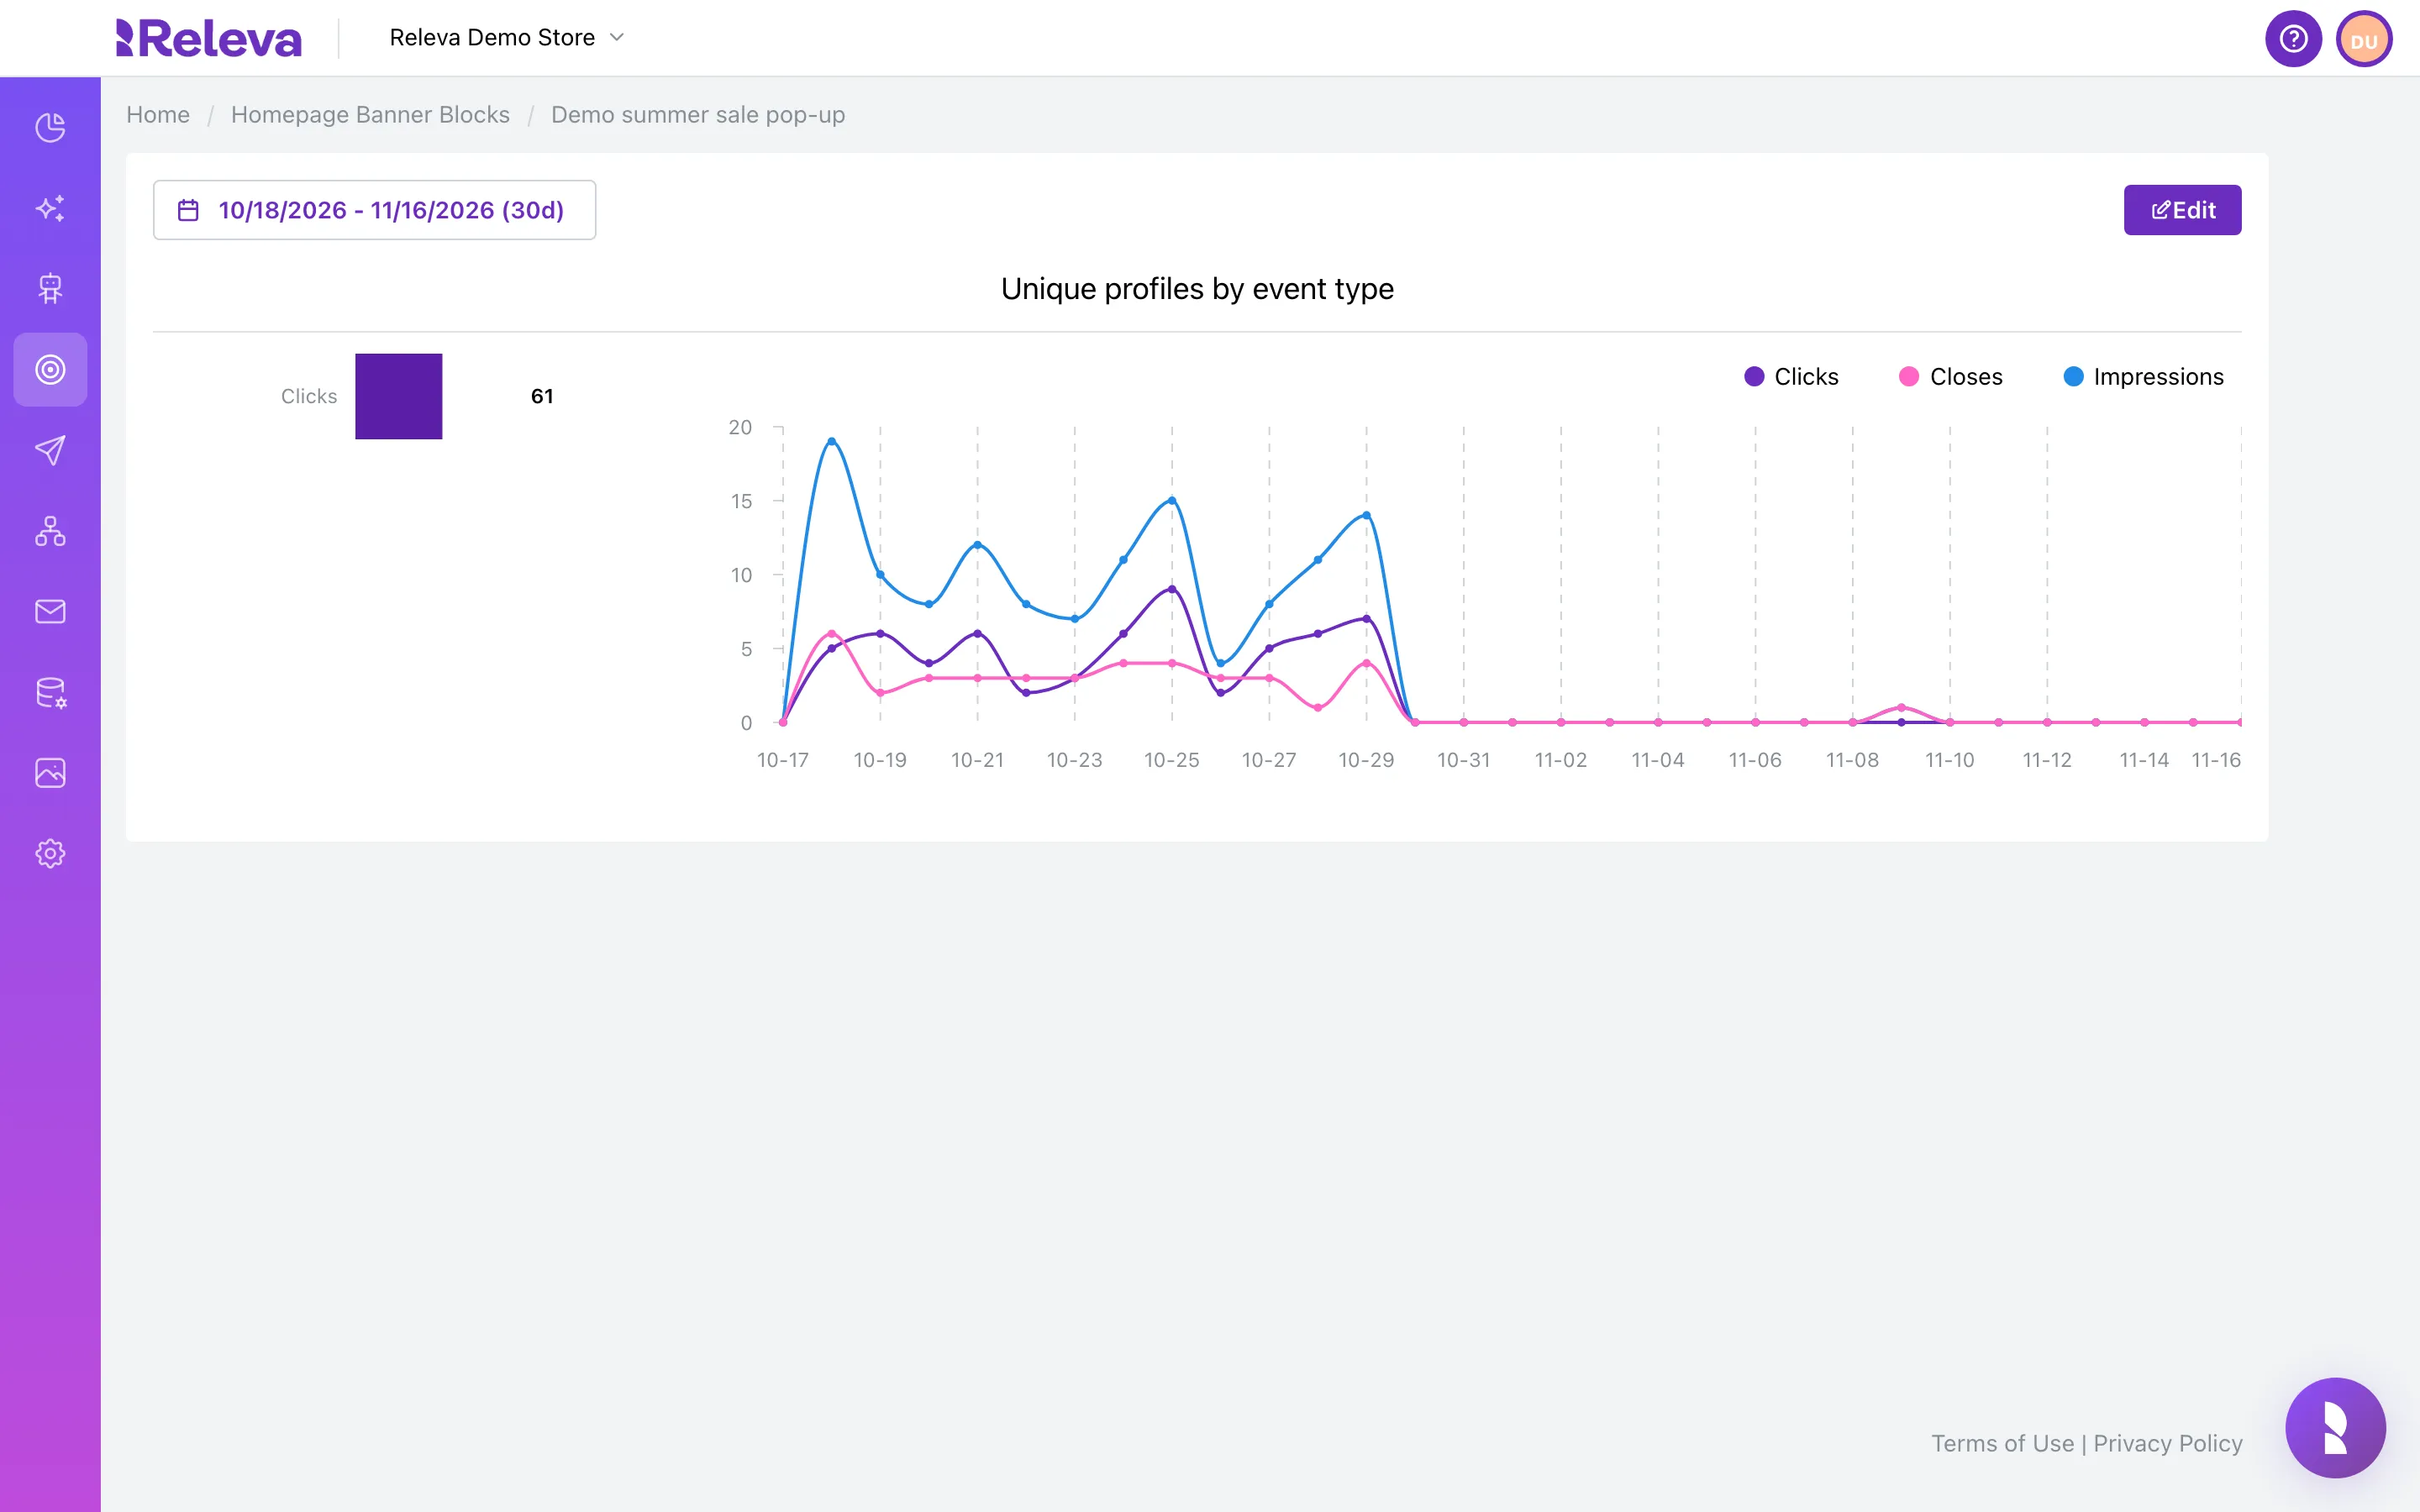
Select Statistics on the card to see the block’s numbers over time. Choose the period with the date range at the top left; Edit opens the block. The chart shows clicks, closes and impressions per day.
Troubleshooting
Section titled “Troubleshooting”Save & Close is disabled on Display Configuration. The block is in Static mode, and a static block needs a CSS Selector on the Appearance tab. Go to Appearance and enter the selector of an element on the page, such as h1. You can refine it later with Position on my site.
Save & Close is disabled on Appearance. A Card width, Card height or offset field has an inline error. Use auto or a number followed by px or %, for example 480px or 70%.
There is no Position on my site button. The button is only on the Appearance tab of a Static block, next to CSS Selector. Pop-up, Flyout, Bar and Custom blocks have no selector. On a block you have not saved yet, the tab shows Save this banner block first, and you can then position it on your own site. instead: enter a first selector, save, and open the block again.
Position on my site opens the wrong page. Releva opens the most recent address of this page that your shop reported in the last 30 days. If there is none, it opens your shop address plus the page’s URL Path, which can be your home page. Visit the right page once on your shop, then go back to the block and select Position on my site again.
I closed the shop tab instead of selecting Done. Nothing changed. Open the block again under Personalization › Banner Blocks; it still has the selector you last saved.
The banner does not show on the site. Check, in this order: the block’s switch is on, and a minute has passed since you turned it on; the visitor is in the banner’s segment and inside its Show when dates (Choose who sees a banner); the CSS Selector matches an element on the page you opened; the URL filter, Locales to Display and Session Interval let that visit through; Max Banners Displayed is not already used up by blocks with a higher priority; and you are not in the control group of a running A/B test. See also When a block is served.
The card says EXPIRED. The banner’s Show when end date has passed. Open the banner and move or clear the date.
I opened a block link and the screen is blank. The page id in the link no longer exists. Go back to Personalization › Banner Blocks and pick the page in the selector.